


Creating a system image in Windows 11 can be a good idea if you tend to have a backup of your entire system, including your operating system, programs, personalized settings, and personal files. This can be helpful amid a system failure, malware infection, or other issues that may require you to restore your system to a previous state. Now, let's start learning to create a system image!
![[Windows 11] How to Create a System Image](https://img.php.cn/upload/article/000/000/000/172256395559650.jpg?x-oss-process=image/resize,p_40)
- Method 1: Create a system image with WBAdmin
- Method 2: Create a system image with the professional software iSumsoft Cloner
- Method 3: Create a system image with wimlib tool
Method 1: Create a system image in Windows 11 with WBAdmin
WBAdmin is a command-line tool in Windows that allows you to manage backups and recovery options. With it, you can perform a variety of backup and recovery tasks, such as creating backups of files, folders, volumes, and system state; restoring backups; listing available backup versions; etc.
Step 1: Right-click on the Start icon and select Windows Terminal (Admin).
![[Windows 11] How to Create a System Image](https://img.php.cn/upload/article/000/000/000/172256395826496.jpg?x-oss-process=image/resize,p_40)
Step 2: Click Yes to allow the program to make changes to your device, then you will access Windows PowerShell.
![[Windows 11] How to Create a System Image](https://img.php.cn/upload/article/000/000/000/172256396196851.jpg?x-oss-process=image/resize,p_40)
Step 3: Type wbadmin start backup -backuptarget:E: -include:C: -allcritical -quiet and hit Enter to create a system image of the C drive stored on the E disk. The backup status will be displayed on the panel.
![[Windows 11] How to Create a System Image](https://img.php.cn/?x-oss-process=image/resize,p_40)
Step 4: The program has successfully created a system image when it shows the following message.
Step 5: Open the E drive and you will see the WindowsImageBackup folder in its root directory.
Method 2: Create a system image in Windows 11 with the professional software iSumsoft Cloner
iSumsoft Cloner, an excellent disk cloning software for Windows 11, is used to copy or clone Windows OS, data partitions, and even the entire hard drive. Not only does the software have a user-friendly interface design that makes it easy to back up the system efficiently, but it also has a high success rate.
![[Windows 11] How to Create a System Image](https://img.php.cn/upload/article/000/000/000/172256396356622.png?x-oss-process=image/resize,p_40)
第1步:下载iSumsoft Cloner并启动它,然后单击主页中的备份选项 页。
第二步:选择C盘(系统盘)进行备份。
![[Windows 11] How to Create a System Image](https://img.php.cn/upload/article/000/000/000/172256396415206.png?x-oss-process=image/resize,p_40)
第三步:点击选择按钮选择保存备份文件的路径。
第四步:点击开始按钮开始备份并选择是确认您的 选择。
第5步:等待备份过程完成。然后当出现提示框时单击确定按钮 出现。 (这通常需要大约 15 分钟才能完成, 取决于要备份的数据的大小。)
![[Windows 11] How to Create a System Image](https://img.php.cn/upload/article/000/000/000/172256396424380.png?x-oss-process=image/resize,p_40)
方法三:使用wimlib工具在Windows 11中创建系统镜像
Wimlib,一个开源库,是一个强大而灵活的工具 在职的 与 Windows 磁盘映像。您是否需要创建自定义 Windows 安装、修改现有的 图像,或提取单个文件和文件夹,它提供了一组强大的功能和选项 帮助您完成工作。
第 1 步: 下载 wimlib v1.13.5 Windows 二进制文件(64 位) 并将其放在D盘根目录下。
![[Windows 11] How to Create a System Image](https://img.php.cn/upload/article/000/000/000/172256396623983.jpg?x-oss-process=image/resize,p_40)
第二步:在D卷中,右键点击下载的文件,选择全部解压 » 依次提取。
![[Windows 11] How to Create a System Image](https://img.php.cn/upload/article/000/000/000/172256397080111.jpg?x-oss-process=image/resize,p_40)
第3步:重命名提取的文件wimlib.
第四步:右键单击Windows图标,然后选择Windows Terminal (管理员) 从选项中。
步骤 5: 当出现启动 Windows PowerShell 的对话框时,输入 Yes。
第 6 步:输入 D:wimlibwimlib-imagex 捕获 C:D:win11bk.wim --check --snapshot,然后 按输入。该命令将备份系统驱动器,生成一个名为 win11bk.wim 中 D盘.
第7步:成功完成。
第8步:可以看到文件在D盘
以上是[Windows 11] 如何创建系统映像的详细内容。更多信息请关注PHP中文网其他相关文章!

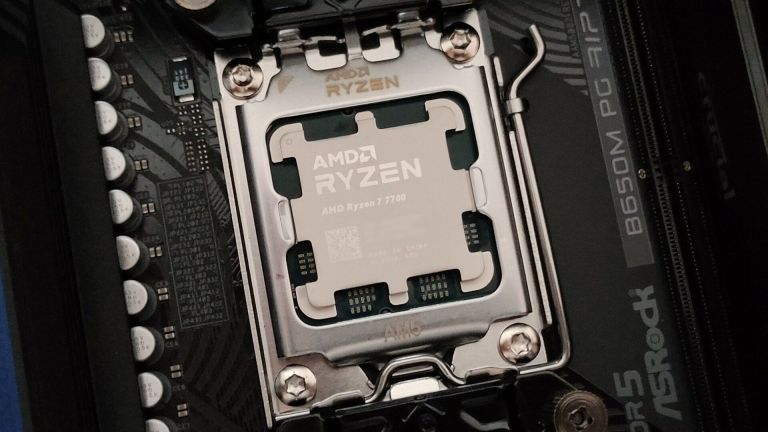 使用PBO获得了AMD CPU和AREN' t?你错过了Apr 12, 2025 pm 09:02 PM
解锁Ryzen的潜力:精确提升超速驱动(PBO)的简单指南 超频您的新电脑似乎令人生畏。 尽管性能提高可能会感到难以捉摸,但留下潜在的启用甚至更具吸引力。幸运的是,AMD Ryzen Processo
 买了一台新游戏PC?不要犯这些令人讨厌的错误Apr 12, 2025 am 06:10 AM
设置新游戏PC令人兴奋,但即使是技术专家也可能犯有昂贵的错误。这是一些常见的陷阱,可以避免使用平稳的游戏体验。 1。使用主板的显示输出而不是您的GPU 经常的技术支持que
 Microsoft的下一个Windows API更改将破坏某些应用Apr 12, 2025 am 06:07 AM
微软即将对Windows API进行的更改将使某些应用程序非功能。 GitHub搜索表明,有限数量的较小项目利用受影响的地图API,包括OpenHAB客户和非官方的Poké
 Microsoft 365服务中断锁家庭订户从办公室应用程序中Apr 12, 2025 am 06:06 AM
Microsoft 365家庭服务中断会影响办公室套件访问。 影响Microsoft 365家庭订户的广泛停电使许多人无法访问办公室应用程序。 微软承认了这个问题,但是解决方案可能需要SE
 5个Windows设置要更改以改善笔记本电脑电池寿命Apr 12, 2025 am 06:04 AM
您的Windows笔记本电脑电池的排水速度比您想要的快吗? 不用担心,您可以通过对Windows的内置电源管理功能进行一些简单的调整来显着延长其寿命。 这是如何在单级别上最大化笔记本电脑的电池寿命
 6个设置使您的Windows 11桌面更加极简Apr 12, 2025 am 03:01 AM
简化您的Windows桌面:极简主义指南 杂乱无章的桌面,上面有捷径和固定应用程序,可能会阻碍生产力和视觉吸引力。 幸运的是,Windows提供了广泛的自定义选项,以实现极简主义的WO
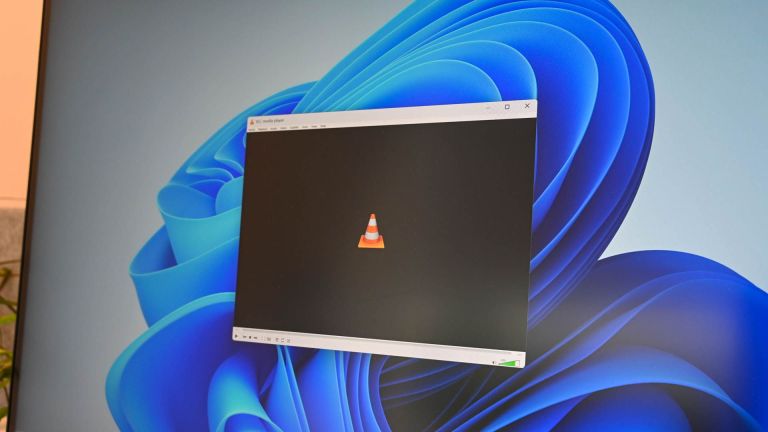 VLC媒体播放器的6个隐藏功能,您应该使用Apr 11, 2025 am 06:08 AM
解锁VLC媒体播放器的隐藏力量:超越基本播放 VLC Media Player是一位免费的开源媒体播放器,不仅提供基本音频和视频播放。 本文重点介绍了一些鲜为人知但非常有用的F
 框架笔记本电脑12预订从今天开始,但在美国不在Apr 11, 2025 am 06:02 AM
Framework备受期待的框架笔记本电脑12现在可以预订(在美国除外)。这款紧凑,可维修的笔记本电脑旨在重新定义入门级市场。 但是,由于关税调整,美国客户面临延误,导致


热AI工具

Undresser.AI Undress
人工智能驱动的应用程序,用于创建逼真的裸体照片

AI Clothes Remover
用于从照片中去除衣服的在线人工智能工具。

Undress AI Tool
免费脱衣服图片

Clothoff.io
AI脱衣机

AI Hentai Generator
免费生成ai无尽的。

热门文章
热工具

禅工作室 13.0.1
功能强大的PHP集成开发环境

WebStorm Mac版
好用的JavaScript开发工具

螳螂BT
Mantis是一个易于部署的基于Web的缺陷跟踪工具,用于帮助产品缺陷跟踪。它需要PHP、MySQL和一个Web服务器。请查看我们的演示和托管服务。

SublimeText3 Linux新版
SublimeText3 Linux最新版

记事本++7.3.1
好用且免费的代码编辑器

