
两种Excel工作簿保护攻略:防止工作表被添加、删除或移动

- WBOYWBOYWBOYWBOYWBOYWBOYWBOYWBOYWBOYWBOYWBOYWBOYWB原创
- 2024-07-24 01:35:39851浏览
Protect Excel workbooks from unauthorized editing When using Excel, you often need to protect the data and structure in the workbook to prevent others from making unauthorized changes. You can easily set different protection levels in Excel to meet your specific needs. This article will detail two simple methods for you to effectively protect your Excel workbook and ensure its security and integrity. Don’t miss the following content compiled by PHP editor Baicao to learn how to protect Excel workbooks to avoid accidental or malicious editing.
Method 1: Set a restricted password
Lock the Excel workbook with a password, so that only the worksheet can be added, deleted, moved or hidden by knowing the password.
Setting method
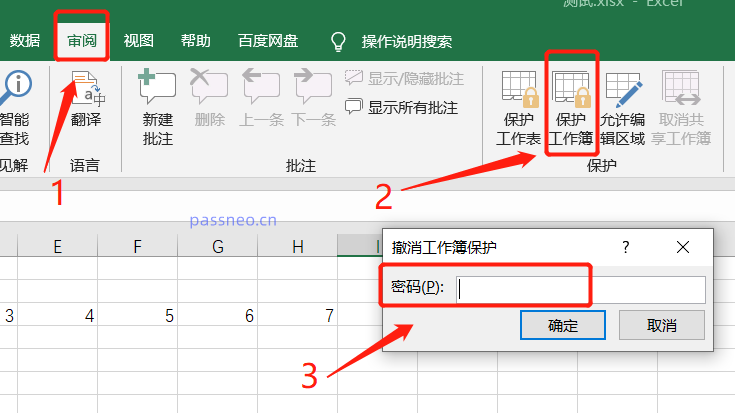
First, open the Excel workbook that needs to be protected and click "Protect Workbook" in the "Review" tab list.
In the pop-up dialog box, select the "Structure" checkbox to ensure that only the workbook structure is protected.
Then enter the password you want to set in the password field, click "Confirm" and re-enter it to set it.

After setting up, you can see that operations such as adding, deleting or moving worksheets are prohibited, which means that the workbook structure has been protected.

Cancellation method
If you need to cancel the protection of the workbook structure, follow the steps below:
In the "Review" tab, click "Unprotect Workbook". After the dialog box pops up, enter the password and click "OK", and the workbook structure protection will be cancelled.
It should be noted that after setting the password, remember to remember it or save it, because it is impossible to cancel the structure protection in Excel without a password.
If you really forget it accidentally, you need to use other tools to solve the problem. For example, PepsiNiu Excel Password Recovery Tool can directly remove the "restriction password" of the Excel workbook without a password and cancel the structure protection.
You only need to click the [Unrestriction] module in the tool, and then import the protected Excel into the tool, and you can unblock it with one click.

Method 2: Use VBA macro to protect the workbook structure
If you don’t want to set a password, you can also use VBA macro code to protect the workbook.
Setting method
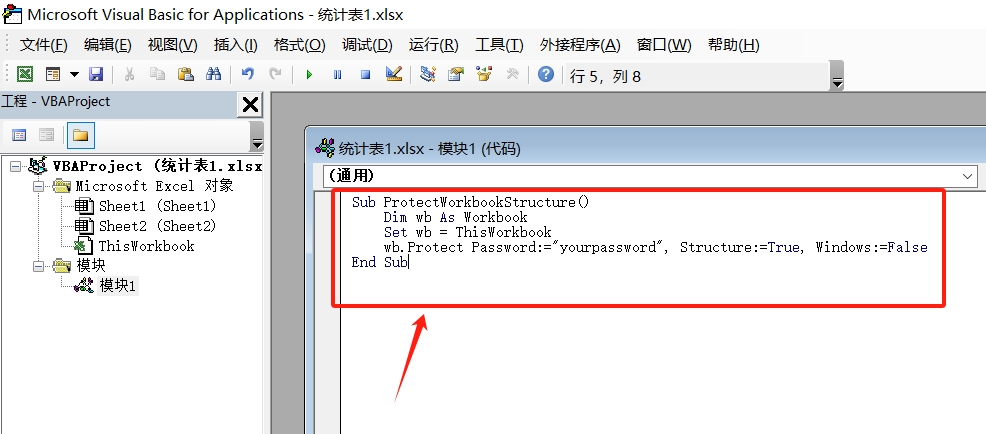
1. After opening Excel, press "Alt + F11" to open the VBA editor. In the VBA editor, click the "Insert" menu and select "Module".

2. After creating a new module, enter the following code:
Sub ProtectWorkbookStructure() Dim wb As Workbook Set wb = ThisWorkbook wb.Protect Password:=”yourpassword”, Structure:=True, Windows:=FalseEnd Sub
3. Close the VBA editor, return to Excel, press "Alt + F8" to open the macro dialog box, select "ProtectWorkbookStructure", and then click "Run", the Excel workbook structure will be locked, and Begin to be protected.

Cancellation method
If you need to cancel the protection set through VBA macro, follow the steps below:
1. Call up the VBA editor according to the setting method. After creating a new module, enter the following code:
Sub UnprotectWorkbookStructure() Dim wb As Workbook Set wb = ThisWorkbook wb.Unprotect Password:=”yourpassword”End Sub

2.关闭VBA编辑器,回到Excel,按“Alt + F8”打开宏对话框,选择“UnprotectWorkbookStructure”,然后点击“运行”。
Excel工作簿的结构保护就取消了。

以上是两种Excel工作簿保护攻略:防止工作表被添加、删除或移动的详细内容。更多信息请关注PHP中文网其他相关文章!