


本文涵蓋了在解決電腦視覺中的目標偵測問題時,對影像資料執行的預處理步驟。

首先,讓我們從電腦視覺中為目標偵測選擇正確的資料開始。在選擇電腦視覺中的目標偵測最佳影像時,您需要選擇那些在訓練強大且準確的模型方面提供最大價值的影像。在選擇最佳影像時,請考慮以下一些因素:
- 目標覆蓋率:選擇那些具有良好目標覆蓋度的影像,也就是感興趣的物件在影像中得到很好的表示和可見。物件被遮蔽、重疊或部分切斷的影像可能提供較少有價值的訓練資料。
- 目標變化:選擇那些在物件外觀、姿勢、尺度、光照條件和背景方面具有變化的影像。所選圖像應涵蓋各種場景,以確保模型能夠良好地泛化。
- 影像品質:喜歡品質好且清晰的影像。模糊、雜訊或低解析度的影像可能會對模型準確偵測物件的能力產生負面影響。
- 註解準確度:檢查影像中註解的準確性和品質。具有精確和準確的邊界框註釋的圖像有助於更好的訓練結果。
- 類別平衡:確保在不同物件類別之間具有影像的平衡。資料集中每個類別的近似相等表示可以防止模型在訓練過程中偏袒或忽略某些類別。
- 影像多樣性:包括來自不同來源、角度、視點或設定的影像。這種多樣性有助於模型在新的和未見過的數據上良好泛化。
- 具有挑戰性的場景:包含包含具有遮蔽、雜亂背景或不同距離處的物件的影像。這些圖像有助於模型學會處理真實世界的複雜性。
- 代表性資料:確保所選圖像代表模型在實際世界中可能遇到的目標分佈。資料集中的偏見或缺口可能導致受過訓練的模型效能出現偏見或受限。
- 避免冗餘:從資料集中移除高度相似或重複的圖像,以避免引入特定實例的偏見或過度表示。
- 品質控制:對資料集進行品質檢查,確保所選影像符合所需標準,沒有異常、錯誤或工件。
需要注意的是,選擇過程可能涉及主觀決策,這取決於您的目標偵測任務的特定要求和可用資料集。考慮這些因素將有助於您策劃多樣化、平衡和代表性的用於訓練目標檢測模型的資料集。
現在,讓我們來探索一下使用Python選擇目標偵測資料的方法吧!下面是一個範例的Python腳本,它展示瞭如何根據一些標準(如影像品質、目標覆蓋等)從資料集中選擇最佳的影像,用於解決電腦視覺中的偵測問題。這個範例假設您已經有了一個帶有影像標註的資料集,並且希望根據特定的標準(如影像品質、目標覆蓋等)來識別最佳的影像
import cv2import osimport numpy as np# Function to calculate image quality score (example implementation)def calculate_image_quality(image):# Add your image quality calculation logic here# This could involve techniques such as blur detection, sharpness measurement, etc.# Return a quality score or metric for the given imagereturn 0.0# Function to calculate object coverage score (example implementation)def calculate_object_coverage(image, bounding_boxes):# Add your object coverage calculation logic here# This could involve measuring the percentage of image area covered by objects# Return a coverage score or metric for the given imagereturn 0.0# Directory containing the datasetdataset_dir = “path/to/your/dataset”# Iterate over the images in the datasetfor image_name in os.listdir(dataset_dir):image_path = os.path.join(dataset_dir, image_name)image = cv2.imread(image_path)# Example: Calculate image quality scorequality_score = calculate_image_quality(image)# Example: Calculate object coverage scorebounding_boxes = [] # Retrieve bounding boxes for the image (you need to implement this)coverage_score = calculate_object_coverage(image, bounding_boxes)# Decide on the selection criteria and thresholds# You can modify this based on your specific problem and criteriaif quality_score > 0.8 and coverage_score > 0.5:# This image meets the desired criteria, so you can perform further processing or save it as needed# For example, you can copy the image to another directory for further processing or analysisselected_image_path = os.path.join(“path/to/selected/images”, image_name)cv2.imwrite(selected_image_path, image)
在此範例中,您需要根據特定需求實作calculate_image_quality()和calculate_object_coverage()函數。這些函數應以影像作為輸入,並分別傳回品質和覆蓋得分。
您需要根據您的資料集所在的目錄自訂dataset_dir變數。腳本將遍歷資料集中的影像,為每個影像計算品質和覆蓋分數,並根據您選擇的標準確定最佳影像。在此範例中,我們將品質分數大於0.8且覆蓋分數大於0.5的影像定義為最佳影像。您可以根據具體需求修改這些閾值。請記住,根據您的偵測問題、註解格式和選擇最佳影像的標準來調整腳本
這個Python腳本示範如何使用電腦視覺對影像資料進行預處理,以解決目標偵測問題。假設您擁有類似於Pascal VOC或COCO的圖像資料集和相應的邊界框註釋
import cv2import numpy as npimport os# Directory pathsdataset_dir = “path/to/your/dataset”output_dir = “path/to/preprocessed/data”# Create the output directory if it doesn’t existif not os.path.exists(output_dir):os.makedirs(output_dir)# Iterate over the images in the datasetfor image_name in os.listdir(dataset_dir):image_path = os.path.join(dataset_dir, image_name)annotation_path = os.path.join(dataset_dir, image_name.replace(“.jpg”, “.txt”))# Read the imageimage = cv2.imread(image_path)# Read the annotation file (assuming it contains bounding box coordinates)with open(annotation_path, “r”) as file:lines = file.readlines()bounding_boxes = []for line in lines:# Parse the bounding box coordinatesclass_id, x, y, width, height = map(float, line.split())# Example: Perform any necessary data preprocessing steps# Here, we can normalize the bounding box coordinates to values between 0 and 1normalized_x = x / image.shape[1]normalized_y = y / image.shape[0]normalized_width = width / image.shape[1]normalized_height = height / image.shape[0]# Store the normalized bounding box coordinatesbounding_boxes.append([class_id, normalized_x, normalized_y, normalized_width, normalized_height])# Example: Perform any additional preprocessing steps on the image# For instance, you can resize the image to a desired size or apply data augmentation techniques# Save the preprocessed imagepreprocessed_image_path = os.path.join(output_dir, image_name)cv2.imwrite(preprocessed_image_path, image)# Save the preprocessed annotation (in the same format as the original annotation file)preprocessed_annotation_path = os.path.join(output_dir, image_name.replace(“.jpg”, “.txt”))with open(preprocessed_annotation_path, “w”) as file:for bbox in bounding_boxes:class_id, x, y, width, height = bboxfile.write(f”{class_id} {x} {y} {width} {height}\n”)
在此腳本中,您需要自訂dataset_dir和output_dir變量,分別指向儲存資料集的目錄和要保存預處理資料的目錄。腳本會遍歷資料集中的影像並讀取對應的註釋檔案。它假定註解檔案包含每個物件的邊界框座標(類別ID、x、y、寬度和高度)。
您可以在循環內部執行任何必要的資料預處理步驟。在本範例中,我們將邊界框座標歸一化為0到1之間的值。您也可以執行其他預處理步驟,例如將影像調整為所需大小或套用資料增強技術。預處理後的圖像和註釋將以與原始檔案相同的檔案名稱保存在輸出目錄中。請根據您的特定資料集格式、註解樣式和預處理要求調整腳本。
以上是電腦視覺中目標偵測的資料預處理的詳細內容。更多資訊請關注PHP中文網其他相關文章!

 AI技能差距正在減慢供應鏈Apr 26, 2025 am 11:13 AM
經常使用“ AI-Ready勞動力”一詞,但是在供應鏈行業中確實意味著什麼? 供應鏈管理協會(ASCM)首席執行官安倍·埃什肯納齊(Abe Eshkenazi)表示,它表示能夠評論家的專業人員
 一家公司如何悄悄地努力改變AIApr 26, 2025 am 11:12 AM
分散的AI革命正在悄悄地獲得動力。 本週五在德克薩斯州奧斯汀,Bittensor最終遊戲峰會標誌著一個關鍵時刻,將分散的AI(DEAI)從理論轉變為實際應用。 與閃閃發光的廣告不同
 NVIDIA釋放NEMO微服務以簡化AI代理開發Apr 26, 2025 am 11:11 AM
企業AI面臨數據集成挑戰 企業AI的應用面臨一項重大挑戰:構建能夠通過持續學習業務數據來保持準確性和實用性的系統。 NeMo微服務通過創建Nvidia所描述的“數據飛輪”來解決這個問題,允許AI系統通過持續接觸企業信息和用戶互動來保持相關性。 這個新推出的工具包包含五個關鍵微服務: NeMo Customizer 處理大型語言模型的微調,具有更高的訓練吞吐量。 NeMo Evaluator 提供針對自定義基準的AI模型簡化評估。 NeMo Guardrails 實施安全控制,以保持合規性和適當的
 AI為藝術與設計的未來描繪了一幅新圖片Apr 26, 2025 am 11:10 AM
AI:藝術與設計的未來畫卷 人工智能(AI)正以前所未有的方式改變藝術與設計領域,其影響已不僅限於業餘愛好者,更深刻地波及專業人士。 AI生成的藝術作品和設計方案正在迅速取代傳統的素材圖片和許多交易性設計活動中的設計師,例如廣告、社交媒體圖片生成和網頁設計。 然而,專業藝術家和設計師也發現AI的實用價值。他們將AI作為輔助工具,探索新的美學可能性,融合不同的風格,創造新穎的視覺效果。 AI幫助藝術家和設計師自動化重複性任務,提出不同的設計元素並提供創意輸入。 AI支持風格遷移,即將一種圖像的風格應用
 Zoom如何徹底改變與Agent AI的合作:從會議到里程碑Apr 26, 2025 am 11:09 AM
Zoom最初以其視頻會議平台而聞名,它通過創新使用Agentic AI來引領工作場所革命。 最近與Zoom的CTO XD黃的對話揭示了該公司雄心勃勃的願景。 定義代理AI 黃d
 對大學的存在威脅Apr 26, 2025 am 11:08 AM
AI會徹底改變教育嗎? 這個問題是促使教育者和利益相關者的認真反思。 AI融入教育既提出了機遇和挑戰。 正如科技Edvocate的馬修·林奇(Matthew Lynch)所指出的那樣
 原型:美國科學家正在國外尋找工作Apr 26, 2025 am 11:07 AM
美國科學研究和技術發展或將面臨挑戰,這或許是由於預算削減導致的。據《自然》雜誌報導,2025年1月至3月期間,美國科學家申請海外工作的數量比2024年同期增加了32%。此前一項民意調查顯示,75%的受訪研究人員正在考慮前往歐洲和加拿大尋找工作。 過去幾個月,數百項NIH和NSF的撥款被終止,NIH今年的新撥款減少了約23億美元,下降幅度接近三分之一。洩露的預算提案顯示,特朗普政府正在考慮大幅削減科學機構的預算,削減幅度可能高達50%。 基礎研究領域的動盪也影響了美國的一大優勢:吸引海外人才。 35
 所有有關打開AI最新的GPT 4.1家庭的信息 - 分析VidhyaApr 26, 2025 am 10:19 AM
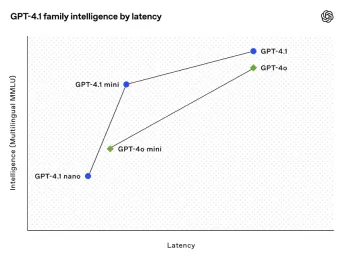
Openai推出了強大的GPT-4.1系列:一個專為現實世界應用設計的三種高級語言模型家族。 這種巨大的飛躍提供了更快的響應時間,增強的理解和大幅降低了成本


熱AI工具

Undresser.AI Undress
人工智慧驅動的應用程序,用於創建逼真的裸體照片

AI Clothes Remover
用於從照片中去除衣服的線上人工智慧工具。

Undress AI Tool
免費脫衣圖片

Clothoff.io
AI脫衣器

Video Face Swap
使用我們完全免費的人工智慧換臉工具,輕鬆在任何影片中換臉!

熱門文章
熱工具

Dreamweaver CS6
視覺化網頁開發工具

SublimeText3 英文版
推薦:為Win版本,支援程式碼提示!

mPDF
mPDF是一個PHP庫,可以從UTF-8編碼的HTML產生PDF檔案。原作者Ian Back編寫mPDF以從他的網站上「即時」輸出PDF文件,並處理不同的語言。與原始腳本如HTML2FPDF相比,它的速度較慢,並且在使用Unicode字體時產生的檔案較大,但支援CSS樣式等,並進行了大量增強。支援幾乎所有語言,包括RTL(阿拉伯語和希伯來語)和CJK(中日韓)。支援嵌套的區塊級元素(如P、DIV),

EditPlus 中文破解版
體積小,語法高亮,不支援程式碼提示功能

SAP NetWeaver Server Adapter for Eclipse
將Eclipse與SAP NetWeaver應用伺服器整合。

