

点击上方“嵌入式Linux充电站”,选择“置顶/星标公众号”

上篇介绍了procfs接口的创建,今天再介绍一种debugfs接口的创建。
实现效果
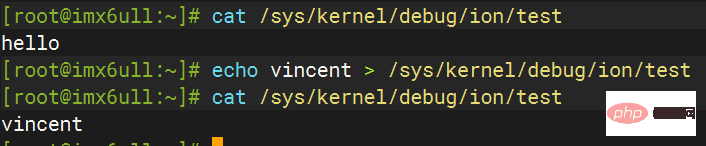
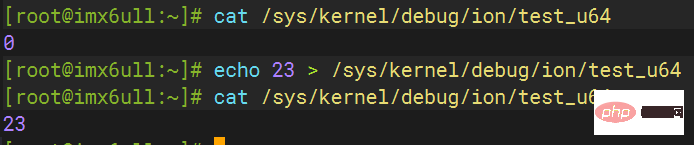
在/sys/kernel/debug/目录下创建一个ion/test文件,通过cat、echo的方式进行读写操作:
前期准备
内核配置打开debugfs:
CONFIG_DEBUG_FS=y
挂载debugfs文件系统:
mount -t debugfs none /sys/kernel/debug
代码实现
读写变量:
#include <linux/debugfs.h>
#include <linux/module.h>
#include <linux/types.h>

static struct dentry *ion_dir;
static u64 test_u64 = 0;

static int __init debugfs_init(void)
{

    //创建一个/sys/kernel/debug/ion目录
    ion_dir = debugfs_create_dir("ion", NULL);
    if (!ion_dir) {
        printk("ion_dir is null\n");
        return -1;
    }

    /* 创建/sys/kernel/debug/ion/test_u64文件 */
    debugfs_create_u64("test_u64", 0644,
                        ion_dir, &test_u64);

    return 0;
}

static void __exit debugfs_exit(void)
{
    debugfs_remove_recursive(ion_dir);
}

module_init(debugfs_init);
module_exit(debugfs_exit);
MODULE_LICENSE("GPL");
运行结果:
读写字符串:
#include <linux/debugfs.h>
#include <linux/module.h>
#include <linux/fs.h>
#include <linux/uaccess.h>
#include <linux/errno.h>
#include <linux/dcache.h>
#include <linux/types.h>

static char ion_buf[512] = "hello\n";
static struct dentry *ion_dir;

static int ion_open(struct inode *inode, struct file *filp)
{
    //printk("ion open\n");
    return 0;
}

ssize_t ion_read(struct file *filp, char __user *buf, size_t count, loff_t *offp)
{
    int retval = 0;
    if ((*offp + count) > 512)
        count = 512 - *offp;

    if (copy_to_user(buf, ion_buf+*offp, count)) {
        printk("copy to user failed, count:%ld\n", count);
        retval = -EFAULT;
        goto out;
    }
    *offp += count;
    retval = count;
out:
    return retval;
}

ssize_t ion_write(struct file *filp, const char __user *buff, size_t count, loff_t *offp)
{
    int retval;

    if (*offp > 512)
        return 0;

    if (*offp + count > 512)
        count = 512 - *offp;

    if (copy_from_user(ion_buf+*offp, buff, count)) {
        printk("copy from user failed, count:%ld\n", count);
        retval = -EFAULT;
        goto out;
    }
    *offp += count;
    retval = count;
out:
    return retval;
}

struct file_operations my_fops = {
    .owner = THIS_MODULE,
    .read = ion_read,
    .write = ion_write,
    .open = ion_open,
};

static int __init debugfs_init(void)
{
    printk("INIT MODULE\n");

    //创建一个/sys/kernel/debug/ion目录
    ion_dir = debugfs_create_dir("ion", NULL);
    if (!ion_dir) {
        printk("ion_dir is null\n");
        return -1;
    }

    /* 创建/sys/kernel/debug/ion/test文件 */
    struct dentry *filent = debugfs_create_file("test", 0644, ion_dir, NULL, &my_fops);
    if (!filent) {
        printk("test file is null\n");
        return -1;
    }

    return 0;
}

static void __exit debugfs_exit(void)
{
    debugfs_remove_recursive(ion_dir);
}

module_init(debugfs_init);
module_exit(debugfs_exit);
MODULE_LICENSE("GPL");
运行结果:
函数接口说明
创建目录、文件函数:
/* 创建目录 */
struct dentry *debugfs_create_dir(const char *name, struct dentry *parent);

/*创建节点 */
struct dentry *debugfs_create_file(const char *name, umode_t mode,
                                   struct dentry *parent, void *data,
const struct file_operations *fops);name:要创建的/sys/kernel/debug下的目录名
parent:父目录,用struct dentry结构体表示。如果直接在/sys/kernel/debug/下创建文件,则为NULL
创建不同大小的文件:
//创建十进制的无符号文件
void debugfs_create_u8(const char *name, umode_t mode,
                       struct dentry *parent, u8 *value);
void debugfs_create_u16(const char *name, umode_t mode,
                        struct dentry *parent, u16 *value);
void debugfs_create_u32(const char *name, umode_t mode,
                        struct dentry *parent, u32 *value);
void debugfs_create_u64(const char *name, umode_t mode,
                        struct dentry *parent, u64 *value);
//创建十六进制的无符号文件
void debugfs_create_x8(const char *name, umode_t mode,
                       struct dentry *parent, u8 *value);
void debugfs_create_x16(const char *name, umode_t mode,
                        struct dentry *parent, u16 *value);
void debugfs_create_x32(const char *name, umode_t mode,
                        struct dentry *parent, u32 *value);
void debugfs_create_x64(const char *name, umode_t mode,
                        struct dentry *parent, u64 *value);
更详细的debugfs用法请参考官方文档:Documentation/filesystems/debugfs.txt
以上是Linux驱动 | debugfs接口创建的詳細內容。更多資訊請關注PHP中文網其他相關文章!

 Debian如何提升Hadoop數據處理速度Apr 13, 2025 am 11:54 AM
本文探討如何在Debian系統上提升Hadoop數據處理效率。優化策略涵蓋硬件升級、操作系統參數調整、Hadoop配置修改以及高效算法和工具的運用。一、硬件資源強化確保所有節點硬件配置一致,尤其關注CPU、內存和網絡設備性能。選擇高性能硬件組件對於提升整體處理速度至關重要。二、操作系統調優文件描述符和網絡連接數:修改/etc/security/limits.conf文件,增加系統允許同時打開的文件描述符和網絡連接數上限。 JVM參數調整:在hadoop-env.sh文件中調整
 Debian syslog如何學習Apr 13, 2025 am 11:51 AM
本指南將指導您學習如何在Debian系統中使用Syslog。 Syslog是Linux系統中用於記錄系統和應用程序日誌消息的關鍵服務,它幫助管理員監控和分析系統活動,從而快速識別並解決問題。一、Syslog基礎知識Syslog的核心功能包括:集中收集和管理日誌消息;支持多種日誌輸出格式和目標位置(例如文件或網絡);提供實時日誌查看和過濾功能。二、安裝和配置Syslog(使用Rsyslog)Debian系統默認使用Rsyslog。您可以通過以下命令安裝:sudoaptupdatesud
 Debian中Hadoop版本怎麼選Apr 13, 2025 am 11:48 AM
選擇適合Debian系統的Hadoop版本,需要綜合考慮以下幾個關鍵因素:一、穩定性與長期支持:對於追求穩定性和安全性的用戶,建議選擇Debian穩定版,例如Debian11(Bullseye)。該版本經過充分測試,擁有長達五年的支持週期,能夠確保系統穩定運行。二、軟件包更新速度:如果您需要使用最新的Hadoop功能和特性,則可以考慮Debian的不穩定版(Sid)。但需注意,不穩定版可能存在兼容性問題和穩定性風險。三、社區支持與資源:Debian擁有龐大的社區支持,可以提供豐富的文檔和
 Debian上TigerVNC共享文件方法Apr 13, 2025 am 11:45 AM
本文介紹如何在Debian系統上使用TigerVNC共享文件。你需要先安裝TigerVNC服務器,然後進行配置。一、安裝TigerVNC服務器打開終端。更新軟件包列表:sudoaptupdate安裝TigerVNC服務器:sudoaptinstalltigervnc-standalone-servertigervnc-common二、配置TigerVNC服務器設置VNC服務器密碼:vncpasswd啟動VNC服務器:vncserver:1-localhostno
 Debian郵件服務器防火牆配置技巧Apr 13, 2025 am 11:42 AM
配置Debian郵件服務器的防火牆是確保服務器安全性的重要步驟。以下是幾種常用的防火牆配置方法,包括iptables和firewalld的使用。使用iptables配置防火牆安裝iptables(如果尚未安裝):sudoapt-getupdatesudoapt-getinstalliptables查看當前iptables規則:sudoiptables-L配置
 Debian郵件服務器SSL證書安裝方法Apr 13, 2025 am 11:39 AM
在Debian郵件服務器上安裝SSL證書的步驟如下:1.安裝OpenSSL工具包首先,確保你的系統上已經安裝了OpenSSL工具包。如果沒有安裝,可以使用以下命令進行安裝:sudoapt-getupdatesudoapt-getinstallopenssl2.生成私鑰和證書請求接下來,使用OpenSSL生成一個2048位的RSA私鑰和一個證書請求(CSR):openss
 Debian郵件服務器虛擬主機配置方法Apr 13, 2025 am 11:36 AM
在Debian系統上配置郵件服務器的虛擬主機通常涉及安裝和配置郵件服務器軟件(如Postfix、Exim等),而不是ApacheHTTPServer,因為Apache主要用於Web服務器功能。以下是配置郵件服務器虛擬主機的基本步驟:安裝Postfix郵件服務器更新系統軟件包:sudoaptupdatesudoaptupgrade安裝Postfix:sudoapt
 Debian郵件服務器DNS設置指南Apr 13, 2025 am 11:33 AM
要配置Debian郵件服務器的DNS設置,您可以按照以下步驟進行操作:打開網絡配置文件:使用文本編輯器(例如vi或nano)打開網絡配置文件/etc/network/interfaces。 sudonano/etc/network/interfaces查找網絡接口配置:在配置文件中找到要修改的網絡接口。通常情況下,以太網接口的配置位於ifaceeth0區塊中。


熱AI工具

Undresser.AI Undress
人工智慧驅動的應用程序,用於創建逼真的裸體照片

AI Clothes Remover
用於從照片中去除衣服的線上人工智慧工具。

Undress AI Tool
免費脫衣圖片

Clothoff.io
AI脫衣器

AI Hentai Generator
免費產生 AI 無盡。

熱門文章
熱工具

Atom編輯器mac版下載
最受歡迎的的開源編輯器

ZendStudio 13.5.1 Mac
強大的PHP整合開發環境

SublimeText3漢化版
中文版,非常好用

WebStorm Mac版
好用的JavaScript開發工具

VSCode Windows 64位元 下載
微軟推出的免費、功能強大的一款IDE編輯器

