


問題複現一下,大家看下面的程式碼,觀察是否有問題,又該如何解決這個問題:
@RequestMapping("verify")
@RestController
@DependsOn({"DingAppInfoService","CloudChatAppInfoService"})
public class LoginAction {
    @Qualifier("ElderSonService")
    @Autowired
    private ElderSonService elderSonService;
    @Qualifier("EmployeeService")
    @Autowired
    private EmployeeService employeeService;
    @Qualifier("UserThreadPoolTaskExecutor")
    @Autowired
    private ThreadPoolTaskExecutor userThreadPoolTaskExecutor;
    private static AuthRequest ding_request = null;
    private static RongCloud cloud_chat = null;
    private static TokenResult register = null;
    private static final ThreadLocal<String> USER_TYPE = new ThreadLocal<>();
    /**
     * 注意不能在bean的生命周期方法上添注@CheckAppContext注解
     */
    @PostConstruct
    public void beforeVerifySetContext() {
        AppContext.fillLoginContext();
        Assert.hasText(AppContext.getAppLoginDingId(), "初始化app_login_ding_id错误");
        Assert.hasText(AppContext.getAppLoginDingSecret(), "初始化app_login_ding_secret错误");
        Assert.hasText(AppContext.getAppLoginReturnUrl(), "初始化app_login_return_url错误");
        Assert.hasText(AppContext.getCloudChatKey(), "初始化cloud_chat_key错误");
        Assert.hasText(AppContext.getCloudChatSecret(), "初始化cloud_chat_secret错误");
        if (!(StringUtils.hasText(AppContext.getCloudNetUri()) || StringUtils.hasText(AppContext.getCloudNetUriReserve()))) {
            throw new IllegalArgumentException("初始化cloud_net_uri与cloud_net_uri_reserve错误");
        }
        ding_request = new AuthDingTalkRequest(
                AuthConfig.builder().
                        clientId(AppContext.getAppLoginDingId()).
                        clientSecret(AppContext.getAppLoginDingSecret()).
                        redirectUri(AppContext.getAppLoginReturnUrl()).build());
        cloud_chat = RongCloud.getInstance(AppContext.getCloudChatKey(), AppContext.getCloudChatSecret());
    }
.....以下API方法无所影响......
}
其中可能令人不解的是controller組件裡初始化方法的程式碼:
    public static void fillLoginContext() {
        DingAppInfo appInfo = SpringContextHolder.getBean(DingAppInfoService.class).findAppInfo(APP_CODE);
        setDingVerifyInfo(appInfo);
        CloudChatAppInfo cloudChatAppInfo = SpringContextHolder.getBean(CloudChatAppInfoService.class).findAppInfo(APP_CODE);
        setCloudChatInfo(cloudChatAppInfo);
    }
   public static void setDingVerifyInfo(DingAppInfo dingAppInfo){
        if (dingAppInfo.checkKeyWordIsNotNull(dingAppInfo)) {
            put(APP_LOGIN_DING_ID, dingAppInfo.getApp_id());
            put(APP_LOGIN_DING_SECRET, dingAppInfo.getApp_secret());
            put(APP_LOGIN_RETURN_URL, dingAppInfo.getApp_return_url());
        }
    }
    public static void setCloudChatInfo(CloudChatAppInfo cloudChatAppInfo){
        if (cloudChatAppInfo.checkKeyWordIsNotNull(cloudChatAppInfo)){
            put(CLOUD_CHAT_KEY,cloudChatAppInfo.getCloud_key());
            put(CLOUD_CHAT_SECRET,cloudChatAppInfo.getCloud_secret());
            put(CLOUD_NET_URI,cloudChatAppInfo.getCloud_net_uri());
            put(CLOUD_NET_URI_RESERVE,cloudChatAppInfo.getCloud_net_uri_reserve());
        }
    }
這裡可以發現其實就是將一些專案客製化的資料灌入我們的靜態自訂上下文AppContext的本地線程ThreadLocal
解決想法(實際上不是這麼解決的,但是也可以這麼做,代價是效能耗費高):
設計一個監聽者,一個發布者,在請求進入的方法上進行切面處理,切面檢查AppContext物件數據,若為空則發布事件,不為空則進入方法:
事件原型:
public class AppContextStatusEvent extends ApplicationEvent {
    public AppContextStatusEvent(Object source) {
        super(source);
    }
    public AppContextStatusEvent(Object source, Clock clock) {
        super(source, clock);
    }
}
監聽者:
@Component
public class AppContextListener implements ApplicationListener<AppContextStatusEvent> {
    @Override
    public void onApplicationEvent(AppContextStatusEvent event) {
        if ("FillAppContext".equals(event.getSource())) {
            AppContext.fillLoginContext();
        } else if ("CheckAppContextLogin".equals(event.getSource())) {
            boolean checkContext = AppContext.checkLoginContext();
            if (!checkContext) {
                AppContext.fillLoginContext();
            }
        }
    }
}
發布者(切面類別):
@Aspect
@Component("AppContextAopAutoSetting")
public class AppContextAopAutoSetting {
    @Before("@annotation(com.lww.live.ApplicationListener.CheckAppContextLogin)")
    public void CheckContextIsNull(JoinPoint joinPoint){
        System.out.println("-----------aop---------CheckAppContextLogin---------start-----");
        MethodSignature signature = (MethodSignature) joinPoint.getSignature();
        boolean value = signature.getMethod().getAnnotation(CheckAppContextLogin.class).value();
        if (value){
            boolean checkContext = AppContext.checkLoginContext();
            if (!checkContext){
                SpringContextHolder.pushEvent(new AppContextStatusEvent("FillAppContext"));
            }
        }
    }
    @After("@annotation(com.lww.live.ApplicationListener.CheckAppContextLogin)")
    public void CheckContextIsNull(){
        System.out.println("-----------aop---------CheckAppContextLogin---------end-----");
        SpringContextHolder.pushEvent(new AppContextStatusEvent("CheckAppContextLogin"));
    }
}
那麼AOP切面類別捕獲的是註解:
@Inherited
@Documented
@Target(ElementType.METHOD)
@Retention(RetentionPolicy.RUNTIME)
public @interface CheckAppContextLogin {
    boolean value() default false;
    String info() default "";
}
這裡不難發現我們在切面的前置與後置增強方法裡都是先檢查AppContext資料的完整性,再進行填入資料。這樣如果我們每一個請求方法都打上註解@CheckAppContextLogin也可以實現,但是問題是除填充的方法外其他的資料太難維護且切面劫持代理的代價太高,檢查資料的頻率太高。
正確的解決方案:
根據資料的業務功能劃分,因為主要是實現兩個物件的填充,即使這幾個資料都遺失了,但是同一個controller元件的成員變量都是同一個對象,且都在初始化的時候進行了初始化,故後續切換請求了也不影響它們實現業務的能力:
 private static AuthRequest ding_request = null;
 private static RongCloud cloud_chat = null;
我們可以在攔截器中要求前端給我們傳遞當前用戶的使用者類型與唯一標識,來進行每一次請求的使用者自訂資料的封裝(減少請求內呼叫方法鏈查庫操作):
public boolean preHandle(HttpServletRequest request, HttpServletResponse response, Object handler) throws Exception {
        String token = (String) request.getSession().getAttribute("token");
        String user_type = (String) request.getSession().getAttribute("user_type");
        if (StringUtils.hasText(token) && StringUtils.hasText(user_type)) {
            Context context = new Context();
            if (Objects.equals(user_type, "elder_son")) {
                ElderSon elderSon = elderSonService.getElderSonByElderSonId(token);
                context.setContextByElderSon(elderSon);
                return true;
            } else if (Objects.equals(user_type, "employee")) {
                Employee employee = employeeService.getEmployeeById(token);
                context.setContextByEmployee(employee);
                return true;
            }
        } else if (StringUtils.hasText(user_type)) {
            response.sendRedirect("/verify/login?user_type=" + user_type);
            return false;
        }
        return false;
    }
最後千萬不要忘記remove一下ThreadLocal的引用:
 @Override
    public void afterCompletion(HttpServletRequest request, HttpServletResponse response, Object handler, Exception ex) throws Exception {
        AppContext.clear();
        HandlerInterceptor.super.afterCompletion(request, response, handler, ex);
    }
所以實際場景實際解決,核心是業務,程式碼簡潔只是附帶的要求。
以上是SpringBoot ApplicationListener事件監聽介面使用問題怎麼解決的詳細內容。更多資訊請關注PHP中文網其他相關文章!

 Spring Boot怎么使用SSE方式向前端推送数据May 10, 2023 pm 05:31 PM
前言SSE简单的来说就是服务器主动向前端推送数据的一种技术,它是单向的,也就是说前端是不能向服务器发送数据的。SSE适用于消息推送,监控等只需要服务器推送数据的场景中,下面是使用SpringBoot来实现一个简单的模拟向前端推动进度数据,前端页面接受后展示进度条。服务端在SpringBoot中使用时需要注意,最好使用SpringWeb提供的SseEmitter这个类来进行操作,我在刚开始时使用网上说的将Content-Type设置为text-stream这种方式发现每次前端每次都会重新创建接。最
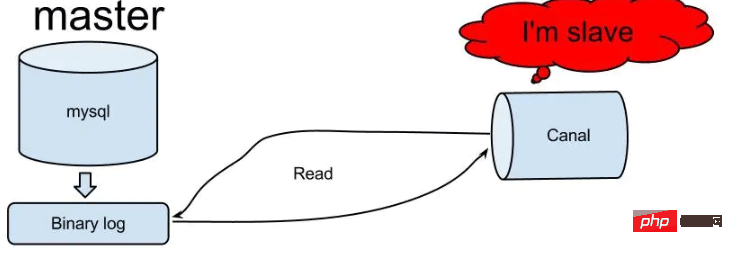 怎么使用SpringBoot+Canal实现数据库实时监控May 10, 2023 pm 06:25 PM
Canal工作原理Canal模拟MySQLslave的交互协议,伪装自己为MySQLslave,向MySQLmaster发送dump协议MySQLmaster收到dump请求,开始推送binarylog给slave(也就是Canal)Canal解析binarylog对象(原始为byte流)MySQL打开binlog模式在MySQL配置文件my.cnf设置如下信息:[mysqld]#打开binloglog-bin=mysql-bin#选择ROW(行)模式binlog-format=ROW#配置My
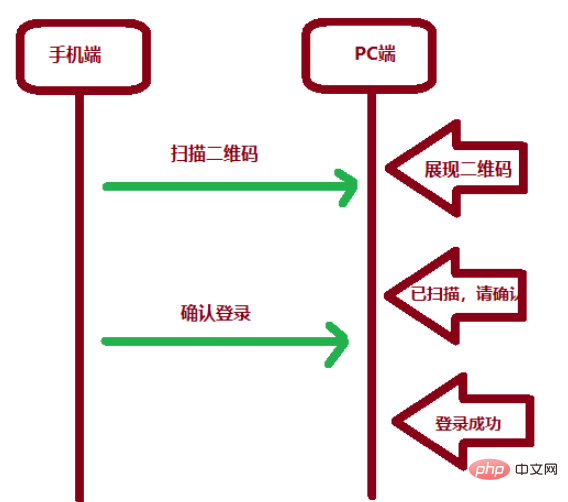 SpringBoot怎么实现二维码扫码登录May 10, 2023 pm 08:25 PM
一、手机扫二维码登录的原理二维码扫码登录是一种基于OAuth3.0协议的授权登录方式。在这种方式下,应用程序不需要获取用户的用户名和密码,只需要获取用户的授权即可。二维码扫码登录主要有以下几个步骤:应用程序生成一个二维码,并将该二维码展示给用户。用户使用扫码工具扫描该二维码,并在授权页面中授权。用户授权后,应用程序会获取一个授权码。应用程序使用该授权码向授权服务器请求访问令牌。授权服务器返回一个访问令牌给应用程序。应用程序使用该访问令牌访问资源服务器。通过以上步骤,二维码扫码登录可以实现用户的快
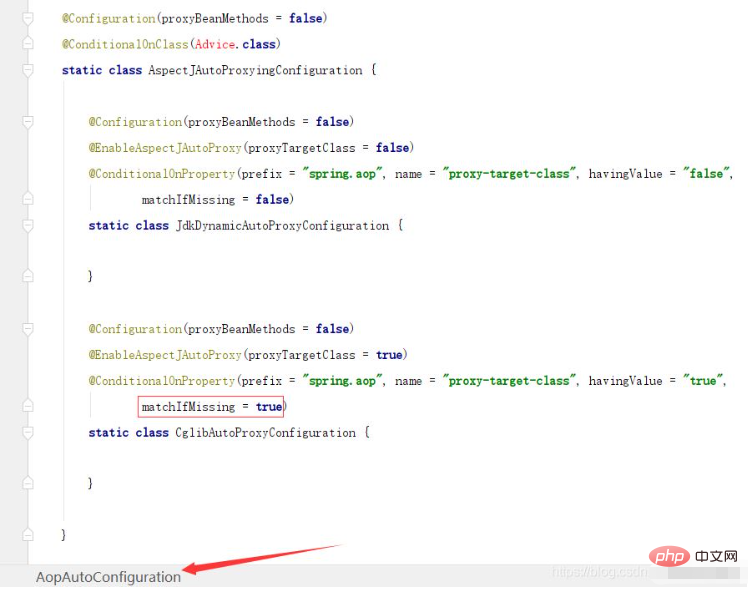 SpringBoot/Spring AOP默认动态代理方式是什么May 10, 2023 pm 03:52 PM
1.springboot2.x及以上版本在SpringBoot2.xAOP中会默认使用Cglib来实现,但是Spring5中默认还是使用jdk动态代理。SpringAOP默认使用JDK动态代理,如果对象没有实现接口,则使用CGLIB代理。当然,也可以强制使用CGLIB代理。在SpringBoot中,通过AopAutoConfiguration来自动装配AOP.2.Springboot1.xSpringboot1.xAOP默认还是使用JDK动态代理的3.SpringBoot2.x为何默认使用Cgl
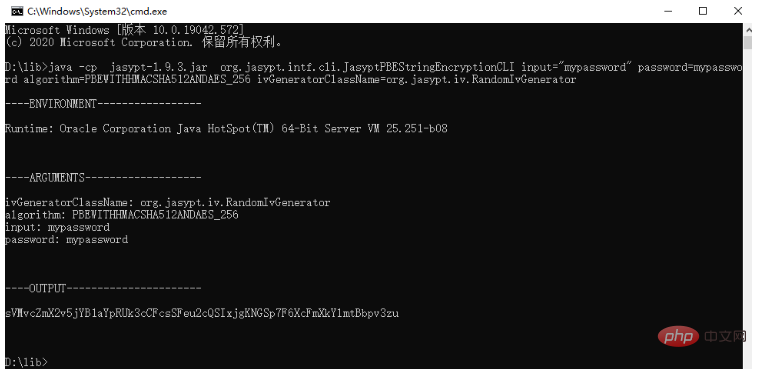 spring boot怎么对敏感信息进行加解密May 10, 2023 pm 02:46 PM
我们使用jasypt最新版本对敏感信息进行加解密。1.在项目pom文件中加入如下依赖:com.github.ulisesbocchiojasypt-spring-boot-starter3.0.32.创建加解密公用类:packagecom.myproject.common.utils;importorg.jasypt.encryption.pbe.PooledPBEStringEncryptor;importorg.jasypt.encryption.pbe.config.SimpleStrin
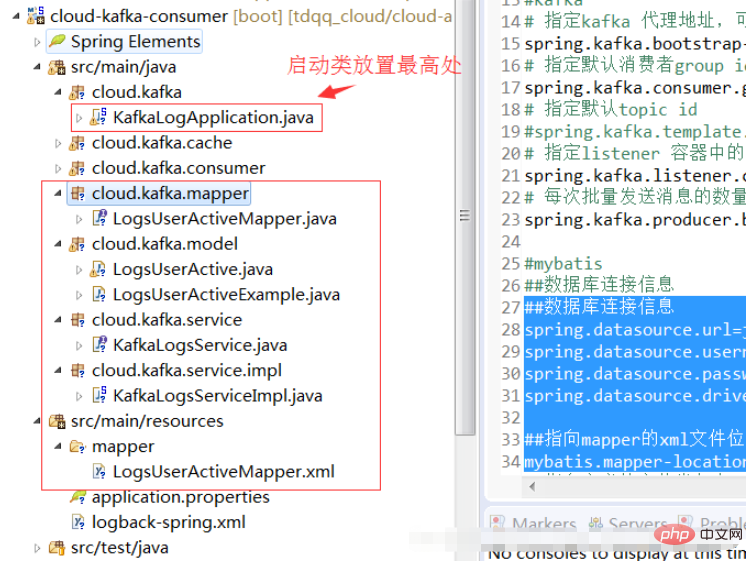 springboot怎么配置mybatis和事务管理May 10, 2023 pm 07:13 PM
一、springboot与mybatis的配置1.首先,springboot配置mybatis需要的全部依赖如下:org.springframework.bootspring-boot-starter-parent1.5.1.RELEASEorg.springframework.bootspring-boot-starter-web1.5.1.RELEASEorg.mybatis.spring.bootmybatis-spring-boot-starter1.2.0com.oracleojdbc
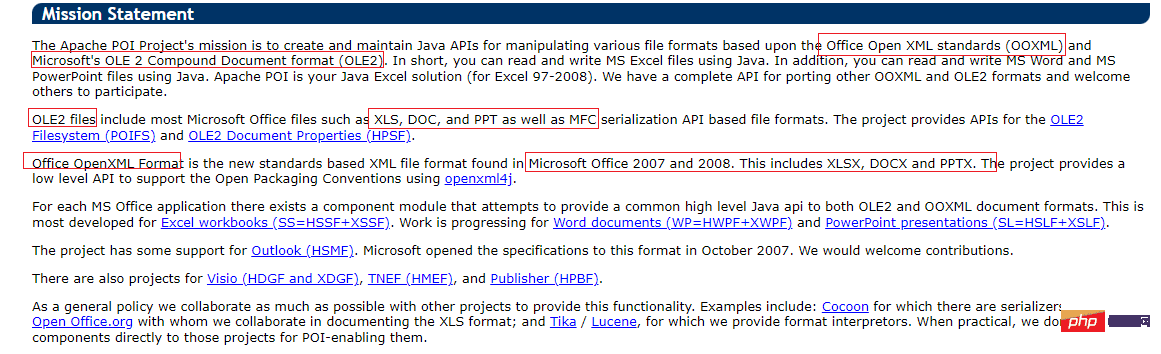 使用Java SpringBoot集成POI实现Word文档导出Apr 21, 2023 pm 12:19 PM
知识准备需要理解ApachePOI遵循的标准(OfficeOpenXML(OOXML)标准和微软的OLE2复合文档格式(OLE2)),这将对应着API的依赖包。什么是POIApachePOI是用Java编写的免费开源的跨平台的JavaAPI,ApachePOI提供API给Java程序对MicrosoftOffice格式档案读和写的功能。POI为“PoorObfuscationImplementation”的首字母缩写,意为“简洁版的模糊实现”。ApachePOI是创建和维护操作各种符合Offic
 springboot怎么整合shiro实现多验证登录功能May 10, 2023 pm 04:19 PM
1.首先新建一个shiroConfigshiro的配置类,代码如下:@ConfigurationpublicclassSpringShiroConfig{/***@paramrealms这儿使用接口集合是为了实现多验证登录时使用的*@return*/@BeanpublicSecurityManagersecurityManager(Collectionrealms){DefaultWebSecurityManagersManager=newDefaultWebSecurityManager();


熱AI工具

Undresser.AI Undress
人工智慧驅動的應用程序,用於創建逼真的裸體照片

AI Clothes Remover
用於從照片中去除衣服的線上人工智慧工具。

Undress AI Tool
免費脫衣圖片

Clothoff.io
AI脫衣器

AI Hentai Generator
免費產生 AI 無盡。

熱門文章
熱工具

SublimeText3 英文版
推薦:為Win版本,支援程式碼提示!

SublimeText3漢化版
中文版,非常好用

WebStorm Mac版
好用的JavaScript開發工具

SublimeText3 Mac版
神級程式碼編輯軟體(SublimeText3)

SublimeText3 Linux新版
SublimeText3 Linux最新版

