nginx怎麼使用ssl模組配置支援HTTPS訪問
- 王林轉載
- 2023-05-21 18:10:062312瀏覽
背景:
專案開發中用到了微信小程序,但是伺服器配置url必須是https,所以需要透過配置nginx的ssl模組來支援https訪問,也就是說,要做一個網站網域為dmsdbj.com 要求透過https://dmsdbj.com進行存取.
ssl英文名為secure socket layer,安全通訊端層。 ssl是一種數位證書,它使用ssl協定在瀏覽器和web server之間建立一條安全通道,資料資訊在client與server之間的安全傳輸.
前提:
1. 設定ssl模組首先需要ca證書,ca證書可以自己手動頒發也可以在阿里雲申請,本人在阿里雲上申請的證書。 (手動頒發可參考文章底部連結)
2. 預設情況下ssl模組並未被安裝,如果要使用該模組則需要在編譯nginx時指定–with-http_ssl_module參數.
阿里雲購買ca證書
操作步驟:
一、下載ca證書
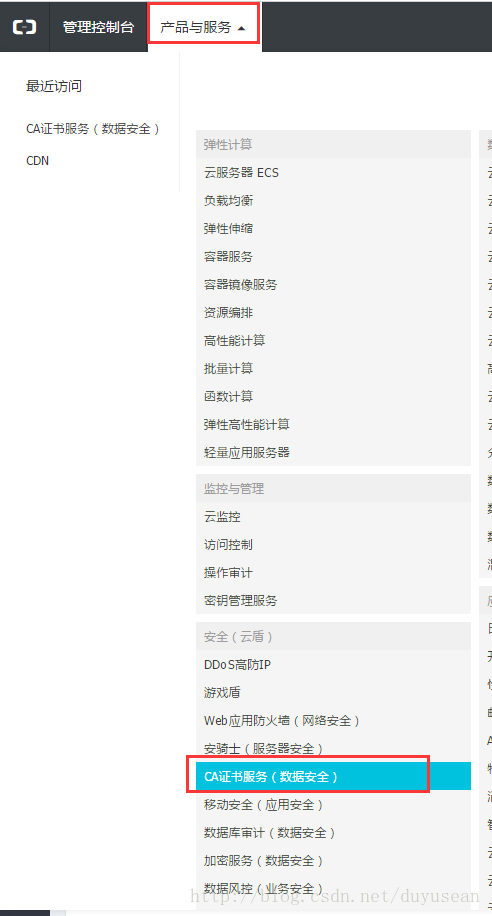
1. 登入阿里雲,選擇“控制台”-“產品與服務”,在“安全(雲盾)”一欄中選擇“ca證書服務(資料安全)”。


2.在已經購買好的憑證點擊“下載”,在新開啟的頁面上選擇“nginx/tengine”,點選「下載憑證for nginx」。


二、在nginx設定檔中安裝憑證
檔說明:1.憑證檔案「憑證名稱.pem'',包含兩段內容,請不要刪除任何一段內容。2. 如果是憑證系統建立的csr,也包含:憑證私密金鑰檔案「憑證名稱.key」。( 1 ) 在nginx的設定檔所在的目錄下建立cert資料夾,並且將下載的全部文件拷貝到cert目錄中。如果申請憑證時是自己建立的csr文件,請將對應的私鑰檔案放到cert目錄下並且命名為「證書名稱.key」;
( 2 ) 開啟nginx 安裝目錄下conf 目錄中的nginx.conf 文件,找到:
# https server
# #server {
# listen 443;
# server_name localhost;
# ssl on;
# ssl_certificate cert.pem;
# ssl_certificate_key cert.key;
# ssl_session_timeout 5m;
# ssl_protocols sslv2 sslv3 tlsv1;
# ssl_ciphers all:!adh:!export56:rc4+rsa:+high:+medium:+low:+sslv2:+exp;
# ssl_prefer_server_ciphers on;
# location / {
#
#
#}
#}
( 3 ) 將其修改為(以下屬性中ssl開頭的屬性與憑證設定有直接關係,其它屬性請結合自己的實際情況複製或調整) :
server {
  listen 443;
  server_name localhost;
  ssl on;
  root html;
  index index.html index.htm;
  ssl_certificate  cert/证书名称.pem;
  ssl_certificate_key cert/证书名称.key;
  ssl_session_timeout 5m;
  ssl_ciphers ecdhe-rsa-aes128-gcm-sha256:ecdhe:ecdh:aes:high:!null:!anull:!md5:!adh:!rc4;
  ssl_protocols tlsv1 tlsv1.1 tlsv1.2;
  ssl_prefer_server_ciphers on;
  location / {
    root html;
    index index.html index.htm;
  }
}
儲存退出。
( 4 )重啟nginx。
nginx -s reload
( 5 ) 透過https 方式存取您的站點,測試站點憑證的安裝配置。在瀏覽器中輸入 https://dmsdbj.com,如下圖所示,則說明配置成功。

安裝過程中遇見的問題
#錯誤一:
nginx: [emerg ] unknown directive "ssl" in /usr/local/nginx/conf/nginx.conf:151
解決方案:
出現這種錯誤可能是兩種情況造成的:
情況一:設定檔格式不正確。
解決方法參考連結:
情況二:ssl模組並未被安裝
預設情況下ssl模組並未被安裝,如果要使用該模組則需要在編譯nginx時指定–with-http_ssl_module參數,這種情況也會導致錯誤二的出現。
解決方案:
nginx缺少http_ssl_module模組,編譯安裝的時候帶上--with-http_ssl_module配置就行了,但是現在的情況是我的nginx已經安裝過了,怎麼添加模組,其實也很簡單,往下看: 做個說明:我的nginx的安裝目錄是/usr/local/nginx這個目錄,我的源碼包在/usr/local/src/nginx-1.3.6目錄
#(1)切換到源碼包:
cd /root/nginx-1.13.6
(2)設定資訊:
./configure --prefix=/usr/local/nginx --with-http_stub_status_module --with-http_ssl_module
(3)設定完成後,執行make進行編譯,千萬不要進行make install,否則就是覆寫安裝。
mark
(4)然後備份原有已經安裝好的nginx
cp /usr/local/nginx/sbin/nginx /usr/local/nginx/sbin/nginx.bak
#(5)停止nginx,正常指令直接nginx -s stop就可以
nginx -s stop
如果關不掉,就直接kill掉進程。 ps aux | grep 進程名 查看進程所佔用的pid號。
ps aux|grep nginx

殺掉查出來的pid就可以了,kill -9 pid 指令用來終止進程。必須先kill掉root對應的pid才能進行下面的三個nobody的pid。
kill -9 10922
kill -9 28276
kill -9 28277
kill -9 28278
(6)將剛剛編譯好的nginx覆寫原來的nginx
cp ./objs/nginx /usr/local/nginx/sbin/
(7)啟動nginx
nginx
(8)透過下面的指令來查看是否已經加入成功。
nginx -v
錯誤二:
nginx: [emerg] the "ssl" parameter requires ngx_http_ssl_module in /usr/local/nginx/conf/nginx.conf:148


以上是nginx怎麼使用ssl模組配置支援HTTPS訪問的詳細內容。更多資訊請關注PHP中文網其他相關文章!

