
SpringBoot怎麼整合Thymeleaf與FreeMarker視圖層技術

- WBOYWBOYWBOYWBOYWBOYWBOYWBOYWBOYWBOYWBOYWBOYWBOYWB轉載
- 2023-05-20 14:34:241813瀏覽
整合Thymeleaf
Thymeleaf是新一代Java模板引擎,類似Velocity、FreeMarker等傳統Java模板引擎。與傳統Java模板引擎不同的是,Thymeleaf支援HTML原型,既可以讓前端工程師在瀏覽器中直接開啟檢視樣式,也可以讓後端工程師結合真實資料查看顯示效果。同事,Spring Boot提供了Thymeleaf自動化配置解決方案,因此在Spring Boot中使用Thymeleaf 非常方便。以下是可用的步驟,用於將Thymeleaf整合到Spring Boot中
1. 創建工程添加依賴
新建一個Spring Boot工程,然後添加spring-boot-starter-web 和spring -boot-starter-thymeleaf 依賴
<dependency>
  <groupId>org.springframework.boot</groupId>
  <artifactId>spring-boot-starter-web</artifactId>
</dependency>
<!--    整合Thymeleaf    -->
<dependency>
  <groupId>org.springframework.boot</groupId>
  <artifactId>spring-boot-starter-thymeleaf</artifactId>
</dependency>
2. 配置Thymeleaf
Spring Boot為Thymeleaf提供了自動化配置類別ThymeleafAutoConfiguration,相關的配置屬性在ThymeleafProperties 類別中,ThymeleafProperties類別部分來源碼如下:
@ConfigurationProperties(prefix = "spring.thymeleaf")
public class ThymeleafProperties {
	private static final Charset DEFAULT_ENCODING = StandardCharsets.UTF_8;
	public static final String DEFAULT_PREFIX = "classpath:/templates/";
	public static final String DEFAULT_SUFFIX = ".html";
}
因此配置可以看到,預設的模板位置在classpath:/templates/,預設的模板後綴名為.html。在使用IDEA建立Spring Boot專案時,預設會在templates資料夾中建立一些檔案。如需對預設的Thymeleaf 配置參數進行自訂配置,可以在application.properties 中進行配置,部分常見配置如下:
#是否開啟緩存,開發時可設定為false,預設為true
spring.thymeleaf.cache=false
#檢查模版是否存在,預設為true
spring.thymeleaf.check-template=true
#檢查模版位置是否存在,預設為true
spring.thymeleaf.check-template-location=true
#模版檔案編碼
spring.thymeleaf.encoding=UTF-8
#模版檔案位置
spring.thymeleaf.prefix=classpath:/ templates/
#Content-Type設定
spring.thymeleaf.servlet.content-type=text/html
#模版檔案後綴
spring.thymeleaf.suffix=.html
#3. 配置控制器
建立Book實體類,然後在Controller中傳回ModelAndView,如下:
public class Book {
    private int id;
    private String name;
    private String author;
    public int getId() {
        return id;
    }
    public void setId(int id) {
        this.id = id;
    }
    public String getName() {
        return name;
    }
    public void setName(String name) {
        this.name = name;
    }
    public String getAuthor() {
        return author;
    }
    public void setAuthor(String author) {
        this.author = author;
    }
}
@RestController
public class BookController {
@GetMapping(value = "/books")
public ModelAndView books(){
List<Book> books = new ArrayList<>();
Book b1 = new Book();
b1.setId(1);
b1.setAuthor("唐家三少");
b1.setName("斗罗大陆Ⅰ");
Book b2 = new Book();
b2.setId(2);
b2.setAuthor("唐家三少");
b2.setName("斗罗大陆Ⅱ");
books.add(b1);
books.add(b2);
ModelAndView modelAndView = new ModelAndView();
modelAndView.addObject("books",books);
modelAndView.setViewName("books");
return modelAndView;
}
}4. 建立視圖
在resources目錄下的templates目錄中建立books.html,如下:
<!DOCTYPE html>
<html lang="en" xmlns:th="http://www.thymeleaf.org">
<head>
    <meta charset="UTF-8">
    <title>图书列表</title>
</head>
<body>
<table border="1">
    <tr>
        <td>图书编号</td>
        <td>图书名称</td>
        <td>图书作者</td>
    </tr>
    <tr th:each="book:${books}">
        <td th:text="${book.id}"></td>
        <td th:text="${book.name}"></td>
        <td th:text="${book.author}"></td>
    </tr>
</table>
</body>
</html>
程式碼解釋:
首先在第二行匯入Thymeleaf 的名稱空間
-
#透過遍歷將books中的資料展示出來,Thymeleaf中透過th:each進行集合遍歷,透過th:text展示資料
#5.運行
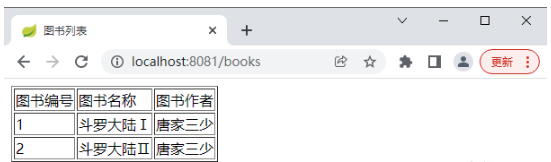
# #瀏覽器輸入"http://localhost:8081/books",查看運行結果,如圖: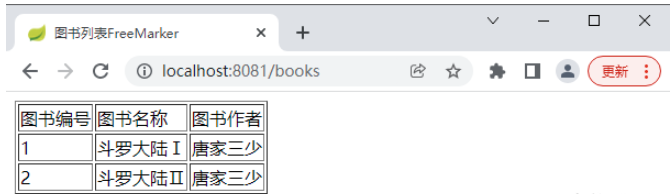
<dependency>
  <groupId>org.springframework.boot</groupId>
  <artifactId>spring-boot-starter-web</artifactId>
</dependency>
<!--    整合FreeMarker    -->
<dependency>
  <groupId>org.springframework.boot</groupId>
  <artifactId>spring-boot-starter-freemarker</artifactId>
</dependency>
###2. 配置FreeMarker######Spring Boot對FreeMarker 也提供了自動化配置類別FreeMarkerAutoConfiguration,相關的配置屬性在FreeMarkerProperties中,FreeMarkerProperties的部分源碼如下:###
@ConfigurationProperties(prefix = "spring.freemarker")
public class FreeMarkerProperties extends AbstractTemplateViewResolverProperties {
	public static final String DEFAULT_TEMPLATE_LOADER_PATH = "classpath:/templates/";
	public static final String DEFAULT_PREFIX = "";
	public static final String DEFAULT_SUFFIX = ".ftl";
    ...
}
###FreeMarker 預設模板位置和Thymeleaf 一樣,都在classpath:/templates/中,預設檔案後綴是.ftl,開發者可以在application.properties 中對這些預設配置進行修改,如下:######3. 控制器# #####控制器和Thymeleaf 中的控制器一樣,這裡不再重複######4. 建立視圖######在resources目錄下的templates目錄中建立books.ftl 文件,如下:###<!DOCTYPE html>
<html lang="en">
<head>
<meta charset="UTF-8">
<title>图书列表FreeMarker</title>
</head>
<body>
<table border="1">
<tr>
<td>图书编号</td>
<td>图书名称</td>
<td>图书作者</td>
</tr>
<#if books ?? && (books?size>0)>
<#list books as book>
<tr>
<td>${book.id}</td>
<td>${book.name}</td>
<td>${book.author}</td>
</tr>
</#list>
</#if>
</table>
</body>
</html>###程式碼解釋:######先判斷model中的books部位可控且books中有數據,然後再進行遍歷#######5. 運行############################################################################ #瀏覽器輸入"http://localhost:8081/books",查看運行結果,如圖:############以上是SpringBoot怎麼整合Thymeleaf與FreeMarker視圖層技術的詳細內容。更多資訊請關注PHP中文網其他相關文章!