SpringBoot spring.factories載入時機源碼分析
- WBOYWBOYWBOYWBOYWBOYWBOYWBOYWBOYWBOYWBOYWBOYWBOYWB轉載
- 2023-05-17 21:31:041469瀏覽
spring.factories作用
這個類似Java中的SPI功能,SpringBoot啟動的時候會讀取所有jar套件下面的META-INF/spring.factories檔案;
並且將檔案中的介面/抽象類別對應的實作類別都對應起來,並在需要的時候可以實例化對應的實作類別
下面我們來分析一下原始碼看看spring.factories的使用場景
原始碼解析
啟動SpringApplication,看看建構方法
	public SpringApplication(ResourceLoader resourceLoader, Class<?>... primarySources) {
		this.resourceLoader = resourceLoader;
		Assert.notNull(primarySources, "PrimarySources must not be null");
		this.primarySources = new LinkedHashSet<>(Arrays.asList(primarySources));
		this.webApplicationType = WebApplicationType.deduceFromClasspath();
		setInitializers((Collection) getSpringFactoriesInstances(
				ApplicationContextInitializer.class));
		setListeners((Collection) getSpringFactoriesInstances(ApplicationListener.class));
		this.mainApplicationClass = deduceMainApplicationClass();
}其中方法getSpringFactoriesInstances( ApplicationContextInitializer.class) 是用於取得Spring中指定類別實例用的;並且取得的時候是根據讀取整個專案中檔案路徑為META-INF/spring.factories 中的內容實例化對應的實例類的;
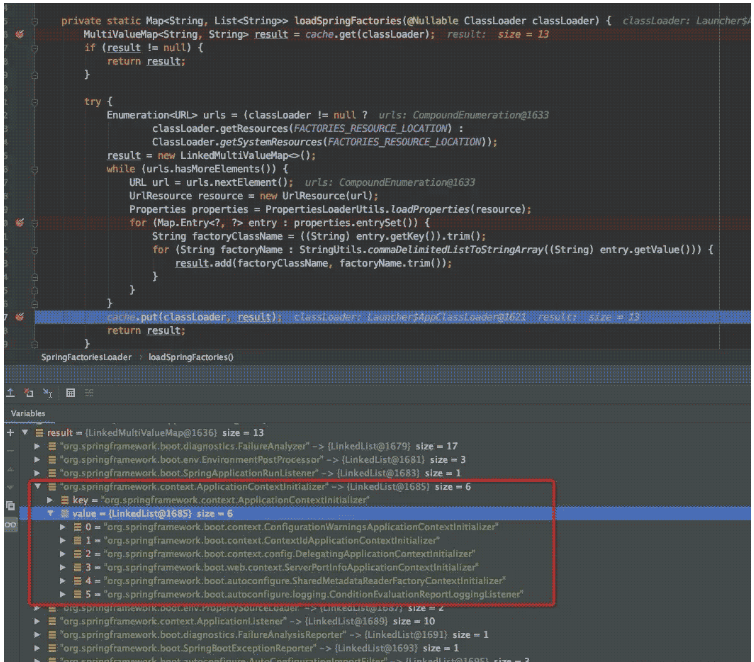
例如這裡的ApplicationContextInitializer 是一個介面,那麼應該實例化哪些他的實作類別呢?那就找META-INF/spring.factories檔案; 那我們在spring-boot:2.1.0jar套件中找到了這個檔案

#讀取到需要實例化的實作類別為
org.springframework.boot.context.ConfigurationWarningsApplicationContextInitializer,\
org.springframework.boot.context.ContextIdApplicationContextInitializer,\
org.springframework.boot.context.config.DelegatingApplicationContextInitializer,\
org.springframework.boot.web.context.ServerPortInfoApplicationContextInitializer
並且還在spring-boot-autoconfigure-2.1.0.RELEASE.jar中找到了這個文件

那麼檔案中的兩個實作類別也會被實例化;加上上面4個總共有6個
org.springframework.boot.autoconfigure.SharedMetadataReaderFactoryContextInitializer,\
org.springframework.boot.autoconfigure.logging.ConditionEvaluationReportLoggingListener

#可以看到不只把org.springframework.context.ApplicationContextInitializer 的實例類別解析了出來;而是所有的都解析了出來並且保存下來了.下次其他的類別需要被實例化的時候就可以直接從記憶體裡面拿了;
上面程序拿到了實例類別之後,接下來就是實例化的過程了
	private <T> Collection<T> getSpringFactoriesInstances(Class<T> type,
			Class<?>[] parameterTypes, Object... args) {
		ClassLoader classLoader = getClassLoader();
		// Use names and ensure unique to protect against duplicates
		Set<String> names = new LinkedHashSet<>(
				SpringFactoriesLoader.loadFactoryNames(type, classLoader));
		List<T> instances = createSpringFactoriesInstances(type, parameterTypes,
				classLoader, args, names);
		AnnotationAwareOrderComparator.sort(instances);
		return instances;
}方法createSpringFactoriesInstances就是創建實例的過程;可以看到傳入了對應的介面類別org.springframework.context.ApplicationContextInitializer ;接下來就會實例化上面找到了對應的實作類別;
	private <T> List<T> createSpringFactoriesInstances(Class<T> type,
			Class<?>[] parameterTypes, ClassLoader classLoader, Object[] args,
			Set<String> names) {
		List<T> instances = new ArrayList<>(names.size());
		for (String name : names) {
			try {
				Class<?> instanceClass = ClassUtils.forName(name, classLoader);
				Assert.isAssignable(type, instanceClass);
				Constructor<?> constructor = instanceClass
						.getDeclaredConstructor(parameterTypes);
				T instance = (T) BeanUtils.instantiateClass(constructor, args);
				instances.add(instance);
			}
			catch (Throwable ex) {
				throw new IllegalArgumentException(
						"Cannot instantiate " + type + " : " + name, ex);
			}
		}
		return instances;
	}
實例化的過程如果,沒有什麼特別需要講解的;
上面有個方法 AnnotationAwareOrderComparator.sort(instances);是用來排序所有實例的; 實作類別需要實現介面Ordered ; getOrder回傳的值越小,優先權更高
用法
知道spring.factories的用法之後, 那麼我們就可以利用這個特性來實現自己的目的;
例如我們也可以寫一個介面類別ApplicationContextInitializer的實作類別。
以上是SpringBoot spring.factories載入時機源碼分析的詳細內容。更多資訊請關注PHP中文網其他相關文章!

