
springboot事件監聽器怎麼使用

- PHPz轉載
- 2023-05-14 10:01:201058瀏覽
引導案例
下面看一個簡單的案例,
@Configuration
public class SelfBusiness {
    public static void main(String[] args) {
        AnnotationConfigApplicationContext context = new AnnotationConfigApplicationContext(SelfBusiness.class);
        context.getBean(MyService.class).doBusiness();
        context.close();
    }
    @Component
    static class MyService {
        private static final Logger logger = LoggerFactory.getLogger(MyService.class);
        @Autowired
        private ApplicationEventPublisher publisher;
        public void doBusiness (){
            logger.debug("主线业务");
            logger.debug("发送短信");
            logger.debug("发送邮件");
        }
    }
運行上面的程式碼,觀察效果

結合輸出結果,這這段程式碼要實現的邏輯是,在主線業務執行完成後,需要執行發短信,發郵件等操作,這樣寫也沒毛病,但不夠優雅,從後續的業務可擴展性上來講,不夠友好,如果後續主線業務執行完畢,還需再增加一個其他的審計操作,則需要新增程式碼邏輯,這就將主線業務和支線邏輯緊密的耦合了起來;
就是說,我們期待的效果是,主線業務根本不關心其他的業務操作,只需要完成自身的邏輯就ok了,這就需要使用到spring提供的事件監聽器功能;
使用事件監聽器改造過程
springboot(spring)的事件監聽器使用主要有兩種方式,透過實作ApplicationListener接口,另一個就是在類別上新增@EventListener 註解來實現,接下來將對這兩種方式逐一說明;
一、透過實作ApplicationListener介面實作步驟
1、自訂一個事件類別(物件),繼承ApplicationEvent
 static class MyEvent extends ApplicationEvent {
        public MyEvent(Object source) {
            super(source);
        }
    }
可以這麼理解,在程式碼中,可能有很多種類型的事件,不同的業務對應著不同的事件,對於某個特定的監聽器來說,它只想監聽A這種類型的事件;
2、自定義業務類別實作ApplicationListener 介面
	@Data
    static class Params {
        private String id ;
        private String name;
        private String phone;
    }
	@Component
    static class SmsApplicationListener implements ApplicationListener<MyEvent> {
        private static final Logger logger = LoggerFactory.getLogger(SmsApplicationListener.class);
        @Override
        public void onApplicationEvent(MyEvent myEvent) {
            Object source = myEvent.getSource();
            try {
                Params params = objectMapper.readValue(source.toString(), Params.class);
                logger.debug("userId : {}",params.getId());
            } catch (JsonProcessingException e) {
                e.printStackTrace();
            }
            logger.debug("执行 sms 发短信业务");
        }
    }
    @Component
    static class EmailApplicationListener implements ApplicationListener<MyEvent> {
        private static final Logger logger = LoggerFactory.getLogger(SmsApplicationListener.class);
        @Override
        public void onApplicationEvent(MyEvent myEvent) {
            Object source = myEvent.getSource();
            logger.debug("执行 email 发邮件业务");
        }
    }
#顯然,這裡的監聽器要監聽的事件類型,正是上面我們定義的MyEvent ,這樣,當業務被觸發的時候,就可以在onApplicationEvent中拿到傳遞過來的參數,從而執行發短信(發郵件)業務操作了
3、主線業務發布事件
@Component
    static class MyService {
        private static final Logger logger = LoggerFactory.getLogger(MyService.class);
        @Autowired
        private ApplicationEventPublisher publisher;
        public void doBusiness (){
            Params params = new Params();
            params.setId("001");
            params.setName("xiaoma");
            params.setPhone("133******");
            logger.debug("主线业务");
            try {
                publisher.publishEvent(new MyEvent(objectMapper.writeValueAsString(params)));
            } catch (JsonProcessingException e) {
                e.printStackTrace();
            }
            //publisher.publishEvent(new MyEvent("MyService doBusiness()"));
            //logger.debug("发送短信");
            //logger.debug("发送邮件");
        }
    }
對主線業務來說,這時候就不再需要寫發送簡訊或郵件邏輯了,只需要一個publisher將事件發佈出去即可,如果需要傳遞參數,將參數一起傳遞過去
完整的程式碼
@Configuration
public class SelfBusiness {
    private static ObjectMapper objectMapper = new ObjectMapper();
    public static void main(String[] args) {
        AnnotationConfigApplicationContext context = new AnnotationConfigApplicationContext(SelfBusiness.class);
        context.getBean(MyService.class).doBusiness();
        context.close();
    }
    @Data
    static class Params {
        private String id ;
        private String name;
        private String phone;
    }
    /**
     * 自定义事件对象
     */
    static class MyEvent extends ApplicationEvent {
        public MyEvent(Object source) {
            super(source);
        }
    }
    @Component
    static class MyService {
        private static final Logger logger = LoggerFactory.getLogger(MyService.class);
        @Autowired
        private ApplicationEventPublisher publisher;
        public void doBusiness (){
            Params params = new Params();
            params.setId("001");
            params.setName("xiaoma");
            params.setPhone("133******");
            logger.debug("主线业务");
            try {
                publisher.publishEvent(new MyEvent(objectMapper.writeValueAsString(params)));
            } catch (JsonProcessingException e) {
                e.printStackTrace();
            }
            //publisher.publishEvent(new MyEvent("MyService doBusiness()"));
            //logger.debug("发送短信");
            //logger.debug("发送邮件");
        }
    }
    /**
     * 监听事件触发后要执行的业务
     */
    @Component
    static class SmsApplicationListener implements ApplicationListener {
        private static final Logger logger = LoggerFactory.getLogger(SmsApplicationListener.class);
        @Override
        public void onApplicationEvent(MyEvent myEvent) {
            Object source = myEvent.getSource();
            try {
                Params params = objectMapper.readValue(source.toString(), Params.class);
                logger.debug("userId : {}",params.getId());
            } catch (JsonProcessingException e) {
                e.printStackTrace();
            }
            logger.debug("执行 sms 发短信业务");
        }
    }
    @Component
    static class EmailApplicationListener implements ApplicationListener {
        private static final Logger logger = LoggerFactory.getLogger(SmsApplicationListener.class);
        @Override
        public void onApplicationEvent(MyEvent myEvent) {
            Object source = myEvent.getSource();
            logger.debug("执行 email 发邮件业务");
        }
    }
}
再次運行上面的程式碼,觀察效果,可以看到,仍然能滿足預期的效果

二、透過添加@EventListener 註解來實現
這種方式不再需要實作ApplicationListener 接口,而是直接在監聽類別的方法上面加上@EventListener註解即可,相對要簡化了一些,下面直接貼出完整的程式碼
package com.congge.config;
import com.fasterxml.jackson.core.JsonProcessingException;
import com.fasterxml.jackson.databind.ObjectMapper;
import lombok.Data;
import org.slf4j.Logger;
import org.slf4j.LoggerFactory;
import org.springframework.beans.factory.annotation.Autowired;
import org.springframework.context.ApplicationEvent;
import org.springframework.context.ApplicationEventPublisher;
import org.springframework.context.ApplicationListener;
import org.springframework.context.annotation.AnnotationConfigApplicationContext;
import org.springframework.context.annotation.Configuration;
import org.springframework.context.event.EventListener;
import org.springframework.stereotype.Component;
@Configuration
public class SelfBusiness2 {
    private static ObjectMapper objectMapper = new ObjectMapper();
    public static void main(String[] args) {
        AnnotationConfigApplicationContext context = new AnnotationConfigApplicationContext(SelfBusiness2.class);
        context.getBean(MyService.class).doBusiness();
        context.close();
    }
    @Data
    static class Params {
        private String id ;
        private String name;
        private String phone;
    }
    /**
     * 自定义事件对象
     */
    static class MyEvent extends ApplicationEvent {
        public MyEvent(Object source) {
            super(source);
        }
    }
    @Component
    static class MyService {
        private static final Logger logger = LoggerFactory.getLogger(MyService.class);
        @Autowired
        private ApplicationEventPublisher publisher;
        public void doBusiness (){
            Params params = new Params();
            params.setId("001");
            params.setName("xiaoma");
            params.setPhone("133******");
            logger.debug("主线业务");
            try {
                publisher.publishEvent(new MyEvent(objectMapper.writeValueAsString(params)));
            } catch (JsonProcessingException e) {
                e.printStackTrace();
            }
        }
    }
    @Component
    static class SmsListenerService {
        private static final Logger logger = LoggerFactory.getLogger(SmsListenerService.class);
        @EventListener
        public void smsListener(MyEvent myEvent){
            Object source = myEvent.getSource();
            try {
                SelfBusiness2.Params params = objectMapper.readValue(source.toString(), SelfBusiness2.Params.class);
                logger.debug("userId : {}",params.getId());
            } catch (JsonProcessingException e) {
                e.printStackTrace();
            }
            logger.debug("执行 sms 发短信业务");
        }
    }
    @Component
    static class EmailListenerService {
        private static final Logger logger = LoggerFactory.getLogger(EmailListenerService.class);
        @EventListener
        public void emailListener(MyEvent myEvent){
            Object source = myEvent.getSource();
            try {
                SelfBusiness2.Params params = objectMapper.readValue(source.toString(), SelfBusiness2.Params.class);
                logger.debug("userId : {}",params.getId());
            } catch (JsonProcessingException e) {
                e.printStackTrace();
            }
            logger.debug("执行 email 发邮件业务");
        }
    }
}
執行上面的程式碼,觀察效果,同樣可以達到預期的效果

三、使用非同步
更進一步來說,為了提升主線業務的邏輯執行效率,我們希望發布事件的業務邏輯異步執行,這個該如何做呢?
翻閱源碼可以知道,ApplicationEventPublisher 默認發布事件時候採用單線程同步發送,如果需要使用異步,需要自定義ThreadPoolTaskExecutor ,以及SimpleApplicationEventMulticaster ,因此我們只需要覆蓋這兩個元件的bean即可,在上面的業務類別中將下面的這兩個bean添加進去;
@Bean
    public ThreadPoolTaskExecutor executor() {
        ThreadPoolTaskExecutor executor = new ThreadPoolTaskExecutor();
        executor.setCorePoolSize(5);
        executor.setMaxPoolSize(10);
        executor.setQueueCapacity(100);
        return executor;
    }
    @Bean
    public SimpleApplicationEventMulticaster applicationEventMulticaster(ThreadPoolTaskExecutor executor) {
        SimpleApplicationEventMulticaster eventMulticaster = new SimpleApplicationEventMulticaster();
        eventMulticaster.setTaskExecutor(executor);
        return eventMulticaster;
    }
這時候再次運行程式碼,反覆運行多次,就可以看到效果
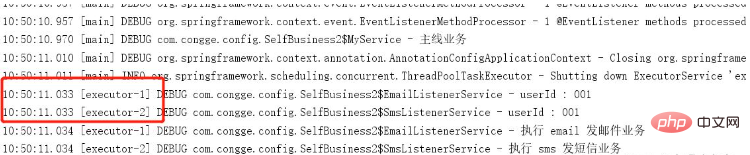
對比下上面單執行緒效果

以上是springboot事件監聽器怎麼使用的詳細內容。更多資訊請關注PHP中文網其他相關文章!