SpringBoot怎麼載入多個設定檔實作dev、product多環境切換
- 王林轉載
- 2023-05-12 23:58:161935瀏覽
1.SpringBoot中實作多環境切換
在SpringBoot中,除了application.properties,我們新建的其他設定檔的檔名需要滿足application-{profile}.properties的格式,其中{profile}對應你的環境識別(不一定是.properties文件,也可以是.yml)其對應的{profile}值是開發者自訂的(如dev,product),在專案啟動的時候,只需要加入對應的參數,springboot就會去讀取該設定檔了。具體profile的配置在application.properties檔案中透過spring.profiles.active屬性來設定。接下來我們以一個例子來說明
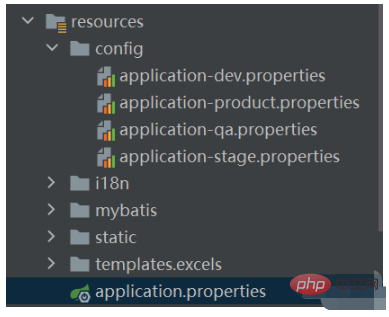
(1)首先這裡建立了dev、product、qa、stage和預設的application五個設定檔

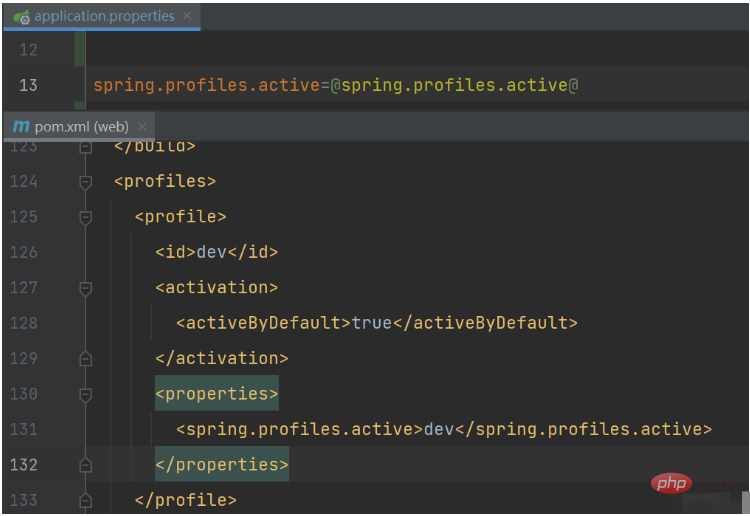
spring.profiles.active=dev或使用@spring.profiles.active@,如下所示
spring.profiles.active=@spring.profiles.active@如果使用這種方式則需要在pom.xml中加入以下內容,其中
activeByDefault標籤來指定專案啟動時預設載入的設定檔。
<profiles>
  <profile>
    <id>dev</id>
    <activation>
      <activeByDefault>true</activeByDefault>
    </activation>
    <properties>
      <spring.profiles.active>dev</spring.profiles.active>
    </properties>
  </profile>
  <profile>
    <id>qa</id>
    <properties>
      <spring.profiles.active>qa</spring.profiles.active>
    </properties>
  </profile>
  <profile>
    <id>stage</id>
    <properties>
      <spring.profiles.active>stage</spring.profiles.active>
    </properties>
  </profile>
  <profile>
    <id>product</id>
    <properties>
      <spring.profiles.active>product</spring.profiles.active>
    </properties>
  </profile>
</profiles>
當執行mvn clean package -P dev 指令對專案進行打包發佈時,打出來的jar/war套件中的設定檔中@spring.profiles.active@ 會被替換成 dev。
注意@spring.profiles.active@
要與pom中的標籤> 保持一致,否則會報錯誤。

設定檔的優先權排序(以哪個設定檔為準):
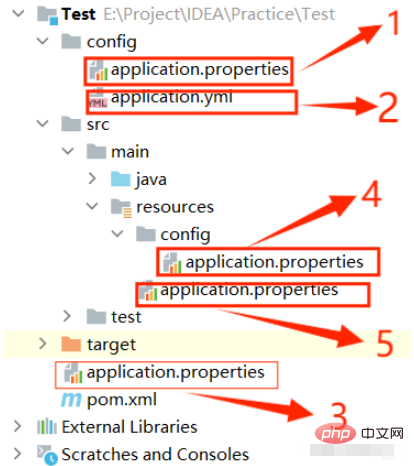
1、專案根目錄下的config目錄。 【優先順序最高】2、專案根目錄。
3、classpath下的config目錄。
4、classpath目錄(新專案時application.properties預設所在位置)。 【優先順序最低】
application.yml,application.properties設定檔同時存在,會以application.properties設定檔為準,也就是說先載入.yml檔後載入.properties檔。

以上是SpringBoot怎麼載入多個設定檔實作dev、product多環境切換的詳細內容。更多資訊請關注PHP中文網其他相關文章!
陳述:
本文轉載於:yisu.com。如有侵權,請聯絡admin@php.cn刪除

