SpringBoot執行過程實例分析
- PHPz轉載
- 2023-05-12 15:19:061526瀏覽
每個Spring Boot專案都有一個主程式啟動類,在主程式啟動類別中有一個啟動專案的main()方法,在該方法中透過執行SpringApplication.run()即可啟動整個Spring Boot程式。
問題:那麼SpringApplication.run()方法到底是如何做到啟動Spring Boot專案的呢?
下面我們查看run()方法內部的原始碼,核心程式碼具體如下:
@SpringBootApplication
public class SpringbootDemoApplication {
    public static void main(String[] args) {
        SpringApplication.run(SpringbootDemoApplication.class, args);
    }
}
public static ConfigurableApplicationContext run(Class<?> primarySource, String... args) {
return run(new Class[]{primarySource}, args);
}
public static ConfigurableApplicationContext run(Class<?>[] primarySources, String[] args) {
return (new SpringApplication(primarySources)).run(args);
}從上述原始碼可以看出,SpringApplication.run()方法內部執行了兩個操作,分別是SpringApplication實例的初始化建立和呼叫run()啟動項目,這兩個階段的實作具體說明如下
#1. SpringApplication實例的初始化創建
查看SpringApplication實例物件初始化創建的源碼訊息,核心代碼具體如下
    public SpringApplication(ResourceLoader resourceLoader, Class... primarySources) {
        this.sources = new LinkedHashSet();
        this.bannerMode = Mode.CONSOLE;
        this.logStartupInfo = true;
        this.addCommandLineProperties = true;
        this.addConversionService = true;
        this.headless = true;
        this.registerShutdownHook = true;
        this.additionalProfiles = new HashSet();
        this.isCustomEnvironment = false;
        this.resourceLoader = resourceLoader;
        Assert.notNull(primarySources, "PrimarySources must not be null");
    // 把项目启动类.class设置为属性存储起来
        this.primarySources = new LinkedHashSet(Arrays.asList(primarySources));
    // 判断当前webApplicationType应用的类型
        this.webApplicationType = WebApplicationType.deduceFromClasspath();
    // 设置初始化器(Initializer),最后会调用这些初始化器
        this.setInitializers(this.getSpringFactoriesInstances(ApplicationContextInitializer.class));
    // 设置监听器(Listener)
        this.setListeners(this.getSpringFactoriesInstances(ApplicationListener.class));
    // 用于推断并设置项目main()方法启动的主程序启动类
        this.mainApplicationClass = this.deduceMainApplicationClass();
從上述原始碼可以看出,SpringApplication的初始化過程主要包括4部分,具體說明如下。
(1)this.webApplicationType = WebApplicationType.deduceFromClasspath()
用來判斷目前webApplicationType應用的型別。 deduceFromClasspath()方法用於查看Classpath類路徑下是否存在某個特徵類,從而判斷當前webApplicationType類型是SERVLET應用(Spring 5之前的傳統MVC應用)還是REACTIVE應用(Spring 5開始出現的WebFlux交互式應用)
(2)this.setInitializers(this.getSpringFactoriesInstances(ApplicationContextInitializer.class))
用於SpringApplication應用的初始化器設定。在初始化器設定過程中,會使用Spring類別載入器SpringFactoriesLoader從META-INF/spring.factories類別路徑下的META-INF下的spring.factores檔案中取得所有可用的應用初始化器類別ApplicationContextInitializer。
(3)this.setListeners(this.getSpringFactoriesInstances(ApplicationListener.class))
#用於SpringApplication應用的監聽器設定。監聽器設定的過程與上一步初始化器設定的過程基本上一樣,也是使用SpringFactoriesLoader從META-INF/spring.factories類別路徑下的META-INF下的spring.factores檔案中取得所有可用的監聽器類別ApplicationListener。
(4)this.mainApplicationClass = this.deduceMainApplicationClass()
用於推斷並設定專案main()方法啟動的主程式啟動類別
#2.專案的初始化啟動
分析完(new SpringApplication(primarySources)).run(args)原始碼前一部分SpringApplication實例物件的初始化建立後,查看run(args)方法執行的專案初始化啟動過程,核心程式碼具體如下:
  public ConfigurableApplicationContext run(String... args) {
        StopWatch stopWatch = new StopWatch();
        stopWatch.start();
        ConfigurableApplicationContext context = null;
        Collection<SpringBootExceptionReporter> exceptionReporters = new ArrayList();
        this.configureHeadlessProperty();
    // 第一步:获取并启动监听器
        SpringApplicationRunListeners listeners = this.getRunListeners(args);
        listeners.starting();
        Collection exceptionReporters;
        try {
            ApplicationArguments applicationArguments = new DefaultApplicationArguments(args);
    // 第二步:根据SpringApplicationRunListeners以及参数来准备环境
            ConfigurableEnvironment environment = this.prepareEnvironment(listeners, applicationArguments);
            this.configureIgnoreBeanInfo(environment);
    // 准备Banner打印器 - 就是启动Spring Boot的时候打印在console上的ASCII艺术字体
            Banner printedBanner = this.printBanner(environment);
    // 第三步:创建Spring容器
            context = this.createApplicationContext();
            exceptionReporters = this.getSpringFactoriesInstances(SpringBootExceptionReporter.class, new Class[]{ConfigurableApplicationContext.class}, new Object[]{context});
    // 第四步:Spring容器前置处理
            this.prepareContext(context, environment, listeners, applicationArguments, printedBanner);
    // 第五步:刷新容器
            this.refreshContext(context);
    // 第六步:Spring容器后置处理
            this.afterRefresh(context, applicationArguments);
            stopWatch.stop();
            if (this.logStartupInfo) {
                (new StartupInfoLogger(this.mainApplicationClass)).logStarted(this.getApplicationLog(), stopWatch);
            }
    // 第七步:发出结束执行的事件
            listeners.started(context);
    // 返回容器
            this.callRunners(context, applicationArguments);
        } catch (Throwable var10) {
            this.handleRunFailure(context, var10, exceptionReporters, listeners);
            throw new IllegalStateException(var10);
        }
        try {
            listeners.running(context);
            return context;
        } catch (Throwable var9) {
            this.handleRunFailure(context, var9, exceptionReporters, (SpringApplicationRunListeners) null);
            throw new IllegalStateException(var9);
        }
    }
從上述原始碼可以看出,專案初始化啟動過程大致包含以下部分:
第一步:取得並啟動監聽器
this.getRunListeners (args)和listeners.starting()方法主要用於取得SpringApplication實例初始化過程中初始化的SpringApplicationRunListener監聽器並執行。
第二步:根據SpringApplicationRunListeners以及參數來準備環境
this.prepareEnvironment(listeners, applicationArguments)方法主要用於對專案運行環境進行預設置,同時透過this.configureIgnoreBeanInfo(environment )方法排除一些不需要的運行環境
第三步:建立Spring容器
根據webApplicationType進行判斷, 決定容器類型,如果該類型為SERVLET類型,會透過反射來裝載對應的字節碼,也就是AnnotationConfigServletWebServerApplicationContext,接著使用先前初始化設定的context(應用上下文環境)、environment(專案運行環境)、listeners(運行監聽器)、applicationArguments(專案參數)和printedBanner(專案圖示資訊)進行應用上下文的組裝配置,並刷新配置
第四步:Spring容器前置處理
這一步主要是在容器刷新之前的準備動作。設定容器環境,包括各種變數等等,其中包含一個非常關鍵的操作:將啟動類別注入容器,為後續開啟自動化配置奠定基礎
第五步:刷新容器
開啟刷新spring容器,透過refresh方法對整個IOC容器的初始化(包括bean資源的定位,解析,註冊等等),同時向JVM運行時註冊一個關機鉤子,在JVM關機時會關閉這個上下文,除非當時它已經關閉
第六步:Spring容器後置處理
擴展接口,設計模式中的模板方法,預設為空實現。如果有自訂需求,可以重寫該方法。例如列印一些啟動結束log,或一些其它後置處理。
第七步驟:發出結束執行的事件
取得EventPublishingRunListener監聽器,並執行其started方法,並且將建立的Spring容器傳進去了,建立一個ApplicationStartedEvent事件,並執行ConfigurableApplicationContext的
publishEvent方法,也就是說這裡是在Spring容器中發布事件,並不是在SpringApplication中發布事件,和前面的starting是不同的,前面的starting是直接向SpringApplication中的監聽器發布啟動事件。
第八步驟:執行Runners
##用於呼叫專案中自訂的執行器XxxRunner類,使得在專案啟動完成後立即執行一些特定程式。其中,Spring Boot提供的執行器介面有ApplicationRunner 和CommandLineRunner兩種,在使用時只需要自訂一個執行器類別實作其中一個介面並重寫對應的run()方法接口,然後Spring Boot專案啟動後會立即執行這些特定程式
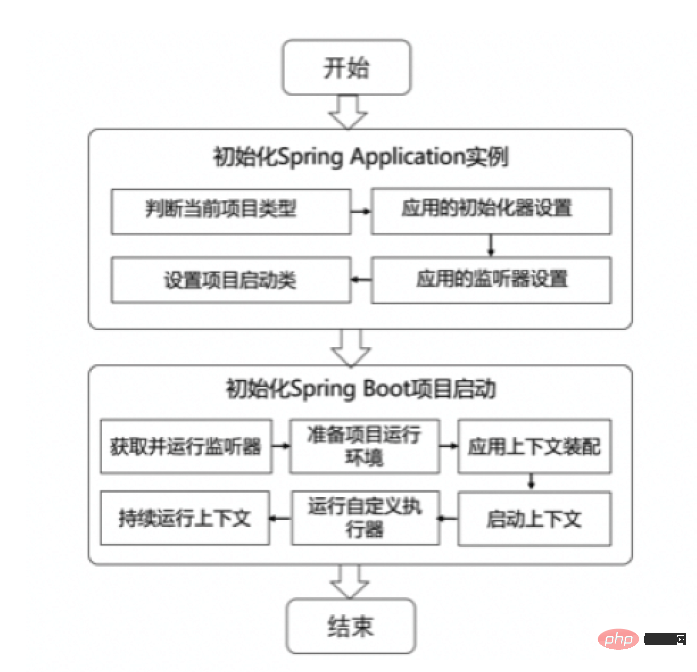
下面,透過一個Spring Boot執行流程圖,讓大家更清楚的知道Spring Boot的整體執行流程和主要啟動階段:

以上是SpringBoot執行過程實例分析的詳細內容。更多資訊請關注PHP中文網其他相關文章!

