Python多執行緒、多行程詳細整理
- WBOYWBOYWBOYWBOYWBOYWBOYWBOYWBOYWBOYWBOYWBOYWBOYWB轉載
- 2023-04-15 20:07:011452瀏覽

執行緒與行程的差異
#行程(process)和執行緒(thread)是作業系統的基本概念,但是它們比較抽象,不容易掌握。關於多進程和多線程,教科書上最經典的一句話是「進程是資源分配的最小單位,線程是CPU調度的最小單位」。執行緒是程式中一個單一的順序控制流程。進程內一個相對獨立的、可調度的執行單元,是系統獨立調度和分派CPU的基本單位指運作中的程式的調度單位。在單一程式中同時執行多個執行緒完成不同的工作,稱為多執行緒。
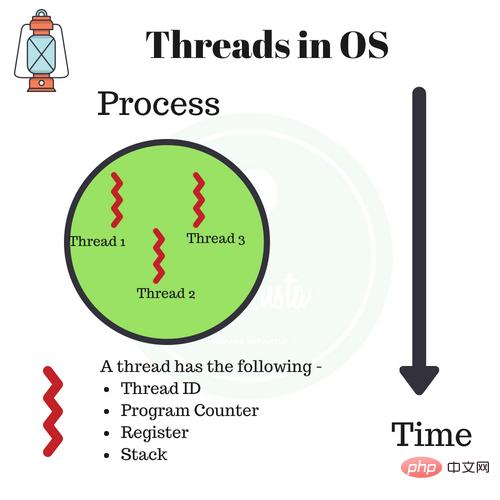
行程與執行緒差異
進程是資源分配的基本單位。所有與該進程有關的資源,都被記錄在進程控制塊PCB中。以表示該進程擁有這些資源或正在使用它們。另外,進程也是搶佔處理機的調度單位,它擁有一個完整的虛擬位址空間。當行程發生調度時,不同的行程擁有不同的虛擬位址空間,而同一行程內的不同執行緒共用相同位址空間。
與進程相對應,執行緒與資源分配無關,它屬於某一個進程,並與進程內的其他執行緒一起共享進程的資源。執行緒只由相關堆疊(系統堆疊或使用者堆疊)暫存器和執行緒控製表TCB組成。暫存器可被用來儲存線程內的局部變量,但不能儲存其他線程的相關變數。
通常在一個行程中可以包含若干個執行緒,它們可以利用行程所擁有的資源。在引進執行緒的作業系統中,通常都是把行程當作分配資源的基本單位,而把執行緒當作獨立運作和獨立調度的基本單位。
由於執行緒比進程更小,基本上不擁有系統資源,故對它的調度所付出的開銷就會小得多,能更有效率的提高系統內多個程式間並發執行的程度,從而顯著提高系統資源的利用率和吞吐量。
因而近年來推出的通用作業系統都引入了線程,以便進一步提高系統的並發性,並把它視為現代作業系統的一個重要指標。
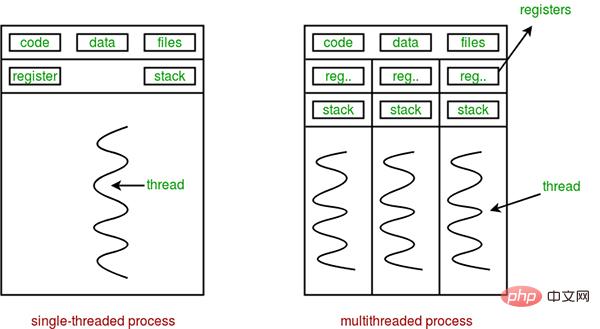
執行緒與進程的差異可以歸納為以下4點:
- 位址空間與其它資源(如開啟檔案):進程間相互獨立,同一進程的各執行緒間共享。某進程內的執行緒在其它進程不可見。
- 通訊:進程間通訊IPC,執行緒間可以直接讀寫進程資料段(如全域變數)來進行通訊-需要進程同步和互斥手段的輔助,以確保資料的一致性。
- 調度和切換:線程上下文切換比進程上下文切換快得多。
- 在多執行緒OS中,行程不是一個可執行的實體。
多重行程與多執行緒的比較
#比較維度 |
多行程 |
多執行緒 |
總結 |
#資料共享、同步 |
資料共享複雜,同步簡單 |
資料共享簡單,同步複雜 |
各有優劣 |
記憶體、CPU |
#佔用記憶體多,切換複雜,CPU利用率低 |
佔用記憶體少,切換簡單,CPU利用率高 |
執行緒佔優 |
創建、銷毀、切換 |
複雜,速度慢 |
#簡單,速度快 |
線程佔優 |
程式設計、偵錯 |
程式簡單,偵錯簡單 |
程式設計複雜,調試複雜 |
進程佔優 |
可靠性 |
################################################################### ###進程間不會互相影響### | 一個執行緒掛掉會導致整個進程掛掉 |
進程佔優 |
| ##分散式 | 適用於多核心、多機,擴展到多台機器簡單 | 適合多核心 |
| 進程佔優
總結,進程和執行緒也可以類比為火車和車廂:
- 執行緒在進程下行進(單純的車廂無法運行)
- 一個行程可以包含多個執行緒(一輛火車可以有多個車廂)
- 不同進程間資料很難共享(一輛火車上的乘客很難換到另外一輛火車,例如站點換乘)
- 同一進程下不同執行緒間資料很易共享(A車廂換到B車廂很容易)
- 行程要比執行緒消耗更多的電腦資源(採用多列火車相比多個車廂更耗資源)
- 進程間不會相互影響,一個線程掛掉將導致整個進程掛掉(一列火車不會影響到另外一列火車,但是如果一列火車上中間的一節車廂著火了,將影響到該班火車的所有車廂)
- 進程可以拓展到多機,進程最多適合多核心(不同火車可以開在多個軌道上,同一火車的車廂不能在行進的不同的軌道上)
- 程序使用的記憶體位址可以上鎖,也就是當一個執行緒使用某些共享記憶體時,其他執行緒必須等它結束,才能使用這一塊記憶體。 (例如火車上的洗手間)-”互斥鎖(mutex)”
- 進程使用的內存地址可以限定使用量(比如火車上的餐廳,最多只允許多少人進入,如果滿了需要在門口等,等有人出來了才能進去)-「信號量(semaphore)」
Python全域解釋器鎖GIL
全域解釋器鎖定(英文:Global Interpreter Lock,縮寫GIL),並不是Python的特性,它是在實作Python解析器(CPython)時所引入的一個概念。由於CPython是大部分環境下預設的Python執行環境。所以在很多人的概念裡CPython就是Python,也就想當然的把GIL歸結為Python語言的缺陷。那麼CPython實作中的GIL又是什麼呢?來看看官方的解釋:
The mechanism used by the CPython interpreter to assure that only one thread executes Python bytecode at a time. This simplifies the CPython implementation byhonma the object metical such as dict) implicitly safe against concurrent access. Locking the entire interpreter makes it easier for the interpreter to be multi-threaded, at the expense of much of the parallelism afforded by multiines#pach執行由Python 虛擬機(也叫解釋器主循環,CPython版本)來控制,Python 在設計之初就考慮到要在解釋器的主循環中,同時只有一個線程在執行,即在任意時刻,只有一個線程在解釋器中運行。對Python 虛擬機器的存取由全域解釋器鎖(GIL)來控制,正是這個鎖能保證同一時刻只有一個執行緒在運作。
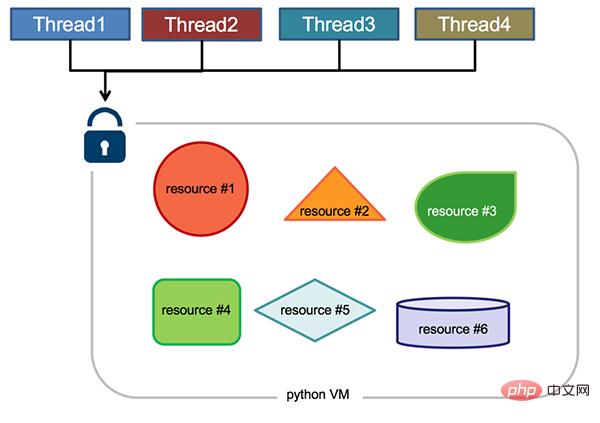 GIL 有什麼好處?簡單來說,它在單線程的情況更快,並且在和 C 庫結合時更方便,而且不用考慮線程安全問題,這也是早期 Python 最常見的應用場景和優勢。另外,GIL的設計簡化了CPython的實現,使得物件模型,包括關鍵的內建類型如字典,都是隱含可以並發存取的。鎖住全域解釋器使得比較容易的實現對多執行緒的支持,但也損失了多處理器主機的平行運算能力。
在多執行緒環境中,Python 虛擬機器會以下列方式執行:
設定GIL- 切換到一個執行緒去執行
- 運行直到指定數量的字節碼指令,或執行緒主動讓出控制(可以呼叫sleep(0))
- 把執行緒設定為睡眠狀態
- 解鎖GIL
- 再次重複以上所有步驟
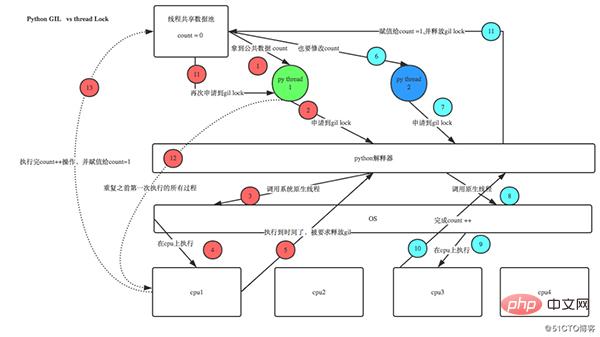 Python3.2前,GIL的釋放邏輯是當前執行緒遇見IO操作或ticks計數達到100(ticks可以看作是python自身的一個計數器,專門做用於GIL,每次釋放後歸零,這個計數可以透過sys.setcheckinterval 來調整),進行釋放。因為計算密集型線程在釋放GIL之後又會立即去申請GIL,並且通常在其它線程還沒有調度完之前它就已經重新獲取到了GIL,就會導致一旦計算密集型線程獲得了GIL,那麼它在很長一段時間內都將佔據GIL,甚至一直到該執行緒執行結束。
Python 3.2開始使用新的GIL。新的GIL實作中用一個固定的超時時間來指示當前的執行緒放棄全域鎖定。在當前執行緒保持這個鎖,且其他執行緒請求這個鎖時,當前執行緒就會在5毫秒後被強制釋放該鎖。此改進在單核心的情況下,對於單一執行緒長期佔用GIL的情況有所改善。
在單核心CPU上,數百次的間隔檢查才會導致一次執行緒切換。在多核心CPU上,有嚴重的線程顛簸(thrashing)。而每次釋放GIL鎖,線程進行鎖競爭、切換線程,會消耗資源。單核心下多線程,每次釋放GIL,喚醒的那個線程都能獲取到GIL鎖,所以能夠無縫執行,但多核心下,CPU0釋放GIL後,其他CPU上的線程都會進行競爭,但GIL可能會馬上又被CPU0拿到,導致其他幾個CPU上被喚醒後的線程會醒著等待到切換時間後又進入待調度狀態,這樣會造成線程顛簸(thrashing),導致效率更低。
另外,從上面的實作機制可以推導出,Python的多執行緒對IO密集型程式碼要比CPU密集型程式碼更友善。
針對GIL的應對措施:
- ## 使用更高版本Python(對GIL機制進行了最佳化)
- 使用多進程替換多執行緒(多進程之間沒有GIL,但是進程本身的資源消耗較多)
- 指定cpu運行線程(使用affinity模組)
- 使用Jython、IronPython等無GIL解釋器
- 全IO密集型任務時才使用多執行緒
- 使用協程(高效率的單執行緒模式,也稱為微線程;通常與多進程配合使用)
- 將關鍵元件用C/C編寫為Python擴展,透過ctypes使Python程式直接呼叫C語言編譯的動態連結函式庫的導出函數。 (with nogil調出GIL限制)
import os
print('Process (%s) start...' % os.getpid())
# Only works on Unix/Linux/Mac:
pid = os.fork()
if pid == 0:
print('I am child process (%s) and my parent is %s.' % (os.getpid(), os.getppid()))
else:
print('I (%s) just created a child process (%s).' % (os.getpid(), pid))
上述程式碼在Linux、Unix和Mac上的執行結果為:Process (876) start... I (876) just created a child process (877). I am child process (877) and my parent is 876.有了fork調用,一個進程在接到新任務時就可以複製出一個子進程來處理新任務,常見的Apache伺服器就是由父進程監聽端口,每當有新的http請求時,就fork出子程序來處理新的http請求。 由於Windows沒有fork調用,上面的程式碼在Windows上無法運作。由於Python是跨平台的,自然也應該提供一個跨平台的多進程支援。 multiprocessing模組就是跨平台版本的多進程模組。 multiprocessing模組封裝了fork()調用,使我們不需要關注fork()的細節。由於Windows沒有fork調用,因此,multiprocessing需要「模擬」出fork的效果。 multiprocessing常用元件及功能
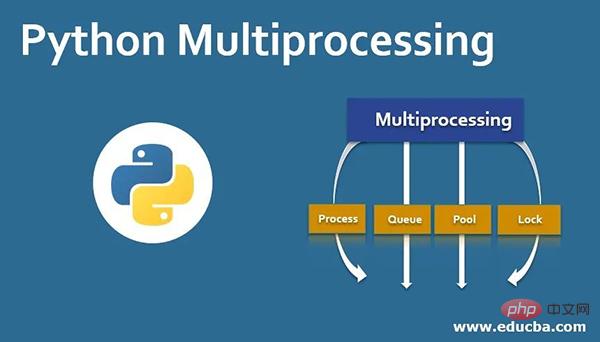
- Process(用於建立程序)
- Pool(用於建立管理進程池)
- Queue(用於進程通信,資源共享)
- Value,Array(用於進程通信,資源共享)
- Pipe(用於管道通訊)
- Manager(用於資源共享)
- Condition(條件變數)
- Event(事件)
- Lock(互斥鎖)
- RLock(可重入的互斥鎖(同一個進程可以多次獲得它,同時不會造成阻塞)
- Semaphore(信號量)
- group:分组,实际上不使用,值始终为None
- target:表示调用对象,即子进程要执行的任务,你可以传入方法名
- name:为子进程设定名称
- args:要传给target函数的位置参数,以元组方式进行传入。
- kwargs:要传给target函数的字典参数,以字典方式进行传入。
实例方法:
- start():启动进程,并调用该子进程中的p.run()
- run():进程启动时运行的方法,正是它去调用target指定的函数,我们自定义类的类中一定要实现该方法
- terminate():强制终止进程p,不会进行任何清理操作,如果p创建了子进程,该子进程就成了僵尸进程,使用该方法需要特别小心这种情况。如果p还保存了一个锁那么也将不会被释放,进而导致死锁
- is_alive():返回进程是否在运行。如果p仍然运行,返回True
- join([timeout]):进程同步,主进程等待子进程完成后再执行后面的代码。线程等待p终止(强调:是主线程处于等的状态,而p是处于运行的状态)。timeout是可选的超时时间(超过这个时间,父线程不再等待子线程,继续往下执行),需要强调的是,p.join只能join住start开启的进程,而不能join住run开启的进程
属性介绍:
- daemon:默认值为False,如果设为True,代表p为后台运行的守护进程;当p的父进程终止时,p也随之终止,并且设定为True后,p不能创建自己的新进程;必须在p.start()之前设置
- name:进程的名称
- pid:进程的pid
- exitcode:进程在运行时为None、如果为–N,表示被信号N结束(了解即可)
- authkey:进程的身份验证键,默认是由os.urandom()随机生成的32字符的字符串。这个键的用途是为涉及网络连接的底层进程间通信提供安全性,这类连接只有在具有相同的身份验证键时才能成功(了解即可)
使用示例:(注意:在windows中Process()必须放到if name == ‘main’:下)
from multiprocessing import Process
import os
def run_proc(name):
print('Run child process %s (%s)...' % (name, os.getpid()))
if __name__=='__main__':
print('Parent process %s.' % os.getpid())
p = Process(target=run_proc, args=('test',))
print('Child process will start.')
p.start()
p.join()
print('Child process end.')
Pool(用于创建管理进程池)
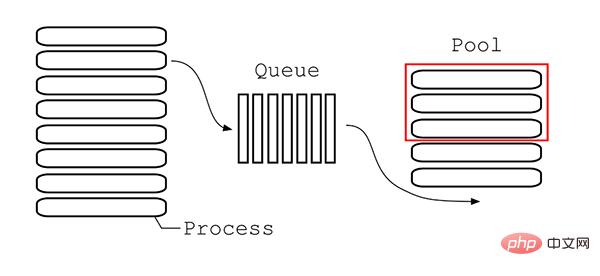
Pool类用于需要执行的目标很多,而手动限制进程数量又太繁琐时,如果目标少且不用控制进程数量则可以用Process类。Pool可以提供指定数量的进程,供用户调用,当有新的请求提交到Pool中时,如果池还没有满,那么就会创建一个新的进程用来执行该请求;但如果池中的进程数已经达到规定最大值,那么该请求就会等待,直到池中有进程结束,就重用进程池中的进程。
构造方法:Pool([processes[, initializer[, initargs[, maxtasksperchild[, context]]]]])
- processes :要创建的进程数,如果省略,将默认使用cpu_count()返回的数量。
- initializer:每个工作进程启动时要执行的可调用对象,默认为None。如果initializer是None,那么每一个工作进程在开始的时候会调用initializer(*initargs)。
- initargs:是要传给initializer的参数组。
- maxtasksperchild:工作进程退出之前可以完成的任务数,完成后用一个新的工作进程来替代原进程,来让闲置的资源被释放。maxtasksperchild默认是None,意味着只要Pool存在工作进程就会一直存活。
- context: 用在制定工作进程启动时的上下文,一般使用Pool() 或者一个context对象的Pool()方法来创建一个池,两种方法都适当的设置了context。
实例方法:
- apply(func[, args[, kwargs]]):在一个池工作进程中执行func(args,*kwargs),然后返回结果。需要强调的是:此操作并不会在所有池工作进程中并执行func函数。如果要通过不同参数并发地执行func函数,必须从不同线程调用p.apply()函数或者使用p.apply_async()。它是阻塞的。apply很少使用
- apply_async(func[, arg[, kwds={}[, callback=None]]]):在一个池工作进程中执行func(args,*kwargs),然后返回结果。此方法的结果是AsyncResult类的实例,callback是可调用对象,接收输入参数。当func的结果变为可用时,将理解传递给callback。callback禁止执行任何阻塞操作,否则将接收其他异步操作中的结果。它是非阻塞。
- map(func, iterable[, chunksize=None]):Pool类中的map方法,与内置的map函数用法行为基本一致,它会使进程阻塞直到返回结果。注意,虽然第二个参数是一个迭代器,但在实际使用中,必须在整个队列都就绪后,程序才会运行子进程。
- map_async(func, iterable[, chunksize=None]):map_async与map的关系同apply与apply_async
- imap():imap 与 map的区别是,map是当所有的进程都已经执行完了,并将结果返回了,imap()则是立即返回一个iterable可迭代对象。
- imap_unordered():不保证返回的结果顺序与进程添加的顺序一致。
- close():关闭进程池,防止进一步操作。如果所有操作持续挂起,它们将在工作进程终止前完成。
- join():等待所有工作进程退出。此方法只能在close()或teminate()之后调用,让其不再接受新的Process。
- terminate():结束工作进程,不再处理未处理的任务。
方法apply_async()和map_async()的返回值是AsyncResul的实例obj。实例具有以下方法:
- get():返回结果,如果有必要则等待结果到达。timeout是可选的。如果在指定时间内还没有到达,将引发异常。如果远程操作中引发了异常,它将在调用此方法时再次被引发。
- ready():如果调用完成,返回True
- successful():如果调用完成且没有引发异常,返回True,如果在结果就绪之前调用此方法,引发异常
- wait([timeout]):等待结果变为可用。
- terminate():立即终止所有工作进程,同时不执行任何清理或结束任何挂起工作。如果p被垃圾回收,将自动调用此函数
<span style="color: rgb(106, 115, 125); margin: 0px; padding: 0px; background: none 0% 0% / auto repeat scroll padding-box border-box rgba(0, 0, 0, 0);"># -*- coding:utf-8 -*-</span><br><span style="color: rgb(89, 89, 89); margin: 0px; padding: 0px; background: none 0% 0% / auto repeat scroll padding-box border-box rgba(0, 0, 0, 0);">Queue(用于进程通信,资源共享)</span><br><span style="color: rgb(106, 115, 125); margin: 0px; padding: 0px; background: none 0% 0% / auto repeat scroll padding-box border-box rgba(0, 0, 0, 0);"># Pool+map</span><br><span style="color: rgb(215, 58, 73); margin: 0px; padding: 0px; background: none 0% 0% / auto repeat scroll padding-box border-box rgba(0, 0, 0, 0);">from</span> <span style="color: rgb(89, 89, 89); margin: 0px; padding: 0px; background: none 0% 0% / auto repeat scroll padding-box border-box rgba(0, 0, 0, 0);">multiprocessing</span> <span style="color: rgb(215, 58, 73); margin: 0px; padding: 0px; background: none 0% 0% / auto repeat scroll padding-box border-box rgba(0, 0, 0, 0);">import</span> <span style="color: rgb(89, 89, 89); margin: 0px; padding: 0px; background: none 0% 0% / auto repeat scroll padding-box border-box rgba(0, 0, 0, 0);">Pool</span><br><span style="color: rgb(215, 58, 73); margin: 0px; padding: 0px; background: none 0% 0% / auto repeat scroll padding-box border-box rgba(0, 0, 0, 0);">def</span> <span style="color: rgb(0, 92, 197); margin: 0px; padding: 0px; background: none 0% 0% / auto repeat scroll padding-box border-box rgba(0, 0, 0, 0);">test</span>(<span style="color: rgb(89, 89, 89); margin: 0px; padding: 0px; background: none 0% 0% / auto repeat scroll padding-box border-box rgba(0, 0, 0, 0);">i</span>):<br><span style="color: rgb(111, 66, 193); margin: 0px; padding: 0px; background: none 0% 0% / auto repeat scroll padding-box border-box rgba(0, 0, 0, 0);">print</span>(<span style="color: rgb(89, 89, 89); margin: 0px; padding: 0px; background: none 0% 0% / auto repeat scroll padding-box border-box rgba(0, 0, 0, 0);">i</span>)<br><span style="color: rgb(215, 58, 73); margin: 0px; padding: 0px; background: none 0% 0% / auto repeat scroll padding-box border-box rgba(0, 0, 0, 0);">if</span> <span style="color: rgb(89, 89, 89); margin: 0px; padding: 0px; background: none 0% 0% / auto repeat scroll padding-box border-box rgba(0, 0, 0, 0);">__name__</span> <span style="color: rgb(215, 58, 73); margin: 0px; padding: 0px; background: none 0% 0% / auto repeat scroll padding-box border-box rgba(0, 0, 0, 0);">==</span> <span style="color: rgb(102, 153, 0); margin: 0px; padding: 0px; background: none 0% 0% / auto repeat scroll padding-box border-box rgba(0, 0, 0, 0);">"__main__"</span>:<br><span style="color: rgb(89, 89, 89); margin: 0px; padding: 0px; background: none 0% 0% / auto repeat scroll padding-box border-box rgba(0, 0, 0, 0);">lists</span> <span style="color: rgb(215, 58, 73); margin: 0px; padding: 0px; background: none 0% 0% / auto repeat scroll padding-box border-box rgba(0, 0, 0, 0);">=</span> <span style="color: rgb(111, 66, 193); margin: 0px; padding: 0px; background: none 0% 0% / auto repeat scroll padding-box border-box rgba(0, 0, 0, 0);">range</span>(<span style="color: rgb(0, 92, 197); margin: 0px; padding: 0px; background: none 0% 0% / auto repeat scroll padding-box border-box rgba(0, 0, 0, 0);">100</span>)<br><span style="color: rgb(89, 89, 89); margin: 0px; padding: 0px; background: none 0% 0% / auto repeat scroll padding-box border-box rgba(0, 0, 0, 0);">pool</span> <span style="color: rgb(215, 58, 73); margin: 0px; padding: 0px; background: none 0% 0% / auto repeat scroll padding-box border-box rgba(0, 0, 0, 0);">=</span> <span style="color: rgb(89, 89, 89); margin: 0px; padding: 0px; background: none 0% 0% / auto repeat scroll padding-box border-box rgba(0, 0, 0, 0);">Pool</span>(<span style="color: rgb(0, 92, 197); margin: 0px; padding: 0px; background: none 0% 0% / auto repeat scroll padding-box border-box rgba(0, 0, 0, 0);">8</span>)<br><span style="color: rgb(89, 89, 89); margin: 0px; padding: 0px; background: none 0% 0% / auto repeat scroll padding-box border-box rgba(0, 0, 0, 0);">pool</span>.<span style="color: rgb(0, 92, 197); margin: 0px; padding: 0px; background: none 0% 0% / auto repeat scroll padding-box border-box rgba(0, 0, 0, 0);">map</span>(<span style="color: rgb(89, 89, 89); margin: 0px; padding: 0px; background: none 0% 0% / auto repeat scroll padding-box border-box rgba(0, 0, 0, 0);">test</span>, <span style="color: rgb(89, 89, 89); margin: 0px; padding: 0px; background: none 0% 0% / auto repeat scroll padding-box border-box rgba(0, 0, 0, 0);">lists</span>)<br><span style="color: rgb(89, 89, 89); margin: 0px; padding: 0px; background: none 0% 0% / auto repeat scroll padding-box border-box rgba(0, 0, 0, 0);">pool</span>.<span style="color: rgb(0, 92, 197); margin: 0px; padding: 0px; background: none 0% 0% / auto repeat scroll padding-box border-box rgba(0, 0, 0, 0);">close</span>()<br><span style="color: rgb(89, 89, 89); margin: 0px; padding: 0px; background: none 0% 0% / auto repeat scroll padding-box border-box rgba(0, 0, 0, 0);">pool</span>.<span style="color: rgb(0, 92, 197); margin: 0px; padding: 0px; background: none 0% 0% / auto repeat scroll padding-box border-box rgba(0, 0, 0, 0);">join</span>()<br>
<span style="color: rgb(106, 115, 125); margin: 0px; padding: 0px; background: none 0% 0% / auto repeat scroll padding-box border-box rgba(0, 0, 0, 0);"># -*- coding:utf-8 -*-</span><br><span style="color: rgb(106, 115, 125); margin: 0px; padding: 0px; background: none 0% 0% / auto repeat scroll padding-box border-box rgba(0, 0, 0, 0);"># 异步进程池(非阻塞)</span><br><span style="color: rgb(215, 58, 73); margin: 0px; padding: 0px; background: none 0% 0% / auto repeat scroll padding-box border-box rgba(0, 0, 0, 0);">from</span> <span style="color: rgb(89, 89, 89); margin: 0px; padding: 0px; background: none 0% 0% / auto repeat scroll padding-box border-box rgba(0, 0, 0, 0);">multiprocessing</span> <span style="color: rgb(215, 58, 73); margin: 0px; padding: 0px; background: none 0% 0% / auto repeat scroll padding-box border-box rgba(0, 0, 0, 0);">import</span> <span style="color: rgb(89, 89, 89); margin: 0px; padding: 0px; background: none 0% 0% / auto repeat scroll padding-box border-box rgba(0, 0, 0, 0);">Pool</span><br><span style="color: rgb(215, 58, 73); margin: 0px; padding: 0px; background: none 0% 0% / auto repeat scroll padding-box border-box rgba(0, 0, 0, 0);">def</span> <span style="color: rgb(0, 92, 197); margin: 0px; padding: 0px; background: none 0% 0% / auto repeat scroll padding-box border-box rgba(0, 0, 0, 0);">test</span>(<span style="color: rgb(89, 89, 89); margin: 0px; padding: 0px; background: none 0% 0% / auto repeat scroll padding-box border-box rgba(0, 0, 0, 0);">i</span>):<br><span style="color: rgb(111, 66, 193); margin: 0px; padding: 0px; background: none 0% 0% / auto repeat scroll padding-box border-box rgba(0, 0, 0, 0);">print</span>(<span style="color: rgb(89, 89, 89); margin: 0px; padding: 0px; background: none 0% 0% / auto repeat scroll padding-box border-box rgba(0, 0, 0, 0);">i</span>)<br><span style="color: rgb(215, 58, 73); margin: 0px; padding: 0px; background: none 0% 0% / auto repeat scroll padding-box border-box rgba(0, 0, 0, 0);">if</span> <span style="color: rgb(89, 89, 89); margin: 0px; padding: 0px; background: none 0% 0% / auto repeat scroll padding-box border-box rgba(0, 0, 0, 0);">__name__</span> <span style="color: rgb(215, 58, 73); margin: 0px; padding: 0px; background: none 0% 0% / auto repeat scroll padding-box border-box rgba(0, 0, 0, 0);">==</span> <span style="color: rgb(102, 153, 0); margin: 0px; padding: 0px; background: none 0% 0% / auto repeat scroll padding-box border-box rgba(0, 0, 0, 0);">"__main__"</span>:<br><span style="color: rgb(89, 89, 89); margin: 0px; padding: 0px; background: none 0% 0% / auto repeat scroll padding-box border-box rgba(0, 0, 0, 0);">pool</span> <span style="color: rgb(215, 58, 73); margin: 0px; padding: 0px; background: none 0% 0% / auto repeat scroll padding-box border-box rgba(0, 0, 0, 0);">=</span> <span style="color: rgb(89, 89, 89); margin: 0px; padding: 0px; background: none 0% 0% / auto repeat scroll padding-box border-box rgba(0, 0, 0, 0);">Pool</span>(<span style="color: rgb(0, 92, 197); margin: 0px; padding: 0px; background: none 0% 0% / auto repeat scroll padding-box border-box rgba(0, 0, 0, 0);">8</span>)<br><span style="color: rgb(215, 58, 73); margin: 0px; padding: 0px; background: none 0% 0% / auto repeat scroll padding-box border-box rgba(0, 0, 0, 0);">for</span> <span style="color: rgb(89, 89, 89); margin: 0px; padding: 0px; background: none 0% 0% / auto repeat scroll padding-box border-box rgba(0, 0, 0, 0);">i</span> <span style="color: rgb(215, 58, 73); margin: 0px; padding: 0px; background: none 0% 0% / auto repeat scroll padding-box border-box rgba(0, 0, 0, 0);">in</span> <span style="color: rgb(111, 66, 193); margin: 0px; padding: 0px; background: none 0% 0% / auto repeat scroll padding-box border-box rgba(0, 0, 0, 0);">range</span>(<span style="color: rgb(0, 92, 197); margin: 0px; padding: 0px; background: none 0% 0% / auto repeat scroll padding-box border-box rgba(0, 0, 0, 0);">100</span>):<br><span style="color: rgb(102, 153, 0); margin: 0px; padding: 0px; background: none 0% 0% / auto repeat scroll padding-box border-box rgba(0, 0, 0, 0);">'''</span><br><span style="color: rgb(102, 153, 0); margin: 0px; padding: 0px; background: none 0% 0% / auto repeat scroll padding-box border-box rgba(0, 0, 0, 0);">For循环中执行步骤:</span><br><span style="color: rgb(102, 153, 0); margin: 0px; padding: 0px; background: none 0% 0% / auto repeat scroll padding-box border-box rgba(0, 0, 0, 0);">(1)循环遍历,将100个子进程添加到进程池(相对父进程会阻塞)</span><br><span style="color: rgb(102, 153, 0); margin: 0px; padding: 0px; background: none 0% 0% / auto repeat scroll padding-box border-box rgba(0, 0, 0, 0);">(2)每次执行8个子进程,等一个子进程执行完后,立马启动新的子进程。(相对父进程不阻塞)</span><br><span style="color: rgb(102, 153, 0); margin: 0px; padding: 0px; background: none 0% 0% / auto repeat scroll padding-box border-box rgba(0, 0, 0, 0);">apply_async为异步进程池写法。异步指的是启动子进程的过程,与父进程本身的执行(print)是异步的,而For循环中往进程池添加子进程的过程,与父进程本身的执行却是同步的。</span><br><span style="color: rgb(102, 153, 0); margin: 0px; padding: 0px; background: none 0% 0% / auto repeat scroll padding-box border-box rgba(0, 0, 0, 0);">'''</span><br><span style="color: rgb(89, 89, 89); margin: 0px; padding: 0px; background: none 0% 0% / auto repeat scroll padding-box border-box rgba(0, 0, 0, 0);">pool</span>.<span style="color: rgb(0, 92, 197); margin: 0px; padding: 0px; background: none 0% 0% / auto repeat scroll padding-box border-box rgba(0, 0, 0, 0);">apply_async</span>(<span style="color: rgb(89, 89, 89); margin: 0px; padding: 0px; background: none 0% 0% / auto repeat scroll padding-box border-box rgba(0, 0, 0, 0);">test</span>, <span style="color: rgb(89, 89, 89); margin: 0px; padding: 0px; background: none 0% 0% / auto repeat scroll padding-box border-box rgba(0, 0, 0, 0);">args</span><span style="color: rgb(215, 58, 73); margin: 0px; padding: 0px; background: none 0% 0% / auto repeat scroll padding-box border-box rgba(0, 0, 0, 0);">=</span>(<span style="color: rgb(89, 89, 89); margin: 0px; padding: 0px; background: none 0% 0% / auto repeat scroll padding-box border-box rgba(0, 0, 0, 0);">i</span>,))<span style="color: rgb(106, 115, 125); margin: 0px; padding: 0px; background: none 0% 0% / auto repeat scroll padding-box border-box rgba(0, 0, 0, 0);"># 维持执行的进程总数为8,当一个进程执行完后启动一个新进程.</span><br><span style="color: rgb(111, 66, 193); margin: 0px; padding: 0px; background: none 0% 0% / auto repeat scroll padding-box border-box rgba(0, 0, 0, 0);">print</span>(<span style="color: rgb(102, 153, 0); margin: 0px; padding: 0px; background: none 0% 0% / auto repeat scroll padding-box border-box rgba(0, 0, 0, 0);">"test"</span>)<br><span style="color: rgb(89, 89, 89); margin: 0px; padding: 0px; background: none 0% 0% / auto repeat scroll padding-box border-box rgba(0, 0, 0, 0);">pool</span>.<span style="color: rgb(0, 92, 197); margin: 0px; padding: 0px; background: none 0% 0% / auto repeat scroll padding-box border-box rgba(0, 0, 0, 0);">close</span>()<br><span style="color: rgb(89, 89, 89); margin: 0px; padding: 0px; background: none 0% 0% / auto repeat scroll padding-box border-box rgba(0, 0, 0, 0);">pool</span>.<span style="color: rgb(0, 92, 197); margin: 0px; padding: 0px; background: none 0% 0% / auto repeat scroll padding-box border-box rgba(0, 0, 0, 0);">join</span>()<br>
<span style="color: rgb(106, 115, 125); margin: 0px; padding: 0px; background: none 0% 0% / auto repeat scroll padding-box border-box rgba(0, 0, 0, 0);"># -*- coding:utf-8 -*-</span><br><span style="color: rgb(106, 115, 125); margin: 0px; padding: 0px; background: none 0% 0% / auto repeat scroll padding-box border-box rgba(0, 0, 0, 0);"># 异步进程池(非阻塞)</span><br><span style="color: rgb(215, 58, 73); margin: 0px; padding: 0px; background: none 0% 0% / auto repeat scroll padding-box border-box rgba(0, 0, 0, 0);">from</span> <span style="color: rgb(89, 89, 89); margin: 0px; padding: 0px; background: none 0% 0% / auto repeat scroll padding-box border-box rgba(0, 0, 0, 0);">multiprocessing</span> <span style="color: rgb(215, 58, 73); margin: 0px; padding: 0px; background: none 0% 0% / auto repeat scroll padding-box border-box rgba(0, 0, 0, 0);">import</span> <span style="color: rgb(89, 89, 89); margin: 0px; padding: 0px; background: none 0% 0% / auto repeat scroll padding-box border-box rgba(0, 0, 0, 0);">Pool</span><br><span style="color: rgb(215, 58, 73); margin: 0px; padding: 0px; background: none 0% 0% / auto repeat scroll padding-box border-box rgba(0, 0, 0, 0);">def</span> <span style="color: rgb(0, 92, 197); margin: 0px; padding: 0px; background: none 0% 0% / auto repeat scroll padding-box border-box rgba(0, 0, 0, 0);">test</span>(<span style="color: rgb(89, 89, 89); margin: 0px; padding: 0px; background: none 0% 0% / auto repeat scroll padding-box border-box rgba(0, 0, 0, 0);">i</span>):<br><span style="color: rgb(111, 66, 193); margin: 0px; padding: 0px; background: none 0% 0% / auto repeat scroll padding-box border-box rgba(0, 0, 0, 0);">print</span>(<span style="color: rgb(89, 89, 89); margin: 0px; padding: 0px; background: none 0% 0% / auto repeat scroll padding-box border-box rgba(0, 0, 0, 0);">i</span>)<br><span style="color: rgb(215, 58, 73); margin: 0px; padding: 0px; background: none 0% 0% / auto repeat scroll padding-box border-box rgba(0, 0, 0, 0);">if</span> <span style="color: rgb(89, 89, 89); margin: 0px; padding: 0px; background: none 0% 0% / auto repeat scroll padding-box border-box rgba(0, 0, 0, 0);">__name__</span> <span style="color: rgb(215, 58, 73); margin: 0px; padding: 0px; background: none 0% 0% / auto repeat scroll padding-box border-box rgba(0, 0, 0, 0);">==</span> <span style="color: rgb(102, 153, 0); margin: 0px; padding: 0px; background: none 0% 0% / auto repeat scroll padding-box border-box rgba(0, 0, 0, 0);">"__main__"</span>:<br><span style="color: rgb(89, 89, 89); margin: 0px; padding: 0px; background: none 0% 0% / auto repeat scroll padding-box border-box rgba(0, 0, 0, 0);">pool</span> <span style="color: rgb(215, 58, 73); margin: 0px; padding: 0px; background: none 0% 0% / auto repeat scroll padding-box border-box rgba(0, 0, 0, 0);">=</span> <span style="color: rgb(89, 89, 89); margin: 0px; padding: 0px; background: none 0% 0% / auto repeat scroll padding-box border-box rgba(0, 0, 0, 0);">Pool</span>(<span style="color: rgb(0, 92, 197); margin: 0px; padding: 0px; background: none 0% 0% / auto repeat scroll padding-box border-box rgba(0, 0, 0, 0);">8</span>)<br><span style="color: rgb(215, 58, 73); margin: 0px; padding: 0px; background: none 0% 0% / auto repeat scroll padding-box border-box rgba(0, 0, 0, 0);">for</span> <span style="color: rgb(89, 89, 89); margin: 0px; padding: 0px; background: none 0% 0% / auto repeat scroll padding-box border-box rgba(0, 0, 0, 0);">i</span> <span style="color: rgb(215, 58, 73); margin: 0px; padding: 0px; background: none 0% 0% / auto repeat scroll padding-box border-box rgba(0, 0, 0, 0);">in</span> <span style="color: rgb(111, 66, 193); margin: 0px; padding: 0px; background: none 0% 0% / auto repeat scroll padding-box border-box rgba(0, 0, 0, 0);">range</span>(<span style="color: rgb(0, 92, 197); margin: 0px; padding: 0px; background: none 0% 0% / auto repeat scroll padding-box border-box rgba(0, 0, 0, 0);">100</span>):<br><span style="color: rgb(102, 153, 0); margin: 0px; padding: 0px; background: none 0% 0% / auto repeat scroll padding-box border-box rgba(0, 0, 0, 0);">'''</span><br><span style="color: rgb(102, 153, 0); margin: 0px; padding: 0px; background: none 0% 0% / auto repeat scroll padding-box border-box rgba(0, 0, 0, 0);">实际测试发现,for循环内部执行步骤:</span><br><span style="color: rgb(102, 153, 0); margin: 0px; padding: 0px; background: none 0% 0% / auto repeat scroll padding-box border-box rgba(0, 0, 0, 0);">(1)遍历100个可迭代对象,往进程池放一个子进程</span><br><span style="color: rgb(102, 153, 0); margin: 0px; padding: 0px; background: none 0% 0% / auto repeat scroll padding-box border-box rgba(0, 0, 0, 0);">(2)执行这个子进程,等子进程执行完毕,再往进程池放一个子进程,再执行。(同时只执行一个子进程)</span><br><span style="color: rgb(102, 153, 0); margin: 0px; padding: 0px; background: none 0% 0% / auto repeat scroll padding-box border-box rgba(0, 0, 0, 0);">for循环执行完毕,再执行print函数。</span><br><span style="color: rgb(102, 153, 0); margin: 0px; padding: 0px; background: none 0% 0% / auto repeat scroll padding-box border-box rgba(0, 0, 0, 0);">'''</span><br><span style="color: rgb(89, 89, 89); margin: 0px; padding: 0px; background: none 0% 0% / auto repeat scroll padding-box border-box rgba(0, 0, 0, 0);">pool</span>.<span style="color: rgb(0, 92, 197); margin: 0px; padding: 0px; background: none 0% 0% / auto repeat scroll padding-box border-box rgba(0, 0, 0, 0);">apply</span>(<span style="color: rgb(89, 89, 89); margin: 0px; padding: 0px; background: none 0% 0% / auto repeat scroll padding-box border-box rgba(0, 0, 0, 0);">test</span>, <span style="color: rgb(89, 89, 89); margin: 0px; padding: 0px; background: none 0% 0% / auto repeat scroll padding-box border-box rgba(0, 0, 0, 0);">args</span><span style="color: rgb(215, 58, 73); margin: 0px; padding: 0px; background: none 0% 0% / auto repeat scroll padding-box border-box rgba(0, 0, 0, 0);">=</span>(<span style="color: rgb(89, 89, 89); margin: 0px; padding: 0px; background: none 0% 0% / auto repeat scroll padding-box border-box rgba(0, 0, 0, 0);">i</span>,))<span style="color: rgb(106, 115, 125); margin: 0px; padding: 0px; background: none 0% 0% / auto repeat scroll padding-box border-box rgba(0, 0, 0, 0);"># 维持执行的进程总数为8,当一个进程执行完后启动一个新进程.</span><br><span style="color: rgb(111, 66, 193); margin: 0px; padding: 0px; background: none 0% 0% / auto repeat scroll padding-box border-box rgba(0, 0, 0, 0);">print</span>(<span style="color: rgb(102, 153, 0); margin: 0px; padding: 0px; background: none 0% 0% / auto repeat scroll padding-box border-box rgba(0, 0, 0, 0);">"test"</span>)<br><span style="color: rgb(89, 89, 89); margin: 0px; padding: 0px; background: none 0% 0% / auto repeat scroll padding-box border-box rgba(0, 0, 0, 0);">pool</span>.<span style="color: rgb(0, 92, 197); margin: 0px; padding: 0px; background: none 0% 0% / auto repeat scroll padding-box border-box rgba(0, 0, 0, 0);">close</span>()<br><span style="color: rgb(89, 89, 89); margin: 0px; padding: 0px; background: none 0% 0% / auto repeat scroll padding-box border-box rgba(0, 0, 0, 0);">pool</span>.<span style="color: rgb(0, 92, 197); margin: 0px; padding: 0px; background: none 0% 0% / auto repeat scroll padding-box border-box rgba(0, 0, 0, 0);">join</span>()<br>
Queue(用于进程通信,资源共享)
在使用多进程的过程中,最好不要使用共享资源。普通的全局变量是不能被子进程所共享的,只有通过Multiprocessing组件构造的数据结构可以被共享。
Queue是用来创建进程间资源共享的队列的类,使用Queue可以达到多进程间数据传递的功能(缺点:只适用Process类,不能在Pool进程池中使用)。
构造方法:Queue([maxsize])
- maxsize是队列中允许最大项数,省略则无大小限制。
实例方法:
- put():用以插入数据到队列。put方法还有两个可选参数:blocked和timeout。如果blocked为True(默认值),并且timeout为正值,该方法会阻塞timeout指定的时间,直到该队列有剩余的空间。如果超时,会抛出Queue.Full异常。如果blocked为False,但该Queue已满,会立即抛出Queue.Full异常。
- get():可以从队列读取并且删除一个元素。get方法有两个可选参数:blocked和timeout。如果blocked为True(默认值),并且timeout为正值,那么在等待时间内没有取到任何元素,会抛出Queue.Empty异常。如果blocked为False,有两种情况存在,如果Queue有一个值可用,则立即返回该值,否则,如果队列为空,则立即抛出Queue.Empty异常。若不希望在empty的时候抛出异常,令blocked为True或者参数全部置空即可。
- get_nowait():同q.get(False)
- put_nowait():同q.put(False)
- empty():调用此方法时q为空则返回True,该结果不可靠,比如在返回True的过程中,如果队列中又加入了项目。
- full():调用此方法时q已满则返回True,该结果不可靠,比如在返回True的过程中,如果队列中的项目被取走。
- qsize():返回队列中目前项目的正确数量,结果也不可靠,理由同q.empty()和q.full()一样
使用示例:
from multiprocessing import Process, Queue
import os, time, random
def write(q):
print('Process to write: %s' % os.getpid())
for value in ['A', 'B', 'C']:
print('Put %s to queue...' % value)
q.put(value)
time.sleep(random.random())
def read(q):
print('Process to read: %s' % os.getpid())
while True:
value = q.get(True)
print('Get %s from queue.' % value)
if __name__ == "__main__":
q = Queue()
pw = Process(target=write, args=(q,))
pr = Process(target=read, args=(q,))
pw.start()
pr.start()
pw.join()# 等待pw结束
pr.terminate()# pr进程里是死循环,无法等待其结束,只能强行终止
JoinableQueue就像是一个Queue对象,但队列允许项目的使用者通知生成者项目已经被成功处理。通知进程是使用共享的信号和条件变量来实现的。
构造方法:JoinableQueue([maxsize])
- maxsize:队列中允许最大项数,省略则无大小限制。
实例方法
JoinableQueue的实例p除了与Queue对象相同的方法之外还具有:
- task_done():使用者使用此方法发出信号,表示q.get()的返回项目已经被处理。如果调用此方法的次数大于从队列中删除项目的数量,将引发ValueError异常
- join():生产者调用此方法进行阻塞,直到队列中所有的项目均被处理。阻塞将持续到队列中的每个项目均调用q.task_done()方法为止
使用示例:
# -*- coding:utf-8 -*-
from multiprocessing import Process, JoinableQueue
import time, random
def consumer(q):
while True:
res = q.get()
print('消费者拿到了 %s' % res)
q.task_done()
def producer(seq, q):
for item in seq:
time.sleep(random.randrange(1,2))
q.put(item)
print('生产者做好了 %s' % item)
q.join()
if __name__ == "__main__":
q = JoinableQueue()
seq = ('产品%s' % i for i in range(5))
p = Process(target=consumer, args=(q,))
p.daemon = True# 设置为守护进程,在主线程停止时p也停止,但是不用担心,producer内调用q.join保证了consumer已经处理完队列中的所有元素
p.start()
producer(seq, q)
print('主线程')
Value,Array(用于进程通信,资源共享)
multiprocessing 中Value和Array的实现原理都是在共享内存中创建ctypes()对象来达到共享数据的目的,两者实现方法大同小异,只是选用不同的ctypes数据类型而已。
Value
构造方法:Value((typecode_or_type, args[, lock])
- typecode_or_type:定义ctypes()对象的类型,可以传Type code或 C Type,具体对照表见下文。
- args:传递给typecode_or_type构造函数的参数
- lock:默认为True,创建一个互斥锁来限制对Value对象的访问,如果传入一个锁,如Lock或RLock的实例,将用于同步。如果传入False,Value的实例就不会被锁保护,它将不是进程安全的。
typecode_or_type支持的类型:
| Type code | C Type | Python Type | Minimum size in bytes |
| --------- | ------------------ | ----------------- | --------------------- |
| `'b'` | signed char| int | 1 |
| `'B'` | unsigned char| int | 1 |
| `'u'` | Py_UNICODE | Unicode character | 2 |
| `'h'` | signed short | int | 2 |
| `'H'` | unsigned short | int | 2 |
| `'i'` | signed int | int | 2 |
| `'I'` | unsigned int | int | 2 |
| `'l'` | signed long| int | 4 |
| `'L'` | unsigned long| int | 4 |
| `'q'` | signed long long | int | 8 |
| `'Q'` | unsigned long long | int | 8 |
| `'f'` | float| float | 4 |
| `'d'` | double | float | 8 |
参考地址:https://docs.python.org/3/library/array.html
Array
构造方法:Array(typecode_or_type, size_or_initializer, **kwds[, lock])
- typecode_or_type:同上
- size_or_initializer:如果它是一个整数,那么它确定数组的长度,并且数组将被初始化为零。否则,size_or_initializer是用于初始化数组的序列,其长度决定数组的长度。
- kwds:传递给typecode_or_type构造函数的参数
- lock:同上
使用示例:
import multiprocessing
def f(n, a):
n.value = 3.14
a[0] = 5
if __name__ == '__main__':
num = multiprocessing.Value('d', 0.0)
arr = multiprocessing.Array('i', range(10))
p = multiprocessing.Process(target=f, args=(num, arr))
p.start()
p.join()
print(num.value)
print(arr[:])
注意:Value和Array只适用于Process类。
Pipe(用于管道通信)
多进程还有一种数据传递方式叫管道原理和 Queue相同。Pipe可以在进程之间创建一条管道,并返回元组(conn1,conn2),其中conn1,conn2表示管道两端的连接对象,强调一点:必须在产生Process对象之前产生管道。
构造方法:Pipe([duplex])
- dumplex:默认管道是全双工的,如果将duplex射成False,conn1只能用于接收,conn2只能用于发送。
实例方法:
- send(obj):通过连接发送对象。obj是与序列化兼容的任意对象
- recv():接收conn2.send(obj)发送的对象。如果没有消息可接收,recv方法会一直阻塞。如果连接的另外一端已经关闭,那么recv方法会抛出EOFError。
- close():关闭连接。如果conn1被垃圾回收,将自动调用此方法
- fileno():返回连接使用的整数文件描述符
- poll([timeout]):如果连接上的数据可用,返回True。timeout指定等待的最长时限。如果省略此参数,方法将立即返回结果。如果将timeout射成None,操作将无限期地等待数据到达。
- recv_bytes([maxlength]):接收c.send_bytes()方法发送的一条完整的字节消息。maxlength指定要接收的最大字节数。如果进入的消息,超过了这个最大值,将引发IOError异常,并且在连接上无法进行进一步读取。如果连接的另外一端已经关闭,再也不存在任何数据,将引发EOFError异常。
- send_bytes(buffer [, offset [, size]]):通过连接发送字节数据缓冲区,buffer是支持缓冲区接口的任意对象,offset是缓冲区中的字节偏移量,而size是要发送字节数。结果数据以单条消息的形式发出,然后调用c.recv_bytes()函数进行接收
- recv_bytes_into(buffer [, offset]):接收一条完整的字节消息,并把它保存在buffer对象中,该对象支持可写入的缓冲区接口(即bytearray对象或类似的对象)。offset指定缓冲区中放置消息处的字节位移。返回值是收到的字节数。如果消息长度大于可用的缓冲区空间,将引发BufferTooShort异常。
使用示例:
from multiprocessing import Process, Pipe
import time
# 子进程执行方法
def f(Subconn):
time.sleep(1)
Subconn.send("吃了吗")
print("来自父亲的问候:", Subconn.recv())
Subconn.close()
if __name__ == "__main__":
parent_conn, child_conn = Pipe()# 创建管道两端
p = Process(target=f, args=(child_conn,))# 创建子进程
p.start()
print("来自儿子的问候:", parent_conn.recv())
parent_conn.send("嗯")
Manager(用于资源共享)
Manager()返回的manager对象控制了一个server进程,此进程包含的python对象可以被其他的进程通过proxies来访问。从而达到多进程间数据通信且安全。Manager模块常与Pool模块一起使用。
Manager支持的类型有list,dict,Namespace,Lock,RLock,Semaphore,BoundedSemaphore,Condition,Event,Queue,Value和Array。
管理器是独立运行的子进程,其中存在真实的对象,并以服务器的形式运行,其他进程通过使用代理访问共享对象,这些代理作为客户端运行。Manager()是BaseManager的子类,返回一个启动的SyncManager()实例,可用于创建共享对象并返回访问这些共享对象的代理。
BaseManager,创建管理器服务器的基类
构造方法:BaseManager([address[, authkey]])
- address:(hostname,port),指定服务器的网址地址,默认为简单分配一个空闲的端口
- authkey:连接到服务器的客户端的身份验证,默认为current_process().authkey的值
实例方法:
- start([initializer[, initargs]]):启动一个单独的子进程,并在该子进程中启动管理器服务器
- get_server():获取服务器对象
- connect():连接管理器对象
- shutdown():关闭管理器对象,只能在调用了start()方法之后调用
实例属性:
- address:只读属性,管理器服务器正在使用的地址
SyncManager,以下类型均不是进程安全的,需要加锁..
实例方法:
- Array(self,*args,**kwds)
- BoundedSemaphore(self,*args,**kwds)
- Condition(self,*args,**kwds)
- Event(self,*args,**kwds)
- JoinableQueue(self,*args,**kwds)
- Lock(self,*args,**kwds)
- Namespace(self,*args,**kwds)
- Pool(self,*args,**kwds)
- Queue(self,*args,**kwds)
- RLock(self,*args,**kwds)
- Semaphore(self,*args,**kwds)
- Value(self,*args,**kwds)
- dict(self,*args,**kwds)
- list(self,*args,**kwds)
使用示例:
import multiprocessing
def f(x, arr, l, d, n):
x.value = 3.14
arr[0] = 5
l.append('Hello')
d[1] = 2
n.a = 10
if __name__ == '__main__':
server = multiprocessing.Manager()
x = server.Value('d', 0.0)
arr = server.Array('i', range(10))
l = server.list()
# 子进程执行方法
def f(Subconn):
time.sleep(1)
Subconn.send("吃了吗")
print("来自父亲的问候:", Subconn.recv())
print(x.value)
print(arr)
print(l)
print(d)
print(n)
同步子进程模块
Lock(互斥锁)
Lock锁的作用是当多个进程需要访问共享资源的时候,避免访问的冲突。加锁保证了多个进程修改同一块数据时,同一时间只能有一个修改,即串行的修改,牺牲了速度但保证了数据安全。Lock包含两种状态——锁定和非锁定,以及两个基本的方法。
构造方法:Lock()
实例方法:
- acquire([timeout]): 使线程进入同步阻塞状态,尝试获得锁定。
- release(): 释放锁。使用前线程必须已获得锁定,否则将抛出异常。
使用示例:
from multiprocessing import Process, Lock
def l(lock, num):
lock.acquire()
print("Hello Num: %s" % (num))
lock.release()
if __name__ == '__main__':
lock = Lock()# 这个一定要定义为全局
for num in range(20):
Process(target=l, args=(lock, num)).start()
RLock(可重入的互斥锁(同一个进程可以多次获得它,同时不会造成阻塞)
RLock(可重入锁)是一个可以被同一个线程请求多次的同步指令。RLock使用了“拥有的线程”和“递归等级”的概念,处于锁定状态时,RLock被某个线程拥有。拥有RLock的线程可以再次调用acquire(),释放锁时需要调用release()相同次数。可以认为RLock包含一个锁定池和一个初始值为0的计数器,每次成功调用 acquire()/release(),计数器将+1/-1,为0时锁处于未锁定状态。
构造方法:RLock()
实例方法:
- acquire([timeout]):同Lock
- release(): 同Lock
Semaphore(信号量)
信号量是一个更高级的锁机制。信号量内部有一个计数器而不像锁对象内部有锁标识,而且只有当占用信号量的线程数超过信号量时线程才阻塞。这允许了多个线程可以同时访问相同的代码区。比如厕所有3个坑,那最多只允许3个人上厕所,后面的人只能等里面有人出来了才能再进去,如果指定信号量为3,那么来一个人获得一把锁,计数加1,当计数等于3时,后面的人均需要等待。一旦释放,就有人可以获得一把锁。
构造方法:Semaphore([value])
- value:设定信号量,默认值为1
实例方法:
- acquire([timeout]):同Lock
- release(): 同Lock
使用示例:
from multiprocessing import Process, Semaphore
import time, random
def go_wc(sem, user):
sem.acquire()
print('%s 占到一个茅坑' % user)
time.sleep(random.randint(0, 3))
sem.release()
print(user, 'OK')
if __name__ == '__main__':
sem = Semaphore(2)
p_l = []
for i in range(5):
p = Process(target=go_wc, args=(sem, 'user%s' % i,))
p.start()
p_l.append(p)
for i in p_l:
i.join()
Condition(条件变量)
可以把Condition理解为一把高级的锁,它提供了比Lock, RLock更高级的功能,允许我们能够控制复杂的线程同步问题。Condition在内部维护一个锁对象(默认是RLock),可以在创建Condigtion对象的时候把琐对象作为参数传入。Condition也提供了acquire, release方法,其含义与锁的acquire, release方法一致,其实它只是简单的调用内部锁对象的对应的方法而已。Condition还提供了其他的一些方法。
构造方法:Condition([lock/rlock])
- 可以传递一个Lock/RLock实例给构造方法,否则它将自己生成一个RLock实例。
实例方法:
- acquire([timeout]):首先进行acquire,然后判断一些条件。如果条件不满足则wait
- release():释放 Lock
- wait([timeout]): 调用这个方法将使线程进入Condition的等待池等待通知,并释放锁。使用前线程必须已获得锁定,否则将抛出异常。处于wait状态的线程接到通知后会重新判断条件。
- notify(): 调用这个方法将从等待池挑选一个线程并通知,收到通知的线程将自动调用acquire()尝试获得锁定(进入锁定池);其他线程仍然在等待池中。调用这个方法不会释放锁定。使用前线程必须已获得锁定,否则将抛出异常。
- notifyAll(): 调用这个方法将通知等待池中所有的线程,这些线程都将进入锁定池尝试获得锁定。调用这个方法不会释放锁定。使用前线程必须已获得锁定,否则将抛出异常。
使用示例:
import multiprocessing
import time
def stage_1(cond):
"""perform first stage of work,
then notify stage_2 to continue
"""
name = multiprocessing.current_process().name
print('Starting', name)
with cond:
print('{} done and ready for stage 2'.format(name))
cond.notify_all()
def stage_2(cond):
"""wait for the condition telling us stage_1 is done"""
name = multiprocessing.current_process().name
print('Starting', name)
with cond:
cond.wait()
print('{} running'.format(name))
if __name__ == '__main__':
condition = multiprocessing.Condition()
s1 = multiprocessing.Process(name='s1',
 target=stage_1,
 args=(condition,))
s2_clients = [
multiprocessing.Process(
name='stage_2[{}]'.format(i),
target=stage_2,
args=(condition,),
)
for i in range(1, 3)
]
for c in s2_clients:
c.start()
time.sleep(1)
s1.start()
s1.join()
for c in s2_clients:
c.join()
Event(事件)
Event内部包含了一个标志位,初始的时候为false。可以使用set()来将其设置为true;或者使用clear()将其从新设置为false;可以使用is_set()来检查标志位的状态;另一个最重要的函数就是wait(timeout=None),用来阻塞当前线程,直到event的内部标志位被设置为true或者timeout超时。如果内部标志位为true则wait()函数理解返回。
使用示例:
import multiprocessing
import time
def wait_for_event(e):
"""Wait for the event to be set before doing anything"""
print('wait_for_event: starting')
e.wait()
print('wait_for_event: e.is_set()->', e.is_set())
def wait_for_event_timeout(e, t):
"""Wait t seconds and then timeout"""
print('wait_for_event_timeout: starting')
e.wait(t)
print('wait_for_event_timeout: e.is_set()->', e.is_set())
if __name__ == '__main__':
e = multiprocessing.Event()
w1 = multiprocessing.Process(
name='block',
target=wait_for_event,
args=(e,),
)
w1.start()
w2 = multiprocessing.Process(
name='nonblock',
target=wait_for_event_timeout,
args=(e, 2),
)
w2.start()
print('main: waiting before calling Event.set()')
time.sleep(3)
e.set()
print('main: event is set')
其他内容
multiprocessing.dummy 模块与 multiprocessing 模块的区别:dummy 模块是多线程,而 multiprocessing 是多进程, api 都是通用的。所有可以很方便将代码在多线程和多进程之间切换。multiprocessing.dummy通常在IO场景可以尝试使用,比如使用如下方式引入线程池。
from multiprocessing.dummy import Pool as ThreadPool
multiprocessing.dummy与早期的threading,不同的点好像是在多多核CPU下,只绑定了一个核心(具体未考证)。
参考文档:
- https://docs.python.org/3/library/multiprocessing.html
- https://www.rddoc.com/doc/Python/3.6.0/zh/library/multiprocessing/
Python并发之concurrent.futures
Python标准库为我们提供了threading和multiprocessing模块编写相应的多线程/多进程代码。从Python3.2开始,标准库为我们提供了concurrent.futures模块,它提供了ThreadPoolExecutor和ProcessPoolExecutor两个类,实现了对threading和multiprocessing的更高级的抽象,对编写线程池/进程池提供了直接的支持。concurrent.futures基础模块是executor和future。
Executor
Executor是一个抽象类,它不能被直接使用。它为具体的异步执行定义了一些基本的方法。ThreadPoolExecutor和ProcessPoolExecutor继承了Executor,分别被用来创建线程池和进程池的代码。
ThreadPoolExecutor对象
ThreadPoolExecutor类是Executor子类,使用线程池执行异步调用。
class concurrent.futures.ThreadPoolExecutor(max_workers)
使用max_workers数目的线程池执行异步调用。
ProcessPoolExecutor对象
ThreadPoolExecutor类是Executor子类,使用进程池执行异步调用。
class concurrent.futures.ProcessPoolExecutor(max_workers=None)
使用max_workers数目的进程池执行异步调用,如果max_workers为None则使用机器的处理器数目(如4核机器max_worker配置为None时,则使用4个进程进行异步并发)。
submit()方法
Executor中定义了submit()方法,这个方法的作用是提交一个可执行的回调task,并返回一个future实例。future对象代表的就是给定的调用。
Executor.submit(fn, *args, **kwargs)
- fn:需要异步执行的函数
- *args, **kwargs:fn参数
使用示例:
from concurrent import futures
def test(num):
import time
return time.ctime(), num
with futures.ThreadPoolExecutor(max_workers=1) as executor:
future = executor.submit(test, 1)
print(future.result())
map()方法
除了submit,Exectuor还为我们提供了map方法,这个方法返回一个map(func, *iterables)迭代器,迭代器中的回调执行返回的结果有序的。
Executor.map(func, *iterables, timeout=None)
- func:需要异步执行的函数
- *iterables:可迭代对象,如列表等。每一次func执行,都会从iterables中取参数。
- timeout:设置每次异步操作的超时时间,timeout的值可以是int或float,如果操作超时,会返回raisesTimeoutError;如果不指定timeout参数,则不设置超时间。
使用示例:
from concurrent import futures
def test(num):
import time
return time.ctime(), num
data = [1, 2, 3]
with futures.ThreadPoolExecutor(max_workers=1) as executor:
for future in executor.map(test, data):
print(future)
shutdown()方法
释放系统资源,在Executor.submit()或 Executor.map()等异步操作后调用。使用with语句可以避免显式调用此方法。
Executor.shutdown(wait=True)
Future
Future可以理解为一个在未来完成的操作,这是异步编程的基础。通常情况下,我们执行io操作,访问url时(如下)在等待结果返回之前会产生阻塞,cpu不能做其他事情,而Future的引入帮助我们在等待的这段时间可以完成其他的操作。
Future类封装了可调用的异步执行。Future 实例通过 Executor.submit()方法创建。
- cancel():试图取消调用。如果调用当前正在执行,并且不能被取消,那么该方法将返回False,否则调用将被取消,方法将返回True。
- cancelled():如果成功取消调用,返回True。
- running():如果调用当前正在执行并且不能被取消,返回True。
- done():如果调用成功地取消或结束了,返回True。
- result(timeout=None):返回调用返回的值。如果调用还没有完成,那么这个方法将等待超时秒。如果调用在超时秒内没有完成,那么就会有一个Futures.TimeoutError将报出。timeout可以是一个整形或者浮点型数值,如果timeout不指定或者为None,等待时间无限。如果futures在完成之前被取消了,那么 CancelledError 将会报出。
- exception(timeout=None):返回调用抛出的异常,如果调用还未完成,该方法会等待timeout指定的时长,如果该时长后调用还未完成,就会报出超时错误futures.TimeoutError。timeout可以是一个整形或者浮点型数值,如果timeout不指定或者为None,等待时间无限。如果futures在完成之前被取消了,那么 CancelledError 将会报出。如果调用完成并且无异常报出,返回None.
- add_done_callback(fn):将可调用fn捆绑到future上,当Future被取消或者结束运行,fn作为future的唯一参数将会被调用。如果future已经运行完成或者取消,fn将会被立即调用。
- wait(fs, timeout=None, return_when=ALL_COMPLETED)
- 等待fs提供的 Future 实例(possibly created by different Executor instances) 运行结束。返回一个命名的2元集合,分表代表已完成的和未完成的
- return_when 表明什么时候函数应该返回。它的值必须是一下值之
- FIRST_COMPLETED :函数在任何future结束或者取消的时候返回。
- FIRST_EXCEPTION :函数在任何future因为异常结束的时候返回,如果没有future报错,效果等于
- ALL_COMPLETED :函数在所有future结束后才会返回。
- as_completed(fs, timeout=None):参数是一个 Future 实例列表,返回值是一个迭代器,在运行结束后产出 Future实例 。
使用示例:
from concurrent.futures import ThreadPoolExecutor, wait, as_completed
from time import sleep
from random import randint
def return_after_5_secs(num):
sleep(randint(1, 5))
return "Return of {}".format(num)
pool = ThreadPoolExecutor(5)
futures = []
for x in range(5):
futures.append(pool.submit(return_after_5_secs, x))
print(1)
for x in as_completed(futures):
print(x.result())
print(2)
参考链接:
以上是Python多執行緒、多行程詳細整理的詳細內容。更多資訊請關注PHP中文網其他相關文章!

