
深析如何封裝一個vue自訂日曆元件

- 藏色散人轉載
- 2023-04-06 15:12:402344瀏覽
這篇文章為大家帶來了關於前端日曆的相關知識,其中主要跟大家聊一聊如何封裝一個自定義日曆組件,感興趣的朋友下面一起來看一下吧,希望對大家有幫助。
前言
眾所周知啊,一般來說,如果專案中有需要用到行事曆元件,往往是找第三方UI函式庫中的元件來使用,或是找現成的其他第三方插件。對很多朋友來說,第一眼看到日曆組件,下意識的就會覺得很複雜,無從下手。但是當我閱讀了這個日曆插件的源碼之後,發現並沒有我想像中的複雜。我以前傻傻得認為,想要做一個日曆組件,得需要把距離現在年份前後至少十年的日曆資料都獲取到,然後才能進行下一步的開發。
然而,在我嘗試著閱讀了dycalendar.js這個函式庫的源碼之後,一方面感覺自己太笨了,把問題想得太複雜了。另外也感慨作者思路之清晰。看完後感覺受益匪淺。
在將作者的思路邏輯梳理完畢後,我依據這個思路開發了一個vue元件。如下圖所示:
接下來,就隨著我一起看看如何開發自己的行事曆元件。
核心程式碼實作
1、梳理想法
- 取得到目標日期資料
- 取得到目前日期的各項重要屬性,諸如
目前年,目前月,目前日期,目前星期幾,目前月一共有幾天,目前月的第一天對應的是星期幾,上個月總共有多少天等。 - 根據這些屬性,來產生特定的
日曆日期資料清單,然後將其循環渲染到範本中。 - 當切換月份的時候,取得到新的目標日期對應的各項關鍵資料。 vue偵測到日曆屬性變更之後,通知頁面進行更新。
2、初始化所需的資料
一般來說,成熟的行事曆元件,日期都是一個雙向綁定的變數。為了方便使用,我們也採用雙向綁定的方式。
<script setup>
import { reactive, ref, computed, watch } from "vue";

const props = defineProps({
  modelValue: Date,
});

const emits = defineEmits(["update:modelValue"]);

/**
 * 最小年份
 */
const MIN_YEAR = 1900;
/**
 * 最大年份
 */
const MAX_YEAR = 9999;

/**
 * 目标日期
 */
const targetDate = ref(props.modelValue);
接下來,我們還需要初始化一些常數用來表示月份和日期:
/**
 * 有关月度的名称列表
 */
const monthNameList = {
  chineseFullName: [
    "一月",
    "二月",
    "三月",
    "四月",
    "五月",
    "六月",
    "七月",
    "八月",
    "九月",
    "十月",
    "十一月",
    "十二月",
  ],
  fullName: [
    "January",
    "February",
    "March",
    "April",
    "May",
    "June",
    "July",
    "August",
    "September",
    "October",
    "November",
    "December",
  ],
  mmm: [
    "Jan",
    "Feb",
    "Mar",
    "Apr",
    "May",
    "Jun",
    "Jul",
    "Aug",
    "Sep",
    "Oct",
    "Nov",
    "Dec",
  ],
};
/**
 * 有关周几的名称列表
 */
const dayNameList = [
  {
    chineseFullName: "周日",
    chineseShortName: "日",
    fullName: "Sunday",
    shortName: "Sun",
    dayNumber: 0,
  },
  {
    chineseFullName: "周一",
    chineseShortName: "一",
    fullName: "Monday",
    shortName: "Mon",
    dayNumber: 1,
  },
  {
    chineseFullName: "周二",
    chineseShortName: "二",
    fullName: "Tuesday",
    shortName: "Tue",
    dayNumber: 2,
  },
  {
    chineseFullName: "周三",
    chineseShortName: "三",
    fullName: "Wednesday",
    shortName: "Wed",
    dayNumber: 3,
  },
  {
    chineseFullName: "周四",
    chineseShortName: "四",
    fullName: "Thursday",
    shortName: "Thu",
    dayNumber: 4,
  },
  {
    chineseFullName: "周五",
    chineseShortName: "五",
    fullName: "Friday",
    shortName: "Fri",
    dayNumber: 5,
  },
  {
    chineseFullName: "周六",
    chineseShortName: "六",
    fullName: "Saturday",
    shortName: "Sat",
    dayNumber: 6,
  },
];
接下來,準備幾個vue的回應式資料:
/**
 * 今日
 */
const today = new Date();

/**
 * 日历的各项属性
 */
const calendarProps = reactive({
  target: {
    year: null,
    month: null,
    date: null,
    day: null,
    monthShortName: null,
    monthFullName: null,
    monthChineseFullName: null,
    firstDay: null,
    firstDayIndex: null,
    totalDays: null,
  },
  previous: {
    totalDays: null,
  },
});

/**
 * 用于展现的日历数据
 */
const calendarData = ref([]);
3 、初始化日曆的各項屬性
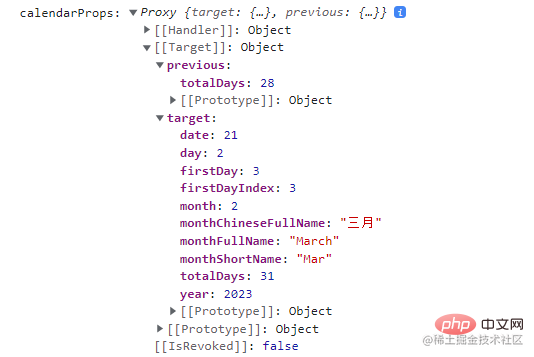
接下來,透過setCalendarProps方法取得行事曆的各個屬性,逐一填入calendarProps中的資料:
function setCalendarProps() {
  if (!targetDate.value) {
    targetDate.value = today;
  }
  // 获取目标日期的年月日星期几数据
  calendarProps.target.year = targetDate.value.getFullYear();
  calendarProps.target.month = targetDate.value.getMonth();
  calendarProps.target.date = targetDate.value.getDate();
  calendarProps.target.day = targetDate.value.getDay();

  if (
    calendarProps.target.year < MIN_YEAR ||
    calendarProps.target.year > MAX_YEAR
  ) {
    console.error("无效的年份,请检查传入的数据是否是正常");
    return;
  }

  // 获取到目标日期的月份【中文】名称
  let dateString;
  dateString = targetDate.value.toString().split(" ");
  calendarProps.target.monthShortName = dateString[1];
  calendarProps.target.monthFullName =
    monthNameList.fullName[calendarProps.target.month];
  calendarProps.target.monthChineseFullName =
    monthNameList.chineseFullName[calendarProps.target.month];
  // 获取目标月份的第一天是星期几,和在星期几中的索引值
  const targetMonthFirstDay = new Date(
    calendarProps.target.year,
    calendarProps.target.month,
    1
  );
  calendarProps.target.firstDay = targetMonthFirstDay.getDay();
  calendarProps.target.firstDayIndex = dayNameList.findIndex(
    (day) => day.dayNumber === calendarProps.target.firstDay
  );

  // 获取目标月份总共多少天
  const targetMonthLastDay = new Date(
    calendarProps.target.year,
    calendarProps.target.month + 1,
    0
  );
  calendarProps.target.totalDays = targetMonthLastDay.getDate();

  // 获取目标月份的上个月总共多少天
  const previousMonth = new Date(
    calendarProps.target.year,
    calendarProps.target.month,
    0
  );
  calendarProps.previous.totalDays = previousMonth.getDate();
}
要注意的一個知識點是,在取得本月多少天和上個月多少天的時候,都將date值設定為了
0。這是因為當date值為0的時候,傳回的Date物件是上個月的最後一天。所以說,為了取得本月多少天,需要將本月的month值加1。
執行這個方法之後,此時calendarProps的值為:
4、根據日曆屬性產生日曆日期的數據
當我們已經知道本月第一天對應的周幾索引值、本月一共有多少天和上個月一共有多少天這三個核心資料之後,就可以開始產生對應的日曆資料了。
想法如下:
- 由於大部分情況下,本月的第一天不是從頭開始的,之前的部分是上個月的日期。所以第一行要單獨處理。
- 設定一個公用的date數值,初始值設定為
1。然後從本月第一天對應的周幾索引值開始進行遞增。本月之前的日期和之後的日期設定一個演算法進行計算。 - 為了方便之後進行日期切換、樣式區分,將產生的資料加工成一個對象,其中包含日期類型-
dateType,表示是本月還是上月還是下個月;
/**
 * 生成日历的数据
 */
function setCalendarData() {
  let i;
  let date = 1;
  const originData = [];
  const firstRow = [];
  // 设置第一行数据
  for (i = 0; i <= 6; i++) {
    // 设置目标月份之前月份的日期数据
    if (i < calendarProps.target.firstDayIndex) {
      const previousDate =
        calendarProps.previous.totalDays -
        calendarProps.target.firstDayIndex +
        (i + 1);
      firstRow.push({
        dateObj: new Date(
          calendarProps.target.year,
          calendarProps.target.month - 1,
          previousDate
        ),
        dateNumber: previousDate,
        dateType: "previous"
      });
    } else {
      // 设置目标月份当月的日期数据
      firstRow.push({
        dateObj: new Date(
          calendarProps.target.year,
          calendarProps.target.month,
          date
        ),
        dateNumber: date,
        dateType: "current"
      });
      date++;
    }
  }
  originData.push(firstRow);
  // 设置后面五行的数据
  for (let j = 0; j <= 4; j++) {
    const rowData = [];
    for (let k = 0; k <= 6; k++) {
      // 设置目标月份剩下的日期数据
      if (date <= calendarProps.target.totalDays) {
        rowData.push({
          dateObj: new Date(
            calendarProps.target.year,
            calendarProps.target.month,
            date
          ),
          dateNumber: date,
          dateType: "current"
        });
      } else {
        // 设置目标月份下个月的日期数据
        const nextDate = date - calendarProps.target.totalDays;
        rowData.push({
          dateObj: new Date(
            calendarProps.target.year,
            calendarProps.target.month + 1,
            nextDate
          ),
          dateNumber: nextDate,
          dateType: "next"
        });
      }
      date++;
    }
    originData.push(rowData);
  }
  calendarData.value = originData;
}
至此,這個日曆元件的核心部分的邏輯就已經實現了。你看,是不是很簡單呢?
接下來,我們只需要根據calendarData中的資料渲染出對應的html模板和新增上樣式就可以了。
5、新增範本和樣式部分
#一般來說,日曆元件都是網格狀的結構,所以我選擇table的方式來渲染。不過你要問我還有沒有別的方式,那還是有的,例如使用flex佈局或grid佈局,但是如果採用這種方式的話,calendarData的資料結構就不是現在這個樣子了。
dom結構如下圖:

至於按鈕邊框的流動效果,是我參考蘇甦的文章做的,詳情請見:
Clip-path實現按鈕流動邊框動畫juejin.cn/post/719877…
然後剩下的樣式部分,即興發揮或根據UI設計圖繪製即可。 想必各位都領教過UI姐姐們精美的設計圖吧(嘻嘻
具體的代碼部分就不貼在文章中了,如有需要可以直接查看下方的完整源碼
#結語
有些感覺很麻煩的元件,可能核心邏輯往往不是那麼複雜。有些時候,可能只是需要一些耐心,將程式碼一行一行的拆解出來閱讀,理清楚其中的思路。
推薦學習:《vue影片教學》
以上是深析如何封裝一個vue自訂日曆元件的詳細內容。更多資訊請關注PHP中文網其他相關文章!