詳解如何用PHP製作一個簡單的日曆(附程式碼)
- 藏色散人轉載
- 2023-03-23 16:52:353798瀏覽
這篇文章為大家帶來了關於PHP的相關知識,其中主要跟大家介紹怎麼用PHP製作一個簡單的日曆,感興趣的朋友下面一起來看一下吧,希望對大家有幫助。
說到對日期和時間的處理,就一定要介紹一下日曆程式的編寫。但一提起編寫日曆,大多數讀者都會認為日曆的作用只是為了在頁面上顯示當前的日期,其實日曆在我們的開發中有著更重要的作用。例如,我們開發一個「記事本」就需要透過日曆設定日期,在一些系統中需要按日期去安排任務也需要日曆,等等。
將日曆類別Calendar 宣告在檔案calendar.class.php中,程式碼如下所示:
<?php
/*
calendar.class.php日历类
声明一个日历类,名称为Calendar,用来显示可以设置日期的日历
*/
class Calendar{
private $year;//当前的年
private $month;//当前的月
private $start_weekday;//当月的第一天对应的是周几,作为当月遍历日期的开始
private $days;//当前月的总天数
/**
* 构造方法,初始化一些属性
*/
function __construct(){
//如果用户没有设置年份数,则使用当前系统时间的年份
$this->year = isset($_GET["year"]) ? $_GET["year"] :date("Y") ;
//如果用户没有设置月份数,则使用当前系统时间的月份
$this->month = isset($_GET["month"]) ? $_GET["month"] :date("m") ;
//通过具体的年份和月份,利用date() 函数的w参数获取当月第一天对应的是周几
$this->start_weekday = date("w",mktime(0, 0, 0, $this->month, 1, $this->year));
//通过具体的年份和月份,利用date()函数的参数获取当月的天数
$this->days = date("t",mktime(0, 0, 0, $this->month, 1, $this->year));
}
/**
* 打印整个日历
* @return string 日历字符串
*/
function __toString(){
$out .= '<table align="center">'; //日历以表格形式打印
$out .= $this->changeDate(); //用户设置日期
$out .= $this->weeksList(); //打印·周·列表
$out .= $this->daysList(); //打印·日·列表
$out .= '</table>'; //表格结束
return $out; //返回整个日历,输出需要的全部字符串
}
/**
* 输出周列表
* @return string 周列表字符串
*/
private function weeksList(){
$week = array ('日','一','二','三','四','五','六');
$out .= '<tr>';
for($i = 0; $i < count($week); $i++){
$out .= '<th class="fontb">' . $week [$i]. '</th>';
}
$out .= '</tr>';
return $out; // 返回周列表字符串
}
/**
* 输出日列表
* @return string 日历表字符串
*/
private function daysList(){
$out .= '<tr>';
// 输出空格(当月第一天对应的是周几,就是几个空格)
for($j = 0; $j < $this->start_weekday; $j++){
$out .= '<td> </td>';
}
// 循环输出当前月所有日期
for($k = 1; $k <= $this->days; $k++){
$j++;
if($k == date('d')){// 若为当前日期,设置为深色背景
$out .= '<td class="fontb">'.$k.'</td>';
} else {
$out .= '<td>'.$k.'</td>';
}
if($j%7 == 0){//每输出7个日期,就换一行
$out .= '</tr><tr>';//输出行结束和下一行开始
}
}
while ($j%7 != 0) {//遍历完日期后,剩下的用空格补全
$out .= '<td> </td>';
$j++;
}
$out .= '</tr>';
return $out; //返回当月日列表
}
/**
* 用于处理当前年份的上一年需要的数据
* @param int $year 当前年份
* @param int $month 当前月份
* @return string 最终的年份和月份设置参数
*/
private function prevYear($year, $month){
$year = $year-1; //上一年是当前年减1
if ($year < 1970){ //如果设至的年份小于1970年
$year = 1970; //年份设置最小值是1970年
}
//返回最终的年份和月份设置参数
return "year={$year}&month={$month}";
}
/**
* 用于处理当前月份的上一月份的数据
* @param int $year 当前年份
* @param int $month 当前月份
* @return string 最终的年份和月份设置参数
*/
private function prevMonth($year, $month){
if($month== 1){
$year = $year -1;
if($year < 1970){ // 最小年份数不能小于1970年
$year = 1970;
}
//如果月是1月,上一月就是上一年的最后一月
$month = 12;
} else {
$month--; //上一月就是当前月减1
}
// 返回最终的年份和月份设置参数
return "year={$year}&month={$month}";
}
/**
* 用于处理当前年份的下一年份的数据
* @param int $year 当前年份
* @param int $month 当前月份
* @return string 最终的年份和月份设置参数
*/
private function nextYear($year, $month){
$year = $year+1; // 下一年是当前年加1
if ($year> 2038){ //如果设量的年份大于2038年
$year=2038; //最大年份不能超过2038年
}
//返回最终的年份和月份设置参数
return "year={$year}&month={$month}";
}
/**
* 用于处理当前月份的下一个月份的数据
* @param int $year 当前年份
* @param int $month 当前月份
* @return string 最终的年份和月份设置参数
*/
private function nextMonth($year, $month){
if($month == 12){//如果已经是当年的最后一个月
$year++;//下一个月就是下一年的第一个月,让年份加1
if($year> 2038){ //如果设豆的年份大于2038年
$year = 2038; //最大年份不能超过2038年
}
$month = 1; //设置月份为下一年的第一个月
} else {
$month++;//其他月份的下一个月都是当前月份加1即可
}
//返回最终的年份和月份设置参数
return "year={$year}&month={$month}";
}
/**
* 调整日期
* @param string $url 页面路径
* @return string 页面字符串
*/
private function changeDate($url='index.php'){
$out .= '<tr>';
//上一年
$out .= '<td><a href="'.$url.'?'.$this->prevYear($this->year,$this->month).'">'.'<<'.'</a></td>';
//上个月
$out .= '<td><a href="'.$url.'?'.$this->prevMonth($this->year,$this->month).'">'.'<'.'</a> </td>';
$out .= '<td colspan="3">';
$out .= '<form>';
//年份选择框
$out .= '<select name="year" οnchange="window.location=\''. $url.'?year=\'+this.options[selectedIndex].value+\'&month='. $this->month. '\'">';
//循环输出年份
for($sy=1970; $sy <= 2038; $sy++){
$selected = ($sy==$this->year) ? "selected" : "";
$out .= '<option '. $selected. ' value="'. $sy. '">'. $sy. '</option>';
}
$out .= '</select>';
//月份选择框
$out .= '<select name="month" οnchange="window.location=\''. $url. '?year='. $this->year. '&month=\'+this.options[selectedIndex].value">';
//循环输出月份
for ($sm=1; $sm <=12; $sm++){
$selected1 = ($sm==$this->month) ? "selected" : "";
$out .='<option '. $selected1. ' value="'. Ssm. '">'. $sm. '</option>';
}
$out .= '</select>';
$out .= '</form>';
$out .= '</td>';
//下一年
$out .= '<td> <a href="'.$url.'?'.$this->nextMonth($this->year,$this->month).'">'.'>'.'</a></td>';
//下个月
$out .= '<td> <a href="'.$url.'?'.$this->nextYear($this->year,$this->month).'">'.'>>'.'</a></td>';
$out .= '</tr>';
return $out; //返回调整日期的表单
}
}本例將一個日曆程式按功能拆分(週列表部分、日期列表部分、設定日期部分,以及上一年、下一年、上一月和下一月的設定部分)並封裝在一個日曆類中。有了日曆類,我們還需要編寫一個主程式去載入並輸出日曆。在主程式中也需要先設定行事曆輸出的樣式,程式碼如下所示:
<!DOCTYPE html>
<html>
<head>
<meta charset="UTF-8">
<meta name="viewport" content="width=device-width, initial-scale=1.0">
<title>日历示例</title>
<style>
table{ border: 1px solid #050; }
.fontb{ color:white;background:blue; }
th { width: 30px; }
td,th { height: 30px;text-align:center; }
form { margin: 0px;padding: 0px; }
</style>
</head>
<body>
<?php
require 'calendar.class.php';
echo new Calendar;
?>
</body>
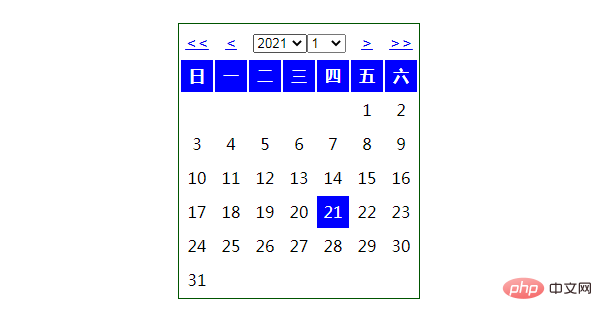
</html>效果顯示
運行效果如下如所示:
推薦學習:《PHP影片教學》
以上是詳解如何用PHP製作一個簡單的日曆(附程式碼)的詳細內容。更多資訊請關注PHP中文網其他相關文章!
陳述:
本文轉載於:csdn.net。如有侵權,請聯絡admin@php.cn刪除

