
淺談angular中的三種類型指令:元件型、結構型、屬性型

- 青灯夜游轉載
- 2021-10-15 10:35:413655瀏覽
這篇文章帶大家了解angular中的指令,介紹一下元件型指令、結構型指令、屬性型指令三種類型的指令,希望對大家有幫助!

在Angular 中有三種類型的指令:
- 元件型指令— 元件是特殊存在,擁有範本
- 結構型指令— 透過新增和移除DOM 元素改變DOM 佈局的指令,常用的有:
*ngIf,*ngFor,ngSwitch - #屬性型指令— 改變元素、元件或其它指令的外觀和行為的指令,常用的有:
NgClass,NgStyle
angular教學》】
angular 指令-https://angular.cn/guide/built-in-directives<p></p>
元件型指令
在查看angular原始碼時,會看到如下<p></p>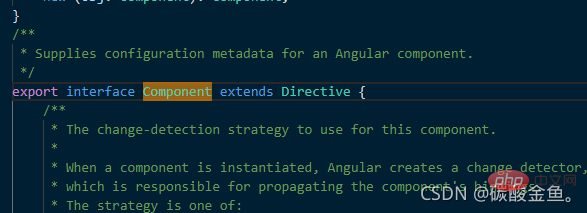
但是因為指令的目的是為了復用,在元件中這樣操作是達不到這個目的,所以強烈不推薦這樣去操作.<p></p>
屬性型指令
上面說屬性型指令是用來改變元素、元件或其它指令的外觀和行為<p></p>那麼我們要如何打造屬於自己的屬性型指令呢?首先,建立指令很像建立元件。 <p></p>
- 導入
- Directive
裝飾器導入符號 - Input
、TemplateRef和ViewContainerRef,視指令類型與需求來選擇為指令類別新增裝飾器。 - 設定
- CSS
屬性選擇器 ,以便在範本中標識出這個指令該套用於哪個元素。
自訂屬性型指令
1、建立屬性型指令appHighlight指令:highlight.directive.ts
// 1、导入 Directive 装饰器
// 3、导入 ElementRef。ElementRef 的 nativeElement 属性会提供对宿主 DOM 元素的直接访问权限
import { Directive, ElementRef } from '@angular/core';
// 2、@Directive() 装饰器的 selector 属性会指定指令的 CSS 属性选择器 [appHighlight]
@Directive({
  selector: '[appHighlight]'
})
export class HighlightDirective {
// 4、构造函数中使用 ElementRef 来注入宿主 DOM 元素的引用
  constructor(el: ElementRef) {
  	// 将对应元素的背景颜色设置为 黄色
     el.nativeElement.style.backgroundColor = 'yellow';
  }
}
與2、宿主元素用法component
和pipe一樣,directive也需要在declarations陣列中宣告才能使用
<p appHighlight>Highlight me!</p>
處理使用者事件
#下列指令的功能為:<p></p>- ##能夠接收2個參數,其中一個為另外一個的預設值
- <p></p> 監聽宿主元素的滑鼠進入和離開事件,在進入時宿主背景顏色為上述傳入的值
-
<p></p>
import { Directive, ElementRef, HostListener, Input } from '@angular/core';

@Directive({
   //指定指令的属性型选择器
   selector: '[appHighlight]'
})

export class HighlightDirective {
  @Input('appHighlight') highlightColor: string;
  @Input() defaultColor: string;

  //构造函数中使用 ElementRef 来注入宿主 DOM 元素的引用
  constructor(private el: ElementRef) { }

  //监听宿主元素 mousenter 事件
  @HostListener('mouseenter') onMouseEnter() {
	this.highlight(this.highlightColor || this.defaultColor);
  }

  //监听宿主元素 mouseleave 事件
   @HostListener('mouseleave') onMouseLeave() {
		this.highlight(null);
   }
 	// 修改背景颜色
   private highlight(color: string) {
		//ElementRef通过其 nativeElement 属性,提供直接访问宿主 DOM 元素的能力。
		this.el.nativeElement.style.backgroundColor = color;
  }
}
宿主元素用法
<p appHighlight="red" defaultColor="black">宿主元素</p><p></p>
結構型指令結構型指令的職責是HTML 佈局。它們塑造或重塑 DOM 的結構,這通常是透過添加、移除和操縱它們所附加到的宿主元素來實現的。
常見內建結構性指令:其效果為:
<p></p>#如果條件是假值,且Angular 先前尚未建立視圖,則此setter 會導致視圖容器從範本建立出嵌入式視圖。- 如果條件為真值,且目前正顯示視圖,則此 setter 會清除容器,這會導致銷毀該視圖。
- <p></p> 1、建立指令ts檔:
<pre class="brush:js;toolbar:false;">// 1、导入 Input、TemplateRef 和 ViewContainerRef
import { Directive, Input, TemplateRef, ViewContainerRef } from &#39;@angular/core&#39;;
// 2、添加 Directive 装饰器
@Directive({ selector: &#39;[appUnless]&#39;})
export class UnlessDirective {
private hasView = false;
// 3、在指令的构造函数中将 TemplateRef 和 ViewContainerRef 注入成私有变量。
constructor(
private templateRef: TemplateRef<any>,
private viewContainer: ViewContainerRef
) { }
// 4、添加一个带 setter 的 @Input() 属性 appUnless
@Input() set appUnless(condition: boolean) {
// 如果条件是假值,并且 Angular 以前尚未创建视图,则此 setter 会导致视图容器从模板创建出嵌入式视图。
if (!condition && !this.hasView) {
this.viewContainer.createEmbeddedView(this.templateRef);
this.hasView = true;
} else if (condition && this.hasView) {
// 如果条件为真值,并且当前正显示着视图,则清除容器,这会导致销毁该视图。
this.viewContainer.clear();
this.hasView = false;
}
}
}</pre>2、測試指令
<p>Show this sentence unless the condition is true.</p>
結構型指令(例如
*ngIf*ngIf)上的星號* 語法是Angular 解釋為較長形式的簡寫形式。 Angular 將結構型指令前面的星號轉換為圍繞宿主元素及其後代的
例如:<ng-template></ng-template>。
<pre class="brush:html;toolbar:false;"><div *ngIf="hero" class="name">{{hero.name}}</div></pre>會被轉換為
<ng-template [ngIf]="hero">
  <div class="name">{{hero.name}}</div>
</ng-template>
Angular 不會創造真正的
元素,只會將<p></p> 和註解節點佔位符渲染到DOM 中
自訂指令範例詳下面的指令會去掉
input輸入方塊中的所有空格<pre class="brush:js;toolbar:false;">import { Component, Directive, HostListener } from &#39;@angular/core&#39;
import { hostElement } from &#39;@angular/core/src/render3/instructions&#39;;
import { FormGroup, FormControl, Validators, NgControl } from &#39;@angular/forms&#39;
@Component({
selector: "app-test",
templateUrl: "./test.component.html",
// declarations: [TestDirective]
})
export class TestComponent {
constructor() {}
ngOninit() {}
firstName = &#39;&#39;;
lastName = &#39;&#39;;
profileForm = new FormGroup({
firstName: new FormControl(&#39;aa&#39;, [Validators.required,Validators.pattern(&#39;[a-zA-Z0-9]*&#39;)]),
lastName: new FormControl(&#39;&#39;, Validators.required),
});
onchange(event) {
console.log(&#39;触发了onchange&#39;, this.firstName)
}
}
@Directive({
selector: &#39;[testDirective]&#39;,
// host: {
// 要传递传递事件参数,使用这种方法,不用的可以使用下面的 @HostListener 方法
// &#39;(keyup)&#39;: &#39;onkeyup($event)&#39;,
// }
})
export class TestDirective {
constructor(public ngControl: NgControl) {}
ngOnInit() {}
// onkeyup(event) {
@HostListener(&#39;keyup&#39;) onkeyup(event) {
// console.log("event", event) // 事件参数
console.log(this.ngControl)
console.log(this.ngControl.control)
console.log(this.ngControl.control.value)
if(/\s+/g.test(this.ngControl.control.value)) {
// 只读属性,要通过 setValue 修改
// this.ngControl.control.value = this.ngControl.control.value.replace(/\s+/g, &#39;&#39;)
this.ngControl.control.setValue(this.ngControl.control.value.replace(/\s+/g, &#39;&#39;))
}
}
}</pre>使用:
<form action="" [formGroup] = 'profileForm'>
<label>
First Name: <input type="text" testDirective formControlName="firstName" [(ngModel)] = "firstName" (ngModelChange) = "onchange($event)">
</label>
<label>
Last Name: <input type="text" testDirective formControlName="lastName">
</label>
<button type="submit" [disabled]="!profileForm.valid">Submit</button>
</form>使用效果
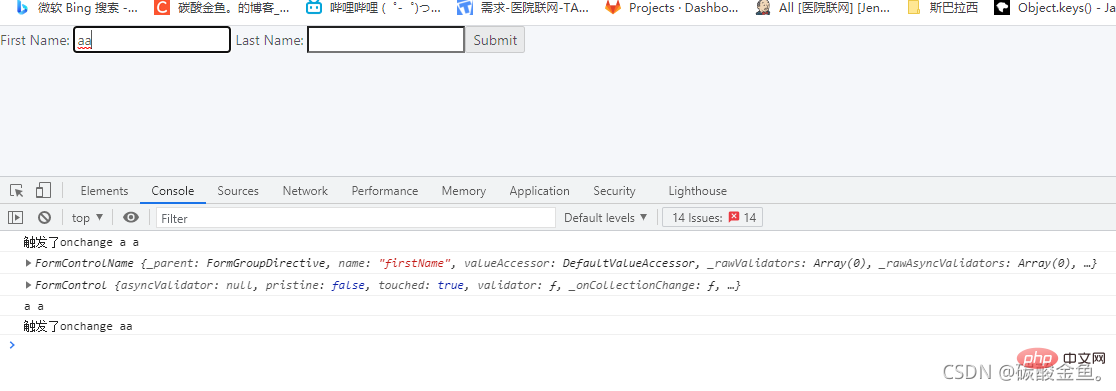
上面的input的初始值為aa,在其中間輸入空格字元,首先觸發onchange事件,然後在指令觸發keyup事件,改變了firstName的值,然後重新觸發onchange事件,所以change事件一共觸發兩次。
更多程式相關知識,請造訪:程式設計入門! !
以上是淺談angular中的三種類型指令:元件型、結構型、屬性型的詳細內容。更多資訊請關注PHP中文網其他相關文章!