


本篇文章跟大家介紹一下Nodejs中的流(stream),看看Node可讀流的實作方法。有一定的參考價值,有需要的朋友可以參考一下,希望對大家有幫助。

stream的概念
流(stream)是 Node.js 中處理串流資料的抽象介面。 stream 模組用於建構實作了流介面的物件。 【推薦學習:《nodejs 教學》】
stream的作用
讀寫大檔案的過程中,不會一次的讀寫到記憶體中。可以控制每次讀寫的個數
stream的分類
1、可讀流-Readable
範例:fs.createReadStream;
原始碼位置:lib/_stream_readable.js
2、可寫入流-Writable
範例:fs.createWriteStream;
原始碼位置:lib/_stream_writable .js
3、雙工流-Duplex:滿足讀寫的功能
例:net.Socket();
原始碼位置:lib/_stream_duplex.js
4、轉換流-Transform:用途:壓縮,轉碼
範例:
const { Transform } = require('stream');
Transform.call(this, '要转换的数据');//具体的使用详情 见node官网
-原始碼位置:lib/_stream_tranform.js
#可讀流讀取檔案的過程
- 讀取檔案程式碼過程
const path = require("path");
const aPath = path.join(__dirname, "a.txt");//需要读取的文件
const fs = require("fs");
let rs = fs.createReadStream(aPath, {
  flags: "r",
  encoding: null,//默认编码格式是buffer,深挖buffer又要学习字符编码,留个坑 到时候写一个编码规范的学习整理
  autoClose: true,//相当于需要调用close方法,如果为false  文件读取end的时候 就不会执行 close
  start: 0,
  highWaterMark: 3,//每次读取的个数 默认是64*1024个字节
});

rs.on("open", function (fd) {
  // fd  number类型
  console.log("fd", fd);
});
// 他会监听用户,绑定了data事件,就会触发对应的回调,不停的触发
rs.on("data", function (chunk) {
//这里会打印的是ascII 值 ,所以可以toString查看详情自己看得懂的样子
  console.log({ chunk }, "chunk.toString", chunk.toString());
  //如果想每一段事件 读一点 可以用rs.pause() 做暂停,然后计时器 里rs.resume()再次触发data事件
  rs.pause();//暂停读取
});
rs.on("close", function () {
  //当文件读取完毕后 会 触发 end事件
  console.log("close");
});
setInterval(() => {
  rs.resume(); //再次触发data,直到读完数据为止
}, 1000);- 題外話:想說下檔案流和普通可讀流的差異
1、open 和close是檔案流獨有,支援open和close便是檔案流
2、可讀流都具備(on('data '),on('end'),on('error'),resume,pause;所以只要支援這些方法就是可讀流
可寫流寫入檔案的過程
- 寫入檔案程式碼過程
const fs = require("fs");
const path = require("path");
const bPath = path.join(__dirname, "b.txt");
let ws = fs.createWriteStream(bPath, {
//参数和可读流的类似
  flags: "w",
  encoding: "utf-8",
  autoClose: true,
  start: 0,
  highWaterMark: 3,
});
ws.on("open", function (fd) {
  console.log("open", fd);
});
ws.on("close", function () {
  console.log("close");
});

//write的参数string 或者buffer,ws.write 还有一个boolea的返回值表示是真实写入文件还是放入缓存中
ws.write("1");
let flag = ws.write("1");
console.log({ flag });//true
flag = ws.write("1");
console.log({ flag });//true
flag = ws.write("1");
console.log({ flag });//false
雙工流的寫入與讀取過程
- 寫一個本機服務做範例
1、server(伺服器程式碼)實作
const net = require("net"); //net 模块是 node自己封装的tcp层
//socket 就是双工流 能读能写  http源码就是用net模块写的 基于tcp
const server = net.createServer(function (socket) {
  socket.on("data", function (data) {//监听客户端发来的消息
    console.log(data.toString)
    socket.write("server:hello");//写入server:hello
  });
  socket.on("end", function () {
    console.log("客户端关闭");
  });
});
server.on("err", function (err) {
  console.log(err);
});
server.listen(8080);//服务端监听8080端口
2、client(客戶端) 實作
const net = require("net"); //net 模块是 node自己封装的tcp层
const socket = new net.Socket(); //
socket.connect(8080, "localhost"); //  表示链接服务器本地8080端口
socket.on("connect", function (data) {
  //和服务器建立链接后
  socket.write("connect server");
});
socket.on("data", function (data) {
  //监听数据,读取服务器传来的数据
  console.log(data.toString());
  socket.destroy()
});
socket.write('ok')
socket.on("error", function (err) {
  console.log(err);
});
3.題外話如果想看tcp的三次握手和四次揮手可以透過我上述程式碼用wireshark(一個抓包工具)看實際過程
轉換流transform過程
轉換流是雙工流的一種, 允許實現輸入,並在對資料執行某些操作後返回輸出,兩者有依賴關係
- 程式碼過程(這個例子我的參考來處)
const stream = require('stream')
let c = 0;
const readable = stream.Readable({
highWaterMark: 2,
read: function () {
let data = c < 26 ? Number(c++ + 97) : null;
console.log('push', data);
this.push( String.fromCharCode(data));
}
})
const transform = stream.Transform({
highWaterMark: 2,
transform: function (buf, enc, next) {
console.log('transform', buf.toString());
next(null, buf);
}
})
readable.pipe(transform);- 列印結果

#可讀流的實作
跟著斷點先了解可讀流的呼叫過程
#就前面可讀流檔案的讀取過程的程式碼為例子打斷點
rs.on('open')
rs.on('open')為斷點入口進入

1、透過Stream.prototype.on.call 繼承Stream類別
原始檔位置:no dlib/_stream_readable.js(我是透過斷點點到這裡直接找,我也沒找到)

- 再點進去發現Stream 是EventEmitter的子類別那麼可讀流也可以支援發布訂閱

2、監聽的事件類型是否是data和readable任一個不是繼續下一個事件的監聽

rs.on('data')

-
data的部分做兩件事
1、判斷flowing(預設值是null)不為false就自動resume方法執行繼續檔讀取(這裡我的案例是rs.pause();手動將flowing 值為false了所以不會繼續呼叫)
2、那如果我沒有呼叫rs.pause () 會繼續呼叫resume 看看resume裡做了什麼

#2.1 最終呼叫了stream.read()繼續讀取檔案;直到文件讀取結束依序去emit end 和close事件
小結:所以data預設是會不斷的讀取檔案直到檔案讀取完畢,如果想要檔案讀取變可控可以跟我一樣用rs.pause()
自己實作
實作想法
继承EventEmitter发布订阅管理我们的事件
const fs = require("fs");
const EventEmitter = require("events");
class ReadStream extends EventEmitter {

}
module.exports = ReadStream;
数据初始化
constructor(path, options = {}) {
    super();
    //参考fs 写实例需要用到的参数
    this.path = path;
    this.flags = options.flags || "r";
    this.encoding - options.encoding || null;//默认编码格式是buffer
    this.autoClose = options.autoClose || true;//相当于需要调用close方法,如果为false  文件读取end的时候 就不会执行 close
    this.start = options.start || 0;//数据读取的开始位置
    this.end = options.end;
    this.highWaterMark = options.highWaterMark || 64 * 1024;//默认一次读取64个字节的数据
    this.offset = this.start;//fs.read的偏移量
    this.fd = undefined; //初始化fd 用于 open成功后的fd做赋值  供 read里使用
    this.flowing = false;//实现pause和resume备用,设置flag,当监听到data事件的时候 改 flowing为true,
    this.open(); //初始化的时候就要调用open
    this.on("readStreamListener", function (type) {
      // console.log(type)//这里打印就能看到 实例上所有 通过on 绑定的事件名称
      if (type === "data") {
      //监听到data事件的时候 改 flowing为true
        this.flowing = true;
        this.read();
      }
    });
    }
文件读取方法read,pause,resume,open和destroy的实现
open()
 open() {
 // 调用fs.open 读取目标文件
    fs.open(this.path, this.flags, (err, fd) => {
      this.fd = fd; //赋值一个fd 供后面的 read()方式使用,文件读取成功,fd是返回一个数字
      this.emit("open", fd);
    });
read()
 read() {
   // console.log("一开始read里的", this.fd); //但是这样依旧拿不到 open后的fd,用 发布订阅 通过on来获取 绑定的事件type
    //这里要做一个容错处理 ,因为open是异步读取文件,read里无法马上拿到open结果
  if (typeof this.fd !== "number") {
      //订阅open,给绑定一个回调事件read 直到this.fd有值
      return this.once("open", () => this.read());
    }
 }
  //fd打开后 调用fs.read
  //实例上的start值是未知number,存在实际剩余的可读的文件大小<highWaterMar的情况 ,用howMuchToRead 替换highWaterMark 去做fs.read的每次读取buffer的大小
    let howMuchToRead = this.end
      ? Math.min(this.end - this.offset + 1, this.highWaterMark)
      : this.highWaterMark;
  //定义一个用户 传进来的highWaterMark 大小的buffer对象
    const buffer = Buffer.alloc(this.highWaterMark);
       //读取文件中的内容fd给buffer 从0位置开始,每次读取howMuchToRead个。插入数据,同时更新偏移量
    fs.read(
      this.fd,
      buffer,
      0,
      howMuchToRead,
      this.offset,
      (err, bytesRead) => {
        if (bytesRead) {
          // 每读完一次,偏移量=已经读到的数量
          this.offset += bytesRead;
          this.emit("data", buffer.slice(0, bytesRead));
          //写到这里实例上的data 已经可以打印出数据了 但是 继续读取 调用this.read() 直到bytesRead不存在 说明数据读取完毕了 走else
          //回调 this.read();时候判断 this.flowing 是否为true
          //pause调用后this.flowing将为false
          if (this.flowing) {
            this.read();
          }
        } else {
          // 执行到这 bytesRead不存在说明  文件数据读取完毕了已经 触发end
          this.emit("end");//emit 实例上绑定的end事件
          //destroy 还没写到 稍等 马上后面就实现...
          this.destroy();
        }
      }
    );
resume()
文件读取不去data事件,会触发对应的回调,不停的触发 所以想要变可控可以手动调用 resume()& pause()
- pause的实现,调用的时候设置 this.flowing=false,打断 read()
  pause() {
    this.flowing = false;
  }
pause()
- pause 打断 read()多次读取,可以使用resume 打开 this.flowing=true 并调用read
resume() {
    if (!this.flowing) {
      this.flowing = true;
      this.read();
    }
  }
destroy()
- 文件open不成功时候抛错时调用
- 文件读取完毕后&&this.autoClose===true ,read()里文件读取end的时候 就执行close
  destroy(err) {
    if (err) {
      this.emit("error");
    }
    // 把close放destroy里 并 在read里调用
    if (this.autoClose) {
      fs.close(this.fd, () => {
        this.emit("close");
      });
    }
  }
完整代码
- 实现代码
/**
 *实现简单的可读流
 */

const fs = require("fs");
const EventEmitter = require("events");
class ReadStream extends EventEmitter {
  constructor(path, options = {}) {
    super();
    //参考fs 写实例需要用到的参数
    this.path = path;
    this.flags = options.flags || "r";
    this.encoding - options.encoding || null;
    this.autoClose = options.autoClose || true;
    this.start = options.start || 0;
    this.end = options.end;
    this.highWaterMark = options.highWaterMark || 64 * 1024;
    this.fd = undefined;
    this.offset = this.start;
    this.flowing = false;
    this.open();
    this.on("newListener", function (type) {
      if (type === "data") {
        this.flowing = true;
        this.read();
      }
    });
  }
  destroy(err) {
    if (err) {
      this.emit("error");
    }
    if (this.autoClose) {
      fs.close(this.fd, () => {
        this.emit("close");
      });
    }
  }
  open() {
    fs.open(this.path, this.flags, (err, fd) => {
      if (err) {
        return this.destroy(err);
      }
      this.fd = fd;
      this.emit("open", fd);
    });
  }
  resume() {
    if (!this.flowing) {
      this.flowing = true;
      this.read();
    }
  }
  pause() {
    this.flowing = false;
  }

  read() {
    if (typeof this.fd !== "number") {
      return this.once("open", () => this.read());
    }
    let howMuchToRead = this.end
      ? Math.min(this.end - this.offset + 1, this.highWaterMark)
      : this.highWaterMark;
    const buffer = Buffer.alloc(this.highWaterMark);
    fs.read(
      this.fd,
      buffer,
      0,
      howMuchToRead,
      this.offset,
      (err, bytesRead) => {
        if (bytesRead) {
          this.offset += bytesRead;
          this.emit("data", buffer.slice(0, bytesRead));
          if (this.flowing) {
            this.read();
          }
        } else {
          this.emit("end");
          this.destroy();
        }
      }
    );
  }
}

module.exports = ReadStream;- 调用代码
const ReadStream = require("./initReadStream");
let rs = new ReadStream(aPath, {
  flags: "r",
  encoding: null, //默认编码格式是buffer
  autoClose: true, //相当于需要调用close方法,如果为false  文件读取end的时候 就不会执行 close
  start: 0,
  highWaterMark: 3, //每次读取的个数 默认是64*1024个字节
});
可写流的实现
待续...
更多编程相关知识,请访问:编程视频!!
以上是淺談Nodejs中的可讀流,可讀流如何實作?的詳細內容。更多資訊請關注PHP中文網其他相關文章!

 Vercel是什么?怎么部署Node服务?May 07, 2022 pm 09:34 PM
Vercel是什么?本篇文章带大家了解一下Vercel,并介绍一下在Vercel中部署 Node 服务的方法,希望对大家有所帮助!
 node.js gm是什么Jul 12, 2022 pm 06:28 PM
gm是基于node.js的图片处理插件,它封装了图片处理工具GraphicsMagick(GM)和ImageMagick(IM),可使用spawn的方式调用。gm插件不是node默认安装的,需执行“npm install gm -S”进行安装才可使用。
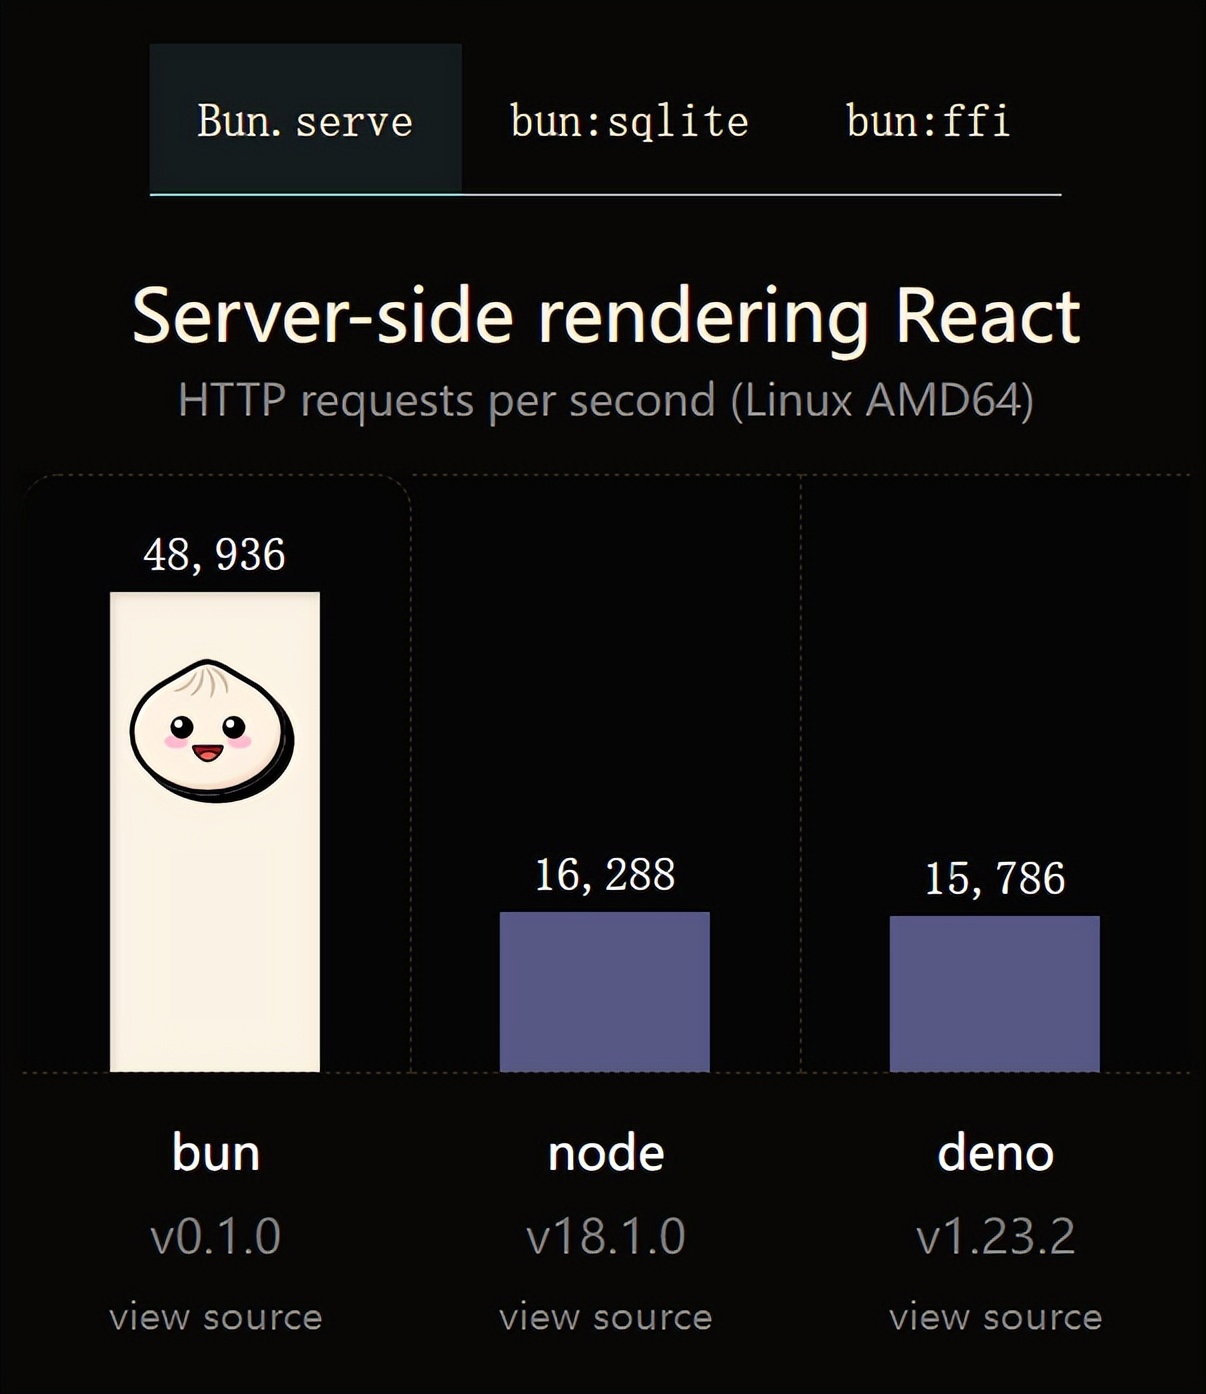 火了!新的JavaScript运行时:Bun,性能完爆NodeJul 15, 2022 pm 02:03 PM
今天跟大家介绍一个最新开源的 javaScript 运行时:Bun.js。比 Node.js 快三倍,新 JavaScript 运行时 Bun 火了!
 nodejs中lts是什么意思Jun 29, 2022 pm 03:30 PM
在nodejs中,lts是长期支持的意思,是“Long Time Support”的缩写;Node有奇数版本和偶数版本两条发布流程线,当一个奇数版本发布后,最近的一个偶数版本会立即进入LTS维护计划,一直持续18个月,在之后会有12个月的延长维护期,lts期间可以支持“bug fix”变更。
 聊聊Node.js中的多进程和多线程Jul 25, 2022 pm 07:45 PM
大家都知道 Node.js 是单线程的,却不知它也提供了多进(线)程模块来加速处理一些特殊任务,本文便带领大家了解下 Node.js 的多进(线)程,希望对大家有所帮助!
 node爬取数据实例:聊聊怎么抓取小说章节May 02, 2022 am 10:00 AM
node怎么爬取数据?下面本篇文章给大家分享一个node爬虫实例,聊聊利用node抓取小说章节的方法,希望对大家有所帮助!


熱AI工具

Undresser.AI Undress
人工智慧驅動的應用程序,用於創建逼真的裸體照片

AI Clothes Remover
用於從照片中去除衣服的線上人工智慧工具。

Undress AI Tool
免費脫衣圖片

Clothoff.io
AI脫衣器

AI Hentai Generator
免費產生 AI 無盡。

熱門文章
熱工具

SublimeText3 Mac版
神級程式碼編輯軟體(SublimeText3)

PhpStorm Mac 版本
最新(2018.2.1 )專業的PHP整合開發工具

Atom編輯器mac版下載
最受歡迎的的開源編輯器

mPDF
mPDF是一個PHP庫,可以從UTF-8編碼的HTML產生PDF檔案。原作者Ian Back編寫mPDF以從他的網站上「即時」輸出PDF文件,並處理不同的語言。與原始腳本如HTML2FPDF相比,它的速度較慢,並且在使用Unicode字體時產生的檔案較大,但支援CSS樣式等,並進行了大量增強。支援幾乎所有語言,包括RTL(阿拉伯語和希伯來語)和CJK(中日韓)。支援嵌套的區塊級元素(如P、DIV),

Dreamweaver Mac版
視覺化網頁開發工具

