PHP如何安裝Xdebug
- 醉折花枝作酒筹轉載
- 2021-05-13 17:15:282473瀏覽
這篇文章跟大家介紹一下PHP安裝Xdebug的方法。有一定的參考價值,有需要的朋友可以參考一下,希望對大家有幫助。

1.下載對應擴充檔
#檢視phpinfo資訊,如下圖:

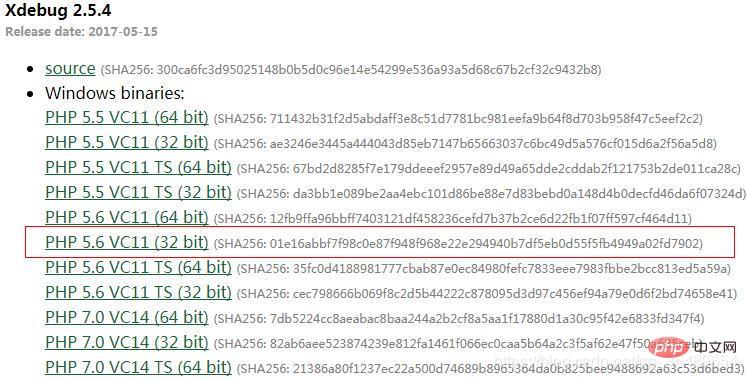
- # php版本5.6.27則需下載對應5.6的文件;
- X86代表需要下載32位元文件,反之下載64位元;
- VC11正常下載VC11,若後期發現不對則再嘗試VC11-TS;
進入Xdebug官網下載頁,https://xdebug.org/download.php 這裡我下載PHP_5.6_VC11 (32_bit);

2.安裝與設定
- 將剛下載的.dll檔案放php的ext資料夾下,如我的:D:\phpStudy\php\php-5.6.27-nts\ext
- 修改php.ini設定檔,在最後地方加入如下設定:
[XDebug]
;zend_extension ="D:\phpStudy\php\php-5.6.27-nts\ext\php_xdebug-2.5.4-5.6-vc11-nts.dll"
zend_extension =php_xdebug-2.5.4-5.6-vc11-nts.dll
xdebug.profiler_enable=on
xdebug.profiler_output_dir="D:\phpStudy\tmp\xdebug"
xdebug.trace_output_dir="D:\phpStudy\tmp\xdebug"
xdebug.remote_enable = on
xdebug.remote_host = 127.0.0.1
xdebug.remote_port = 9000
重啟apache,再一次查看phpinfo()訊息, 搜尋xdebug,如果出現如下則表示大功告捷

注意一:
zend_extension可以為.dll檔案的絕對路徑如:"D:\phpStudy\php\php-5.6.27-nts\ext\php_xdebug-2.5.4-5.6-vc11-nts.dll";也可以為相對路徑如:php_xdebug -2.5.4-5.6-vc11-nts.dll;
##注意二:上述操作如果xdebug擴充仍然無法安裝成功 嘗試下載不同後綴如:PHP 5.6 VC11 TS (32 bit )或:PHP 5.6 VC11 (32 bit);最後重啟apache; 嘗試在不同Xdebug 版本下下載.dll文件,如:Xdebug 2.5.4或Xdeache 2.5.3;最後重啟碼#推薦學習:
php影片教學以上是PHP如何安裝Xdebug的詳細內容。更多資訊請關注PHP中文網其他相關文章!
陳述:
本文轉載於:csdn.net。如有侵權,請聯絡admin@php.cn刪除

