淺談angular9中路由守衛的用法
- 青灯夜游轉載
- 2021-03-18 09:49:282627瀏覽
本篇文章跟大家介紹一下Angular路由守衛的使用。有一定的參考價值,有需要的朋友可以參考一下,希望對大家有幫助。

路由守衛是什麼
任何使用者都能在任何時候導航到任何地方。但有時出於種種原因需要控制對該應用程式的不同部分的存取。可能包括以下場景:
該使用者可能無權導航至目標元件。
可能使用者得先登入(認證)。
在顯示目標元件前,你可能得先取得某些資料。
在離開元件前,你可能要先儲存修改。
你可能要詢問使用者:你是否要放棄本次更改,而不用儲存它們?
相關推薦:《angular教學》
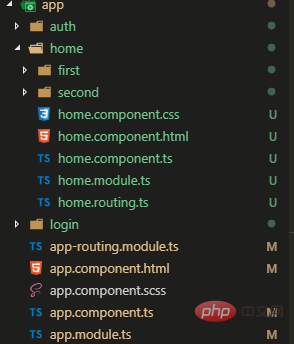
#元件的建立
1、home元件建立
2、login元件建立
3、home下的first和second子元件

守衛路由相關核心程式碼
routing中每個路由都是對所有人開放的。這些新的管理特性應該只能被已登入使用者存取。
編寫一個 CanActivate() 守衛,將正在嘗試存取管理元件匿名使用者重新導向到登入頁面。
1.1 在auth 資料夾下,新建一個auth.service.ts檔案,模擬有關登入的請求服務,實際場景一般是將後台token保存在cookie中.
import { Injectable } from '@angular/core';

import { Observable, of } from 'rxjs';
import { tap, delay } from 'rxjs/operators';

@Injectable({
  providedIn: 'root',
})
export class AuthService {
  isLoggedIn = false; //默认未登录

  // 记录登录之后,需要跳转到原来请求的地址
  redirectUrl: string;
// 登录
  login(): Observable<boolean> {
    return of(true).pipe(
      delay(1000),
      tap(val => this.isLoggedIn = true)
    );
  }
// 登出
  logout(): void {
    this.isLoggedIn = false;
  }
}</boolean>
1.2 在auth 資料夾下,新建一個auth.guard.ts檔案
import { Injectable } from '@angular/core';
import { CanActivate, ActivatedRouteSnapshot, RouterStateSnapshot, Router } from '@angular/router';

import { AuthService } from './auth.service';
@Injectable({
  providedIn: 'root',
})
export class AuthGuard implements CanActivate {
  constructor(private authService: AuthService, private router: Router) {}
  canActivate(
    next: ActivatedRouteSnapshot,
    state: RouterStateSnapshot): boolean {
    let url: string = state.url
    return this.checkLogin(url);
  }

  checkLogin(url: string): boolean {
    if (this.authService.isLoggedIn) { return true; }

    // 保存原始的请求地址,登录后跳转到该地址
    this.authService.redirectUrl = url;

    // 未登录,跳转到登录页面
    this.router.navigate(['/login']);
    return false;
  }
}
在路由中使用守衛
#在app-routing.module.ts檔案下使用
import { NgModule } from '@angular/core';
import { Routes, RouterModule } from '@angular/router';
import { AuthGuard } from './auth/auth.guard';
import { LoginComponent } from './login/login.component';

const routes: Routes = [
  {
    path: '',
    redirectTo: '/home',
    pathMatch: 'full'
  },

  {
    path: 'login',
    component: LoginComponent
  },
  {
    path: 'home',
    loadChildren: () => import('./home/home.module')
      .then(mod => mod.HomeModule),
    canActivate: [AuthGuard], // 守卫路由
  }
];

@NgModule({
  imports: [RouterModule.forRoot(routes)],
  exports: [RouterModule]
})
export class AppRoutingModule {}
#最後的結尾
一般路由守衛與攔截器一起使用,有興趣可以了解一下.
更多程式相關知識,請造訪:程式設計影片! !
以上是淺談angular9中路由守衛的用法的詳細內容。更多資訊請關注PHP中文網其他相關文章!
陳述:
本文轉載於:csdn.net。如有侵權,請聯絡admin@php.cn刪除
上一篇:nodejs怎麼建立檔案並寫入下一篇:nodejs怎麼建立檔案並寫入

