


本篇文章跟大家介紹一下Angular 模組的使用和懶載入。有一定的參考價值,有需要的朋友可以參考一下,希望對大家有幫助。

相關推薦:《angular教學》
一、Angular 內建模組

二、Angular 自訂模組
當我們專案比較小的時候可以不用自訂模組。但是當我們專案非常龐大的時候把所有的組 件都掛載到根模組裡面不是特別合適。所以這個時候我們就可以自訂模組來組織我們的項 目。並且透過 Angular 自訂模組可以實現路由的懶加載。
ng g module mymodule

新一個user 模組
ng g module module/user
新一個user 模組下的根元件
ng g component module/user
新建一個user 模組下的address,order,profile 元件
ng g component module/user/components/address
 ng g component module/user/components/order
 ng g component module/user/components/profile
如何在根模組掛載user 模組呢?
在app 根元件的模板檔app.component.html 裡引用user 元件會報錯
需要如下處理才可以被存取
1、在app .module.ts 引入模組
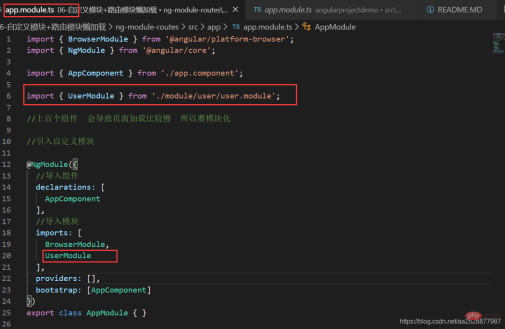
2、user 模組暴露出要被外部存取的元件

<app-user></app-user>如果需要在根組件裡直接使用app-address 元件,也是需要先在user 模組user.module.ts 暴露#/
暴露元件讓其他模組裡面可以使用暴露的元件/ exports:[UserComponent,AddressComponent]
如何在根模組掛載product 模組呢?
同上建立user 模組下的服務
1、建立ng g service module/user/services/common2、在user 模組中引入服務
user.module.ts

#配置路由實作模組懶載入

ng g module module/user --routing
 ng g module module/article --routing
 ng g module module/product --routing
建立元件:
ng g component module/user
ng g component module/user/components/profile
ng g component module/user/components/order

ng g component module/article
ng g component module/article/components/articlelist ng g component module/article/components/info

ng g component module/product
ng g component module/product/components/plist
ng g component module/product/components/pinfo
這裡先以article為例講解:
angular設定懶載入
在angular中路由即時載入元件又能載入模組,而我們說的懶載入其實就是加載模組,目前還沒有看到懶加載組件的例子。 載入元件使用的是component關鍵字
載入模組則是使用loadChildren關鍵字
import { NgModule } from '@angular/core';
import { Routes, RouterModule } from '@angular/router';
@NgModule({
  imports: [RouterModule.forRoot(routes)],
  exports: [RouterModule]
})
export class AppRoutingModule { }
forRoot是用在根模組載入路由配置, 而forChild是用在子模組載入路由配置。
import { AppRoutingModule } from './app-routing.module';
...
imports: [
    AppRoutingModule,
]
2. 在子模組裡設定路由在\module\article\article- routing.module.ts裡設定路由 import { NgModule } from '@angular/core';
import { Routes, RouterModule } from '@angular/router';
// import {ArticleComponent} from './article.component';
const routes: Routes = [
// {
// path:'',
// component:ArticleComponent
// }
];
@NgModule({
imports: [RouterModule.forChild(routes)],
exports: [RouterModule]
})
export class ArticleRoutingModule { }也可以在新建專案的時候就把路由的模組加上,可以省去上面的設定
在article模組的article -routing.module.ts設定路由
.....

import {ArticleComponent} from './article.component';
const routes: Routes = [
  {
    path:'',
    component:ArticleComponent
  }
];

......
3. 在app的路由模組進行設定路由
const routes: Routes = [
  {
    path:'article',
    //写法一:
    loadChildren:'./module/article/article.module#ArticleModule'

    //写法二
    // loadChildren: () => import('./module/user/user.module').then( m => m.UserModule)
  },
  // {
  //   path:'user',loadChildren:'./module/user/user.module#UserModule'
  // },
  // {
  //   path:'product',loadChildren:'./module/product/product.module#ProductModule'
  // },
  {
    path:'**',redirectTo:'article'
  }
];
如果在之前新模組的時候沒有加上–routing ,,需要設定模組的路由
product模組 product的路由:module\product\product-routing.module.ts
#
import { NgModule } from '@angular/core';
import { Routes, RouterModule } from '@angular/router';

import {ProductComponent} from './product.component';
const routes: Routes = [
  {
    path:'',
    component:ProductComponent
  }
];

@NgModule({
  imports: [RouterModule.forChild(routes)],
  exports: [RouterModule]
})
export class ProductRoutingModule { }
product的模組: module\product\product.module.ts
import { ProductRoutingModule } from './product-routing.module';

imports: [
    ProductRoutingModule
  ],
user模組 user的路由: \module\user\user-routing.module.ts
import { NgModule } from '@angular/core';
import { Routes, RouterModule } from '@angular/router';

import {UserComponent} from './user.component';
const routes: Routes = [
  {
    path:'',
    component:UserComponent
  }
];

@NgModule({
  imports: [RouterModule.forChild(routes)],
  exports: [RouterModule]
})
export class UserRoutingModule { }
user的模組: \module\user\user.module.ts
import {UserRoutingModule} from './user-routing.module';  +

 imports: [
    UserRoutingModule   +
  ],
RouterModule.forRoot() 和RouterModule.forChild()
# RouterModule物件為提供了兩個靜態的方法:forRoot()和forChild()來設定路由資訊。 RouterModule.forRoot()方法用於在主模組中定義主要的路由訊息,RouterModule.forChild()與 Router.forRoot()方法類似,但它只能應用在特性模組中。 即根模組中使用forRoot(),子模組中使用forChild()。配置子路由
1、在商品模块的路由product-routing.module.ts 配置子路由
import { PlistComponent } from './components/plist/plist.component';
import { CartComponent } from './components/cart/cart.component';
import { PinfoComponent } from './components/pinfo/pinfo.component';

const routes: Routes = [
  {
    path:'',
    component:ProductComponent,
    children:[
      {path:'cart',component:CartComponent},
      {path:'pcontent',component:PinfoComponent}
    ]
  },
  {path:'plist',component:PlistComponent}
];
2、在商品模块的模板product.component.html 添加router-outlet
<router-outlet></router-outlet>
3、在页面app.component.html添加菜单,方便跳转
<a>商品模块</a><a>商品列表</a>
更多编程相关知识,请访问:编程视频!!
以上是深入了解Angular中的模組和懶加載的詳細內容。更多資訊請關注PHP中文網其他相關文章!

 JavaScript的角色:使網絡交互和動態Apr 24, 2025 am 12:12 AM
JavaScript是現代網站的核心,因為它增強了網頁的交互性和動態性。 1)它允許在不刷新頁面的情況下改變內容,2)通過DOMAPI操作網頁,3)支持複雜的交互效果如動畫和拖放,4)優化性能和最佳實踐提高用戶體驗。
 C和JavaScript:連接解釋Apr 23, 2025 am 12:07 AM
C 和JavaScript通過WebAssembly實現互操作性。 1)C 代碼編譯成WebAssembly模塊,引入到JavaScript環境中,增強計算能力。 2)在遊戲開發中,C 處理物理引擎和圖形渲染,JavaScript負責遊戲邏輯和用戶界面。
 從網站到應用程序:JavaScript的不同應用Apr 22, 2025 am 12:02 AM
JavaScript在網站、移動應用、桌面應用和服務器端編程中均有廣泛應用。 1)在網站開發中,JavaScript與HTML、CSS一起操作DOM,實現動態效果,並支持如jQuery、React等框架。 2)通過ReactNative和Ionic,JavaScript用於開發跨平台移動應用。 3)Electron框架使JavaScript能構建桌面應用。 4)Node.js讓JavaScript在服務器端運行,支持高並發請求。
 Python vs. JavaScript:比較用例和應用程序Apr 21, 2025 am 12:01 AM
Python更適合數據科學和自動化,JavaScript更適合前端和全棧開發。 1.Python在數據科學和機器學習中表現出色,使用NumPy、Pandas等庫進行數據處理和建模。 2.Python在自動化和腳本編寫方面簡潔高效。 3.JavaScript在前端開發中不可或缺,用於構建動態網頁和單頁面應用。 4.JavaScript通過Node.js在後端開發中發揮作用,支持全棧開發。
 C/C在JavaScript口譯員和編譯器中的作用Apr 20, 2025 am 12:01 AM
C和C 在JavaScript引擎中扮演了至关重要的角色,主要用于实现解释器和JIT编译器。1)C 用于解析JavaScript源码并生成抽象语法树。2)C 负责生成和执行字节码。3)C 实现JIT编译器,在运行时优化和编译热点代码,显著提高JavaScript的执行效率。
 JavaScript在行動中:現實世界中的示例和項目Apr 19, 2025 am 12:13 AM
JavaScript在現實世界中的應用包括前端和後端開發。 1)通過構建TODO列表應用展示前端應用,涉及DOM操作和事件處理。 2)通過Node.js和Express構建RESTfulAPI展示後端應用。
 JavaScript和Web:核心功能和用例Apr 18, 2025 am 12:19 AM
JavaScript在Web開發中的主要用途包括客戶端交互、表單驗證和異步通信。 1)通過DOM操作實現動態內容更新和用戶交互;2)在用戶提交數據前進行客戶端驗證,提高用戶體驗;3)通過AJAX技術實現與服務器的無刷新通信。
 了解JavaScript引擎:實施詳細信息Apr 17, 2025 am 12:05 AM
理解JavaScript引擎內部工作原理對開發者重要,因為它能幫助編寫更高效的代碼並理解性能瓶頸和優化策略。 1)引擎的工作流程包括解析、編譯和執行三個階段;2)執行過程中,引擎會進行動態優化,如內聯緩存和隱藏類;3)最佳實踐包括避免全局變量、優化循環、使用const和let,以及避免過度使用閉包。


熱AI工具

Undresser.AI Undress
人工智慧驅動的應用程序,用於創建逼真的裸體照片

AI Clothes Remover
用於從照片中去除衣服的線上人工智慧工具。

Undress AI Tool
免費脫衣圖片

Clothoff.io
AI脫衣器

Video Face Swap
使用我們完全免費的人工智慧換臉工具,輕鬆在任何影片中換臉!

熱門文章
熱工具

SublimeText3漢化版
中文版,非常好用

SublimeText3 英文版
推薦:為Win版本,支援程式碼提示!

SublimeText3 Linux新版
SublimeText3 Linux最新版

WebStorm Mac版
好用的JavaScript開發工具

mPDF
mPDF是一個PHP庫,可以從UTF-8編碼的HTML產生PDF檔案。原作者Ian Back編寫mPDF以從他的網站上「即時」輸出PDF文件,並處理不同的語言。與原始腳本如HTML2FPDF相比,它的速度較慢,並且在使用Unicode字體時產生的檔案較大,但支援CSS樣式等,並進行了大量增強。支援幾乎所有語言,包括RTL(阿拉伯語和希伯來語)和CJK(中日韓)。支援嵌套的區塊級元素(如P、DIV),

