手把手教你用php實現圖片上傳功能
- 烟雨青岚轉載
- 2020-07-16 13:39:286058瀏覽

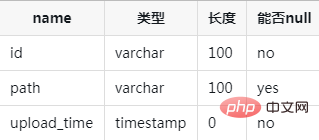
一為了測試圖片上傳功能, 把圖片路徑儲存到資料庫, 我們得先新測試表test_img.

CREATE TABLE test_img (
	id int(4) UNSIGNED NOT NULL AUTO_INCREMENT,
	path varchar(100) default NULL,
	upload_time  timestamp default CURRENT_TIMESTAMP,
	PRIMARY KEY(id)
)engine=myisam DEFAULT charset=utf8
sql 指令: 插入表中時產生一個唯一的數字, 例如測試資料多了, id 是不停地自增, 如果要把id回歸到1, 可以嘗試以下指令.
alter table test_img auto_increment = 1
二新建img.html 檔案用於選擇上傳圖片
<!DOCTYPE html><html lang="utf-8"><head>
    <meta charset="UTF-8">
    <title>图片上传</title></head><body><form action="img.php" method="post" enctype="multipart/form-data">
    选择上传的图片: <input type="file" name="file" accept="image/*">
    <br><br>
<input type="submit" value="上传"></form>< ;form> 標籤中的enctype 控制著是否編碼發送表單資料, 預設是application/x-www-form-urlencoded, 即在發送前編碼所有字元.
| 值 | 描述 |
|---|---|
| #application/x-www-form-urlencoded | 在傳送前編碼所有字元( 預設) |
| multipart/form-data | 不對字元編碼。使用包含檔案上傳控制項的表單時,必須使用該值 |
| text/plain | 空格轉換為「 」 加號,但不對特殊字元編碼 |
<input>標籤中的accept限制上傳格式.
三新建img.php 用於接受處理圖片
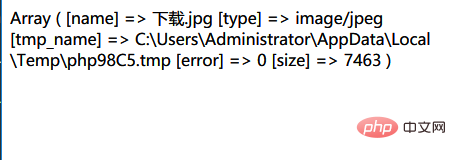
$_FILES 取得圖片檔案, 將特定檔案名稱加入資料表test_img, move_uploaded_file 將圖片檔案儲存到目標資料夾下, iconv 作字元編碼處理, 防止有中文命名的圖片上傳後出現亂碼的情況.
<?php
header("Content-Type: text/html;charset=utf-8");
$conn = new mysqli('localhost', 'root', '', 'test');
if (!$conn) {
die("Connection failed: " . mysqli_connect_error());
}
$destination = '../upload/image/';
$file = $_FILES['file']; // 获取上传的图片
$filename = $file['name'];
$insert = "INSERT INTO test_img (path) VALUES ('$filename')";
$test = move_uploaded_file($file['tmp_name'], $destination . iconv("UTF-8", "gb2312", $filename));
if ($insert && $test) {
$conn->query($insert);
} else {
echo '上传失败' . '<br>';
}
$select = 'SELECT path FROM test_img';
$result = $conn->query($select);
while ($row = $result->fetch_assoc()) {
echo "<img src="/static/imghwm/default1.png" data-src=" . $destination . $row['path'] . " class="lazy" alt="手把手教你用php實現圖片上傳功能" >";
}print_r( $_FILES['file']); // 輸出接受到的上傳圖片得到如下資訊

上傳圖片成功後, 透過資料表圖片資訊匹配upload/image 下的圖片循環顯示出來, 效果如下.

四寫到最後
以上只是分享個php 粗糙版上傳圖片的功能實現, 有些細節你大可自己嘗試修改完善, 要想學好必須透過親自動手領悟, 雲學習只能擼個皮毛而已, 如果我的分享能讓你有點啟發的話,不如點個讚激勵一下我, 當然不給也行, 我也會自我驅動學習的啦~
感謝大家的閱讀,希望大家有所收穫
#推薦教學:《php教學》
以上是手把手教你用php實現圖片上傳功能的詳細內容。更多資訊請關注PHP中文網其他相關文章!
陳述:
本文轉載於:csdn.net。如有侵權,請聯絡admin@php.cn刪除
上一篇:2021年PHP面試題大全下一篇:2021年PHP面試題大全

