Linux如何安裝設定PHP+Nginx
- coldplay.xixi原創
- 2020-07-13 14:15:084704瀏覽
Linux安裝設定PHP Nginx的方法:先安裝好php;然後安裝好Nginx;接著Nginx與PHP透過本機的9000埠完成資料請求;最後完成測試即可。

Linux安裝設定PHP Nginx的方法:
一、PHP的安裝
1.安裝php7.0
軟體下載 # wget http://cn2.php.net/distributions/php-7.0.4.tar.gz
檢查並安裝依賴套件
[root@ser3 Desktop]# rpm -qa libjpeg libjpeg-devel libpng libpng-devel freetype freetype-devel libxml2 curl-devel libxslt-devel openssl-devel
[root@ser3 Desktop]# yum -y install libjpeg libjpeg-devel libpng libpng-devel freetype freetype-devel libxml2 libxslt-devel openssl-devel
[root@ser3 Desktop]# tar xf php-7.0.4.tar.gz
[root@ser3 Desktop]# cd php-7.0.4
[root@ser3 php-7.0.4]# ./configure --prefix=/usr/local/php7 --exec-prefix=/usr/local/php7 --with-config-file-path=/usr/local/php7/etc  --with-curl  --with-freetype-dir  --with-gd  --with-gettext  --with-iconv-dir  --with-kerberos  --with-libdir=lib64  --with-libxml-dir  --with-mysqli  --with-openssl  --with-pcre-regex  --with-pdo-mysql  --with-pdo-sqlite  --with-pear  --with-png-dir  --with-xmlrpc  --with-xsl  --with-zlib --with-zlib-dir --with-mhash --with-mcrypt --with-openssl-dir --with-jpeg-dir --enable-gd-jis-conv  --enable-fpm  --enable-bcmath  --enable-libxml  --enable-inline-optimization  --enable-gd-native-ttf  --enable-mbregex  --enable-mbstring  --enable-opcache  --enable-pcntl  --enable-shmop  --enable-soap  --enable-sockets  --enable-sysvsem  --enable-xml  --enable-zip
[root@ser3 php-7.0.4]# make
[root@ser3 php-7.0.4]# make  test
[root@ser3 php-7.0.4]# make install
2.設定設定檔
[root@ser3 php-7.0.4]# cp php.ini-production /usr/local/php7/etc/php.ini
php.ini-development 適合開發測試,如本地測試環境,php.ini-production擁有較高的安全性設定,適合伺服器上線運作當產品。一般修改php.ini-production為php.ini,安全性更高,確保測試環境(本地)與正式環境(線上)一致
[root@ser3 php-7.0.4]# cp /usr/local/php7/etc/php-fpm.conf.default /usr/local/php7/etc/php-fpm.conf
[root@ser3 php-7.0.4]# cp /usr/local/php7/etc/php-fpm.d/www.conf.default /usr/local/php7/etc/php-fpm.d/www.conf
[root@ser3 php-7.0.4]# cp ./sapi/fpm/init.d.php-fpm /etc/init.d/php-fpm
3.加入啟動服務
[root@ser3 php-7.0.4]# chmod +x /etc/init.d/php-fpm
[root@ser3 php-7.0.4]# chkconfig --add php-fpm
注意的是php7中www.conf這個設定檔配置phpfpm的連接埠號碼等信息,如果你修改預設的9000埠號需在這裡改,再改nginx的設定
4.啟動php服務
[root@ser3 php-7.0.4]# /etc/init.d/php-fpm start
[root@ser3 php-7.0.4]# ps -ef | grep php-fpm
#二、Nginx的安裝
1 .軟體下載:
wget http://nginx.org/download/nginx-1.6.2.tar.gz直接在Linux上用指令下載
2.安裝依賴在套件pcre和依賴的軟體
安裝nginx之前,請確保已安裝了# rpm -qa gcc openssl-devel pcre zlib-devel軟體庫
安裝pcre庫是為了使Nginx支援HTTP Rewriter模組。若pcre預設沒有這個安裝包,安裝則需要下載手動安裝。
3. 安裝前進行安裝包最佳化
(編譯安裝過程最佳化)減少nginx編譯後的檔案的大小在編譯nginx時,默認以debug模式下會插入很多追蹤和ASSERT之類的信息,編譯完成後,
[root@svr1 nginx-1.6.2]# vim auto/cc/gcc
# debug
CFLAGS="$CFLAGS -g"
   注释或删除这两行,即可取消debug模式.
[root@svr1 nginx-1.6.2]# ./configure --prefix=/usr/local/nginx --with-http_stub_status_module --with-http_gzip_static_module --with-openssl=/usr/local/openssl
[root@svr1 nginx-1.6.2]# make && make install
[root@svr1 nginx-1.6.2]# ps -ef | grep nginx
[root@svr1 nginx-1.6.2]# /usr/local/nginx/sbin/nginx -c /usr/local/nginx/conf/nginx.conf
[root@svr1 nginx-1.6.2]# curl -i 127.0.0.1
......
<body>
<h1>Welcome to nginx!</h1>
If you see this page, the nginx web server is successfully installed and
......
測試i頁顯示說明nginx安裝沒有問題
#三、整合Nginx與PHP
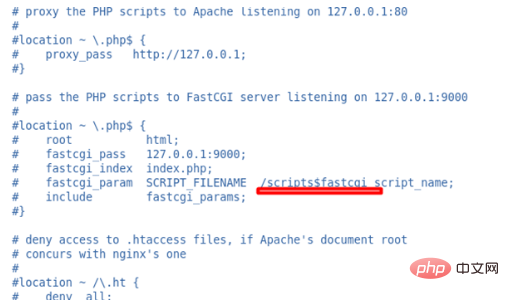
Nginx自己並不處理動態網頁的請求,而且Nginx將得到的動態請求轉交給PHP,Nginx的設定檔
# vim /usr/local/nginx/conf/nginx.conf //标的部分是我们后面要修改的

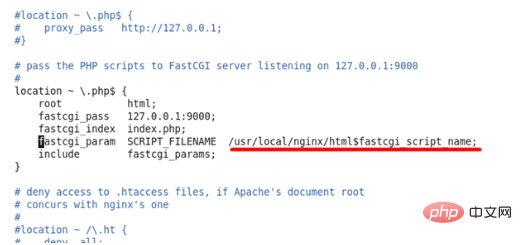
看上圖,Nginx已經知道怎麼把得到的請求傳達給PHP,Nginx在得到*.php請求時,會把請求透過9000埠傳給PHP。下面我們把這些註解去掉即可,如下圖

如上圖所示,我們在前面已經看到Nginx是透過本機的9000埠將PHP請求轉寄給PHP的,而上圖我們可以看到PHP自己是從本機的9000埠偵聽數據,Nginx與PHP透過本機的9000埠完成了資料請求。
四、測試
我們在nginx的設定檔裡面已經定義了PHP網站的存放路徑,路徑是/usr /local/nginx/html
下面我們在這個目錄下新建一個PHP頁面測試網頁,檔案名稱為test.php,內容如下
<?php
     phpinfo();
?>
关闭php
killall php-fpm
php重启
/usr/local/php7/sbin/php-fpm &
关闭nginx
/usr/local/nginx/sbin/nginx -s stop       //关闭服务器
重启nginx
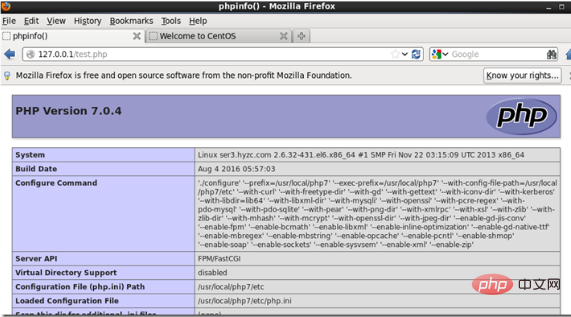
/usr/local/nginx/sbin/nginx 开启服务器重啟PHP與nginx後我們在瀏覽器中輸入http://localhost/test.php,出現以下介面算成功

#相關學習推薦:PHP程式設計從入門到精通
以上是Linux如何安裝設定PHP+Nginx的詳細內容。更多資訊請關注PHP中文網其他相關文章!

