


這篇文章主要講述的是在Mac系統下用Apache和PHP安裝Xdebug詳細流程,有興趣的朋友可以學習一下。
MAC homebrew自2018/3/31後棄用homebrew/php
By 31st March 2018 we will deprecate and archive the Homebrew/php tap. Unfortunately we have been unable to maintain an acceptable, consistent user or contributor experience and CI workload through non-core formula taps in the Homebrew organisation so we are continuing to migrate widely used formulae into Homebrew/core and encourage more niche formulae and options to be supported outside the Homebrew organisation.
詳細:https://brew.sh/2018/01/19/homebrew-1.5.0/
所以不能再用下面的方法安裝xdebug了,下面的方法不行!下面的方法不行!下面的方法不行!
brew install php<version number>-xdebug
所以,安裝xdebug我們可以手動編譯一下,具體步驟如下:
1.首先進入Xdebug 官方下載頁面:https://xdebug.org/ download.php,下載安裝php版本支援的xdebug的版本
eg.我本地的PHP版本是5.6.38,所以下載了2.5.4的source,一個tgz壓縮包
2.在下載xdebug的資料夾裡開啟終端機
-xzf xdebug-.
也可以在本地直接解壓,再進入解壓縮的xdebug的資料夾裡,開啟終端機
phpize
#如果不可以,写phpize的完整路径
./configure
上面指令執行之後,開始編譯
make -j2
編譯完成之後,會提示,在modules可找到xdebug.so檔案

#3.將編譯之後得到的xdebug.so檔案可以拷貝到extension_dir規定的資料夾中
註:php.ini 中搜尋extension_dir
4.在php.ini設定參數
[Xdebug]
zend_extension="/usr/local/lib/php/pecl/20131226/xdebug.so";自动跟踪,可关闭(关闭后提升性能)
xdebug.auto_trace=On
;性能分析,可关闭(关闭后提升性能)
xdebug.profiler_enable=On
xdebug.var_display_max_children=512xdebug.var_display_max_data=2048xdebug.var_display_max_depth=8
修改完之後,重啟apache,phpinfo()偵測一下安裝上了沒,應該是沒問題了
相關影片:PHP影片教學
以上是Mac系統下用Apache和PHP安裝Xdebug詳細流程的詳細內容。更多資訊請關注PHP中文網其他相關文章!

 ip与mac绑定什么意思Mar 09, 2023 pm 04:44 PM
ip与mac绑定是指将特定的IP地址与特定的MAC地址关联起来,使得只有使用该MAC地址的设备才能够使用该IP地址进行网络通信。ip与mac绑定可以防止被绑定的主机的IP地址不被假冒,前提条件:1、MAC地址是唯一的,并且不可假冒;只能绑定与路由器直接相连的网络上的主机(也就是主机的网关在路由器上)。
 mac版下载是什么意思Mar 06, 2023 am 09:52 AM
mac版下载的意思是当软件在选择安装时,选择MAC版下载;Windows版和MAC版是两个不同的操作系统,所以大多数软件在选择安装的同时需要选择Windows版还是MAC版。
 mac鼠标滚轮相反怎么办Mar 16, 2023 pm 05:44 PM
mac鼠标滚轮相反的解决办法:1、打开mac电脑,点击屏幕的苹果标志,然后选择“系统偏好设置”;2、在“系统偏好设置”窗口中,选择“鼠标”;3、在“鼠标”窗口中,将“滚动方向:自然”前面的勾去掉即可。
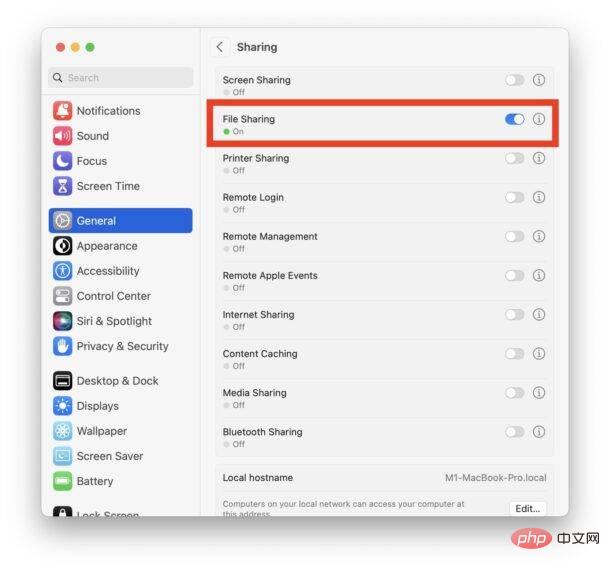 修复文件共享在 MacOS Ventura 中不起作用Apr 13, 2023 am 11:34 AM
修复 SMB 文件共享在 MacOS Ventura 中不起作用的问题从 Apple 菜单打开 Mac 上的“系统设置”应用程序转到“常规”,然后转到“共享”找到“文件共享”的开关并将其关闭通过转到 Apple 菜单并选择重新启动来重新启动 Mac重新启动后,返回共享系统设置面板并将“文件共享”重新设置为打开位置像往常一样恢复文件共享,它应该按预期工作如果 MacOS Ventura Mac 与另一台 Mac 或设备之间的文件共享突然再次停止工作,您可能需要在几天后或随机重复此过程。
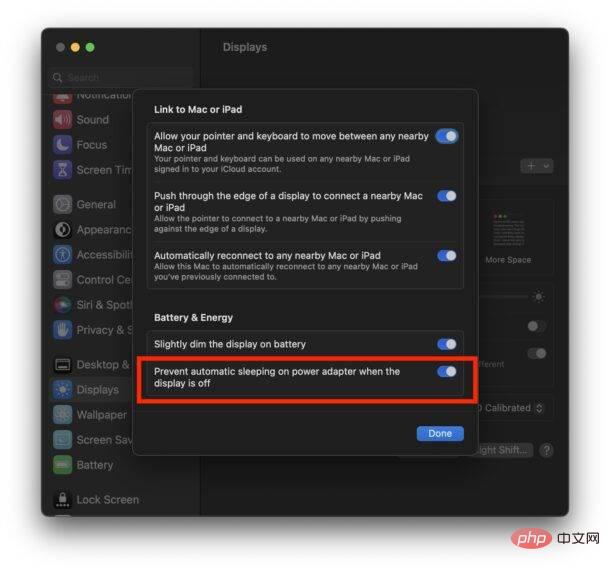 如何防止 Mac 在显示器关闭时进入睡眠状态 (MacOS Ventura)Apr 13, 2023 pm 12:31 PM
显示器关闭时如何防止 Mac 休眠如果您希望 Mac 显示器能够在整个计算机不进入睡眠状态的情况下关闭,请在此处进行适当的设置调整:下拉 Apple 菜单并转到“系统设置”转到“显示”点击“高级...”切换“防止显示器关闭时电源适配器自动休眠”的开关现在 Mac 显示屏可以关闭,同时防止 Mac 本身进入睡眠状态。这可能主要与 Mac 笔记本电脑用户相关,但即使是那些没有 MacBook 的用户也可能会发现该功能很有用。
 mac克隆是什么意思Jan 31, 2023 am 10:33 AM
mac克隆全称mac地址克隆,是固化在网卡上串行EEPROM中的物理地址,通常有48位长。mac克隆一般应用在路由器上,用户在用电脑直接拨号上网,后来又加了个路由器,通过路由器来实现多台电脑同时上网,这时要用到mac地址克隆了,就是把当前的电脑的mac地址克隆到路由器中去,因为运营商是把你的电脑mac地址绑定你的账号的,所以得克隆以后才能用。
 mac解压rar用什么软件Mar 03, 2023 pm 04:18 PM
mac解压rar的软件:1、The Unarchiver,是一款完全免费、小巧,而且非常易于使用的压缩、解压缩小工具;2、Keka,是一款免费、实用的压缩、解压缩工具,支持解压缩RAR格式的压缩包;3、360压缩大师,是一款免费的压缩、解压缩软件,完全支持RAR文件解压;4、MacZip,支持包括RAR在内的超过20种压缩格式的解压;5、BetterZip;6、FastZip。
 mac的shift键是哪个键Mar 13, 2023 pm 02:20 PM
mac的shift键是fn键上方、caps lock键下方的一个键,该键在键盘最左侧,由右下往上数第2个键;shift键是键盘中的上档转换键,可以通过“Ctrl+Shift”组合键来切换输入法。


熱AI工具

Undresser.AI Undress
人工智慧驅動的應用程序,用於創建逼真的裸體照片

AI Clothes Remover
用於從照片中去除衣服的線上人工智慧工具。

Undress AI Tool
免費脫衣圖片

Clothoff.io
AI脫衣器

AI Hentai Generator
免費產生 AI 無盡。

熱門文章
熱工具

mPDF
mPDF是一個PHP庫,可以從UTF-8編碼的HTML產生PDF檔案。原作者Ian Back編寫mPDF以從他的網站上「即時」輸出PDF文件,並處理不同的語言。與原始腳本如HTML2FPDF相比,它的速度較慢,並且在使用Unicode字體時產生的檔案較大,但支援CSS樣式等,並進行了大量增強。支援幾乎所有語言,包括RTL(阿拉伯語和希伯來語)和CJK(中日韓)。支援嵌套的區塊級元素(如P、DIV),

記事本++7.3.1
好用且免費的程式碼編輯器

MinGW - Minimalist GNU for Windows
這個專案正在遷移到osdn.net/projects/mingw的過程中,你可以繼續在那裡關注我們。 MinGW:GNU編譯器集合(GCC)的本機Windows移植版本,可自由分發的導入函式庫和用於建置本機Windows應用程式的頭檔;包括對MSVC執行時間的擴展,以支援C99功能。 MinGW的所有軟體都可以在64位元Windows平台上運作。

Atom編輯器mac版下載
最受歡迎的的開源編輯器

SublimeText3 Linux新版
SublimeText3 Linux最新版

