SpringBoot 中Thymeleaf範本的詳細介紹
- 不言轉載
- 2018-10-11 15:19:323443瀏覽
這篇文章帶給大家的內容是關於SpringBoot 中Thymeleaf模板的詳細介紹,有一定的參考價值,有需要的朋友可以參考一下,希望對你有所幫助。
一、前言
Thymeleaf 的出現是為了取代JSP,雖然JSP 存在了很長時間,並且在Java Web開發中無所不在,但它也存在一些缺陷:
1、JSP 最明顯的問題在於它看起來像HTML或XML,但它其實不是。大多數的JSP模板都是採用HTML的形式,但是又摻雜上了各種JSP標籤庫的標籤,使其變得很混亂。
2、JSP 規範是與 Servlet 規範緊密耦合的。這意味著它只能用在基於 Servlet 的網路應用程式之中。 JSP模板不能作為通用的模板(如格式化Email),也不能用於非Servlet的 Web 應用。
相較於 JSP 來說,Thymeleaf 很好的解決了這些缺點:
1、Thymeleaf模板是原生的,不依賴標籤庫。它能在接受原始 HTML 的地方進行編輯和渲染。
2、因為它沒有與Servlet規格耦合,因此 Thymeleaf 模板能夠進入JSP所無法涉足的領域。這意味著Thymeleaf模板與JSP不同,它能夠以原始的方式進行編輯甚至渲染,而不必經過任何類型的處理器。當然,我們需要Thymeleaf來處理模板並渲染得到最終期望的輸出。即便如此,如果沒有任何特殊的處理,home.html也能夠載入到網頁瀏覽器中,並且看起來與完整渲染的效果很類似。
Spring boot不建議使用 JSP 開發web。
二、整合 Thymeleaf 模板引擎
SpringBoot 對Thymeleaf 模板引擎的支援也很簡單:
1、pom.xml
<dependency>
    <groupId>org.springframework.boot</groupId>
    <artifactId>spring-boot-starter-thymeleaf</artifactId>
</dependency>
這時候,SpringBoot 對Thymeleaf 模板的支援就完成了,我們就能在Web 開發中使用Thymeleaf 模板了,簡單吧?
之前的文章有提到
SpringBoot 的關鍵是 「約定俗成」。既然我們選擇了這麼簡單的配置,那麼在開發中就要遵守 SpringBoot 對 Thymeleaf
約定俗成的方案,最重要的一點就是模板檔案放在templates 目錄下,也就是模板解析器前綴是 /templates/ ,後綴是.html
2、application.yml
#如果不想要所謂約定俗成的方案,想進行一些自訂的配置呢?並看下方:
spring:
  thymeleaf:
    prefix: classpath:/templates/
    suffix: .html
    servlet:
      content-type: text/html
    enabled: true
    encoding: UTF-8
    mode: HTML5
    cache: false
3、WebConfig.java
如果上面的設定還不能達到你的要求,你想要更細化對 Thymeleaf 的控制,包括設定視圖解析器、模板解析器以及模板引擎這些,那麼請看下面的方案!
/**
 * 1、ThymeleafViewResolver 接收逻辑视图名称将它解析为视图
 * 2、SpringTemplateEngine会在Spring中启用Thymeleaf引擎,用来解析模板,并基于这些模板渲染结果
 * 3、TemplateResolver会最终定位和查找模板。
 */
@Configuration
public class WebConfig {
    /**
     * 配置 Thymeleaf 视图解析器 —— 将逻辑视图名称解析为 Thymeleaf 模板视图
     *
     * @param springTemplateEngine 模板引擎
     * @return
     */
    @Bean
    public ViewResolver viewResolver(SpringTemplateEngine springTemplateEngine){
        ThymeleafViewResolver resolver = new ThymeleafViewResolver();
        resolver.setTemplateEngine(springTemplateEngine);
        return resolver;
    }
    /**
     * 模板引擎 —— 处理模板并渲染结果
     *
     * @param templateResolver 模板解析器
     * @return
     */
    @Bean
    public SpringTemplateEngine springTemplateEngine(ITemplateResolver templateResolver) {
        SpringTemplateEngine springTemplateEngine = new SpringTemplateEngine();
        springTemplateEngine.setTemplateResolver(templateResolver);
        return springTemplateEngine;
    }
    /**
     * 模板解析器 —— 加载 Thymeleaf 模板
     *
     * @return
     */
    @Bean
    public ITemplateResolver templateResolver() {
        SpringResourceTemplateResolver templateResolver = new SpringResourceTemplateResolver();
        templateResolver.setPrefix("classpath:/templates/");
        templateResolver.setSuffix(".html");
        templateResolver.setTemplateMode(TemplateMode.HTML);
        templateResolver.setCacheable(false);
        templateResolver.setTemplateMode("HTML5");
        return templateResolver;
    }
}
三、使用Thymeleaf 模板
完成了上面的配置後,讓我們來看看如何在SpringBoot 中使用Thymeleaf 模板吧:
1、範本檔案— /templates/user/list.html
<!DOCTYPE html>
<html xmlns:th="http://www.thymeleaf.org">
<head>
    <meta charset="UTF-8" />
    <title>Insert title here</title>
</head>
<body>
<h2>用户列表</h2>
<div>
    <ul>
        <li  th:each="user:${users}">
            <span th:text="${user.uuid}"></span>-
            <span th:text="${user.name}"></span>-
            <span th:text="${user.age}"></span>-
            <span th:text="${user.address}"></span>
        </li>
    </ul>
</div>
</body>
</html>
2、控制層— ModelAndViews
這裡Model 指的是:控制層處理完請求,傳回需要渲染的結果;Views 指的是:範本的邏輯視圖名稱(前後端分離)。
@Controller
@RequestMapping("/user")
public class UserController {

    @RequestMapping("/list")
    public String listUser(Model model) {
        List<UserDto> userList = new ArrayList<>();
        for (int i = 0; i < 10; i++) {
            userList.add(new UserDto(UUID.randomUUID().toString().replace("-", ""), "张三" + i, 1, "中国北京"));
        }
        model.addAttribute("users", userList);
        return "user/list";
    }
}
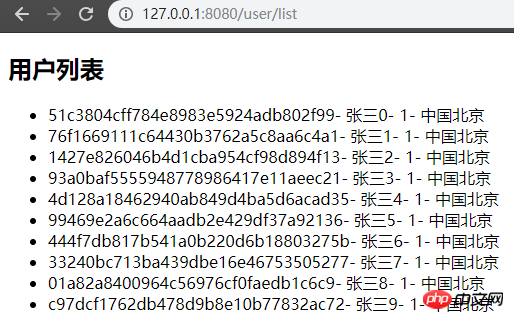
3、效果

#示範原始碼:https:/ /github.com/JMCuixy/Thymeleaf
以上是SpringBoot 中Thymeleaf範本的詳細介紹的詳細內容。更多資訊請關注PHP中文網其他相關文章!

