thinkphp5在部署伺服器的過程中遇到的問題總結
- 不言原創
- 2018-08-15 09:48:416390瀏覽
這篇文章帶給大家的內容是關於thinkphp5在部署伺服器的過程中遇到的問題總結,有一定的參考價值,有需要的朋友可以參考一下,希望對你有幫助。
最近部署TP5遇到了很多坑,各種環境下都會出現一些問題,下面是我記錄的排坑之路
先說最簡單的lnmp一鍵安裝包,我用的是1.5穩定版
安裝指令:wget http://soft.vpser.net/lnmp/lnmp1.5.tar.gz -cO lnmp1.5. tar.gz && tar zxf lnmp1.5.tar.gz && cd lnmp1.5 && ./install.sh lnmp(安裝編譯一鍵搞定)
如需要安裝LNMPA或LAMP,將. /install.sh 後面的參數lnmp替換為lnmpa或lamp即可。如需更改網站與資料庫目錄、自訂Nginx參數、PHP參數模組、開啟lua等需在執行./install.sh 指令前修改安裝包目錄下的lnmp.conf 文件,詳細可查看lnmp.conf檔案參數說明。
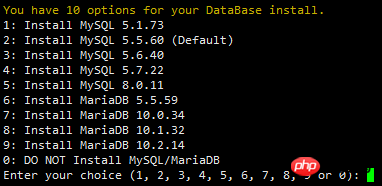
第一個提示:提供總是資料庫(我用的3),直接輸入數字回車即可
第二個提示:輸入資料庫密碼

#第三個提示:是否啟用Innodb,直接回車或y回車

#第四個提示:選擇PHP版本(預設5.6)我的是預設版本
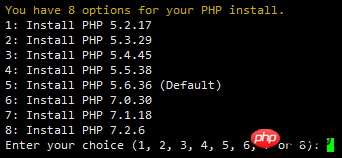
第五個提示:我選的預設不安裝(我的是預設)

第六個提示:選擇apache版本(我選的預設)

#第七個提示:如果顯示Nginx: OK,MySQL: OK,PHP: OK
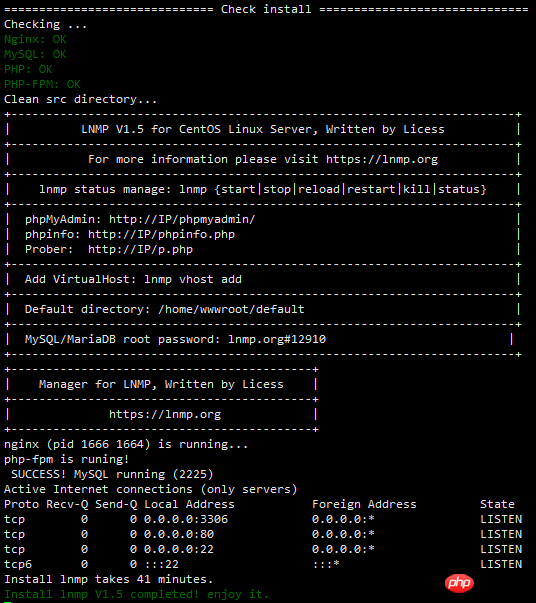
#並且Nginx、MySQL、 PHP都是running,80和3306埠都存在,並提示安裝使用的時間及Install lnmp V1.5 completed! enjoy it.的話,說明已經安裝成功。
某些系統可能會一直卡在Install lnmp V1.5 completed! enjoy it.不自動退出,可以按Ctrl c退出。
安裝完成接下來開始使用就可以了,按新增虛擬主機教學,新增虛擬主機後可以使用sftp或ftp伺服器上傳網站代碼,將網域名稱解析到VPS或伺服器的IP上,解析生效即可使用。
第八個提示:安裝失敗

#如果出現類似上圖的提示,有一個或幾個沒安裝成功表示安裝失敗! !需要用winscp或其他類似工具,將/root目錄下面的lnmp-install.log下載下來,到LNMP支持論壇發帖註明你的系統發行版名稱及版本號、32位還是64位等信息,並將lnmp -install.log壓縮以附件形式上傳到論壇,我們會透過日誌找出錯誤,並給予對應的解決方法
預設LNMP是不安裝FTP伺服器的,如需要FTP伺服器:https://lnmp .org/faq/ftpserver.html
新增虛擬主機:lnmp封裝好的很方便
lnmp vhost add //新增虛擬主機

#輸入你的虛擬網域,我的是www.tp5api.cn

這裡詢問是否要新增更多域名,直接再輸入要綁定的域名,我直接回車跳過了

網站目錄不存在的話會建立目錄。也可以輸入已經存在的目錄或要設定的目錄(注意如要輸入必須是全路徑即以/開頭的完整路徑!!!)。不輸入直接回車的話,採用預設目錄:/home/wwwroot/網域

#開啟偽靜態,利於SEO優化

預設已經有了discuz、discuzx、discuzx2(Discuz X二級目錄)、wordpress、wp2(WordPress二級目錄)、typecho、typecho2(Typecho二級目錄)、sablog、emlog、dabr、phpwind、、dedecms 、drupal、ecshop、shopex等常用的Nginx偽靜態設定文件,可以直接輸入名稱進行使用,如果是二級目錄則需要對應設定檔裡的二級目錄的名稱。

是否開啟錯誤日誌

#如果啟用需要再輸入要設定的日誌的名稱,則預設日誌目錄為:/home/wwwlogs/ 預設檔名:網域.log 回車確認後,會詢問是否要新增資料庫和資料庫使用者。

如果要添加,需要先驗證MySQL的root密碼(註:輸入密碼將不顯示)
提示Enter database name: 後輸入要建立的資料庫名稱,要建立的資料庫使用者名稱會和資料庫同名,回車確認。
提示Please enter password for mysql user 資料庫名稱: 後輸入要設定的密碼,回車確認。
如果安裝了FTP伺服器會詢問是否要新增FTP帳號

如果需要新增輸入y ,不加輸入n 回車。

提示Enter ftp account name: 後輸入要建立的FTP帳號名稱,回車確認。
提示Enter password for ftp account FTP帳號: 後輸入要設定的密碼,回車確認。
接下來是1.4新增的新增SSL功能
如果需要新增輸入 y ,不加入輸入 n 回車。
選擇了新增SSL會提示
有兩個選項,1 選項為使用自己準備好的SSL憑證和key。 
> > 提示Please enter full path to SSL Certificate file 後輸入要SSL憑證的完整路徑和檔名,回車確認。
> > 提示Please enter full path to SSL Certificate Key file: 後輸入輸入要key檔案的完整路徑和檔名,回車確認。
2 選項為使用免費SSL證書提供者Letsencrypt的證書,自動產生SSL證書等資訊。 
需要輸入一個郵件信箱回車確認。
提示 Press any key to start create virtul host... 後,回車確認便會開始建立虛擬主機。
新增成功會提示新增的網域、目錄、偽靜態、日誌、資料庫、FTP等相關信息,如下圖: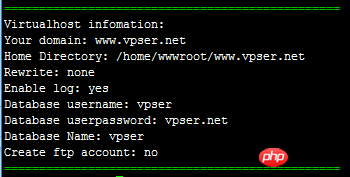
##偽靜態管理
##LNMPA或LAMP可以直接使用網站根目錄下放.htaccess 來設定偽靜態規則(具體規則可以去程式官網網站找google百度),但是在LNMP下,需要使用Nginx偽靜態規則。
偽靜態可以隨時新增或刪除,如果新增完虛擬主機後忘記或沒有新增偽靜態,可以透過修改設定檔來新增偽靜態。
虛擬主機設定檔在:/usr/local/nginx/conf/vhost/網域.conf
#偽靜態規則檔案需要放在/usr/local/nginx/conf/ 下面。
編輯虛擬主機設定文件,可以使用vi、nano或winscp,後2個工具對新手來說簡單些。
例如前面我們新增的虛擬主機,開啟後前半部設定會顯示如下: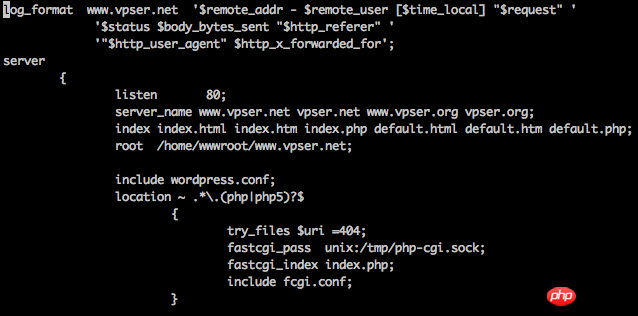
#在root /home/wwwroot/www.vpser.net;這一行下面新增:
include wordpress.conf;
上面的wordpress.conf為偽靜態文件,如需要其他偽靜態文件自己創建個並上傳到/usr/local/nginx/conf/ 下面並include 偽靜態.conf;加完保存,執行:/etc/init.d/nginx restart 重啟生效,如果報錯可能是新增錯誤或偽靜態規則有誤。
1.4及之前版本偽靜態檔案都在/usr/local/nginx/conf/ 目錄下
1.5及之後版本偽靜態檔案都在/usr/local/nginx/conf/rewrite 目錄下
偽靜態檔案名稱後面帶2的是二級目錄的偽靜態,可以依照自己需求修改裡面二級目錄的名稱或複製為其他名字後include到虛擬主機設定檔中。
##上傳網站程式
##如果已經安裝FTP伺服器可以直接使用ftp客戶端透過你的FTP資訊登入後上傳網站或sftp等軟體上傳網站,設置好相關權限開始安裝即可。
上傳網站後建議執行:chown www:www -R /path/to/dir 對網站目錄進行權限設置,/path/to/dir替換為你網站目錄。
為了安全可以將一些不需要PHP運行的上傳檔案之類的目錄去掉執行權限,參考:http://www.vpser.net/security/lnmp-remove-nginx-php-execute.html
##已存在虛擬主機新增ssl憑證開啟https
對於已存在的虛擬主機新增https站點,可以執行:lnmp ssl add
指令新增ssl證書,目前有兩種方式一種是使用自備的ssl證書,二是採用Let'sEncrypt的免費證書。新增流程和前面的新增虛擬主機的過程是一樣的,只是會多一項填寫ssl憑證和key的步驟或直接選擇Let'sEncrypt自動產生憑證。
如果是1.*版本升級到1.4或更改版本的需要參考:https://lnmp.org/faq/upgrade1-4.html 中的說明,如果有提示不安全或不顯示小綠鎖上面連結中也有說明。
##列出網站(虛擬主機)
執行:
lnmp vhost list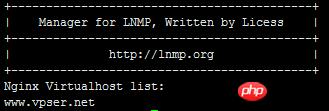
##刪除網站(虛擬主機)
##執行:
lnmp vhost del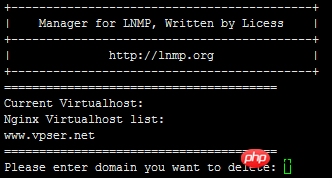
##預設網站(虛擬主機)
##LNMP預設網站設定檔:/usr/local/nginx/conf/nginx.conf
LNMPA預設網站設定檔:/usr/local/nginx/conf/nginx.conf 和/usr/local/apache/conf/extra/httpd-vhosts.conf
LAMP預設網站設定檔:/usr/local/apache/ conf/extra/httpd-vhosts.conf
##防跨目錄設定
##LNMP 1.1及之前的版本使用php.ini裡面, open_basedir設定LNMP 1.2及更高版本防跨目錄功能使用.user.ini,該檔案在網站根目錄下,可以修改.user.ini 裡面的open_basedir的值來設定限制存取的目錄或刪除來移除防跨目錄的設定。
.user.ini檔案無法直接修改,如要修或刪除需要先執行:chattr -i /網站目錄/.user.ini
可以使用winscp檔案管理、vim編輯器或nano編輯器進行修改。
刪除的話rm -f /網站目錄/.user.ini 就可以。
修改完成後再執行:chattr i /網站目錄/.user.ini
.user.ini不需要重啟一般5分鐘左右生效,也可以重啟一下php-fpm立即生效。 如果要更改網站目錄必須要按上述方法修改防跨目錄的設置,否則肯定報錯! !
LNMP 1.4上也可以直接使用lnmp1.4/tools/ 目錄下的 ./remove_open_basedir_restriction.sh 來移除。 在Thinkphp、codeigniter、Laravel等框架下,網站目錄一般是在public下,但是public下的程式要跨目錄呼叫public上級目錄下的文件,因為LNMP預設是不允許跨目錄存取的,所以都是必須將防跨目錄存取的設定去掉,有時候這些框架類別的程式提示500錯誤也可能是這個問題造成的。
LNMPA或LAMP 模式1.2版本以上的防跨目錄的設定所使用的對應apache虛擬主機設定檔(lnmp管理工具新增的話檔案是/usr/local/apache/conf/ vhost/網域.conf )裡的php_admin_value open_basedir參數進行設定。如果不需要設定可以在前面加 # 進行註釋,或自行修改目錄的限制。 重啟apache生效。
##pathinfo設定
###LNMP上各版本pathinfo各個版本的設定基本上一樣:###On lnmp v1.1, modify the configuration file of the corresponding virtual host (/usr/local/nginx/conf/vhost/domain name.conf)
Remove the # in front of #include pathinfo.conf and set try_files $uri = 404; is commented out by adding # in front of it.
1.2, 1.3, 1.4, 1.5 and above, modify the configuration file of the corresponding virtual host (/usr/local/nginx/conf/vhost/domain name.conf)
Will include enable-php.conf ;Replace with include enable-php-pathinfo.conf;
If you enable pathinfo in multiple PHP versions of version 1.4, enter the /usr/local/nginx/conf directory and copy a copy of enable-php-pathinfo.conf and name it enable-php7.2-pathinfo.conf, copy the entire fastcgi_pass line in the enable-php7.2.conf file and replace the fastcgi_pass line in the enable-php7.2-pathinfo.conf file, save it, and then press the previous button Just modify the virtual host include enable-php7.2-pathinfo.conf; and so on for other versions.
If you enable pathinfo for multiple PHP versions in version 1.5, you can choose to enable pathinfo in lnmp vhost add. If there are multiple PHP versions, you will be prompted to choose. You can also directly modify the virtual host configuration file to include enable-php. conf; Replace with include enable-php7.2-pathinfo.conf; Save
Modifying pathinfo requires restarting nginx to take effect.
##Database management
##1.3 or above, you can choose to create a database when adding a virtual host, or you can create it separately Use lnmp database add to add the database as prompted. The added user name and database name have the same name.
Add database command: lnmp database add
Edit database user password command: lnmp database edit
Delete database command: lnmp database del
List all database commands: lnmp database list
These information are all found at https://lnmp.org/faq/lnmp-vhost-add-howto.html (found on lnmp official website)
Many things are copied directly and written to my level It will not be better than the official website manual
If someone uses Pagoda tp5 and reports an error open_base_dir, there is a security protection in the website settings, just turn it off (it took me a long time)
Related recommendations:
CentOS 6 Deployment Nginx PHP5 Server
thinkphp is deployed to Wanwang Cloud Server and reports that it cannot connect to mysql
以上是thinkphp5在部署伺服器的過程中遇到的問題總結的詳細內容。更多資訊請關注PHP中文網其他相關文章!

