


這篇文章主要介紹了vue 實現剪裁圖片並上傳伺服器功能,非常不錯,具有參考借鑒價值,需要的朋友可以參考下
預覽鏈接點擊預覽
效果圖如下圖所示,大家感覺不錯,請參考實現程式碼。

需求
#[x] 預覽:根據選擇影像大小自適應填滿左側裁切區域
[x] 裁切:移動裁切框右側預覽區域可即時預覽
[x ] 上傳&清空:點選確認上傳裁切圖片,點選取消按鈕清空影像
[ ] 裁切框可調整大小
實作步驟
methods:funName() - 對應原始碼中methods中的funName方法
data:dataName - 對應原始碼中data中的dataName資料
1. 圖片選擇與讀取
#選擇圖片:(methods:selectPic) 使用input[ type="file"] 彈出選擇圖片框,js 主動觸發點擊事件;
讀取圖片: (methods:readImage) 建立圖片對象,使用createObjectURL顯示圖片。 objectURL = URL.createObjectURL(blob) ;
#2. 在canvas中展示圖片
需要掌握的canvas相關知識:
清空畫布ctx.clearRect(x,y,width,height) ;
填滿矩形ctx.fillRect(x, y,width,height) ;
繪製圓弧ctx.arc(x,y,r,startAngle,endAngle,counterclockwise) ; 繪製矩形ctx.rect(x,y,width ,height);
繪製圖像drawImage

# 语法
 ctx.drawImage(image, dx, dy);
 ctx.drawImage(image, dx, dy, dWidth, dHeight);
 ctx.drawImage(image, sx, sy, sWidth, sHeight, dx, dy, dWidth, dHeight);
 # 参数
 image    # 绘制的元素(可以为HTMLImageElement,HTMLVideoElement,或者 HTMLCanvasElement。)
 dx,dy    # 目标画布(destination canvas)左上角的坐标
 dWidth,dHeight  # 目标画布(destination canvas)上绘制图像宽高
 sx,sy    # 源画布(source canvase)左上角的坐标
 sWidth,sHeight  # 源画布(source canvase)选择的图像宽高
- #具體步驟:
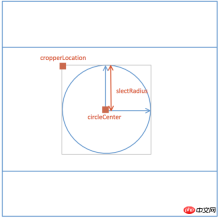
##計算canvas寬高:(methods:calcCropperSize) 根據圖片大小,計算canvas寬高(data:cropperCanvasSize),以致圖片能夠在裁剪區域自適應展示,並確定裁剪的左上角位置(data:cropperLocation)。
繪製左側裁切區域影像:(methods:renderCropperImg)
裁切區域vue data示意圖:
3. 移動裁切框
知識點: onmousedown、onmousemove、onmouseup
#具體實作:methods:drag()
- #記錄滑鼠座標,滑鼠移動根據偏移量計算圓心位置。
canvas.onmousedown = e => {
  let [lastX, lastY] = [e.offsetX, e.offsetY];
  self.movement = true;
  canvas.onmousemove = e => {
   self.circleCenter = {
   X:
    self.cropperCanvasSize.width > 2 * self.slectRadius
    ? self.circleCenter.X + (e.offsetX - lastX)
    : self.cropperCanvasSize.width / 2,
   Y:
    self.cropperCanvasSize.height > 2 * self.slectRadius
    ? self.circleCenter.Y + (e.offsetY - lastY)
    : self.cropperCanvasSize.height / 2
   };
   self.renderCropperImg();
   [lastX, lastY] = [e.offsetX, e.offsetY];
  };
  canvas.onmouseup = e => {
   self.movement = false;
   canvas.onmousemove = null;
   canvas.onmouseup = null;
  };
};知識點:
FormData 物件的使用Convert Data URI to File then append to FormData
methods:upload()
this.$refs.preview.toBlob((blob)=> {
  const url = URL.createObjectURL(blob);
  const formData = new FormData();
  formData.append(this.uploadProps.name, blob, `${Date.now()}.png`);
  if(this.data){
   Object.keys(this.uploadProps.data).forEach(key => {
    formData.append(key, this.uploadProps.data[key]);
   });
  }
  const request = new XMLHttpRequest();
  request.open("POST", this.uploadProps.action, true);
  request.send(formData);
  request.onreadystatechange = () => {
   if (request.readyState === 4 && request.status === 200) {
    // ...
   }
  };
  });
######以上就是本文的全部內容,希望對大家的學習有幫助,更多相關內容請關注PHP中文網! ######相關推薦:#########關於vux uploader 圖片上傳元件的安裝使用方法###############Vue多種方法實作表頭和首列固定的方法###########################以上是vue 實作剪裁圖片並上傳伺服器的功能介紹的詳細內容。更多資訊請關注PHP中文網其他相關文章!

 JavaScript和Web:核心功能和用例Apr 18, 2025 am 12:19 AM
JavaScript在Web開發中的主要用途包括客戶端交互、表單驗證和異步通信。 1)通過DOM操作實現動態內容更新和用戶交互;2)在用戶提交數據前進行客戶端驗證,提高用戶體驗;3)通過AJAX技術實現與服務器的無刷新通信。
 了解JavaScript引擎:實施詳細信息Apr 17, 2025 am 12:05 AM
理解JavaScript引擎內部工作原理對開發者重要,因為它能幫助編寫更高效的代碼並理解性能瓶頸和優化策略。 1)引擎的工作流程包括解析、編譯和執行三個階段;2)執行過程中,引擎會進行動態優化,如內聯緩存和隱藏類;3)最佳實踐包括避免全局變量、優化循環、使用const和let,以及避免過度使用閉包。
 Python vs. JavaScript:學習曲線和易用性Apr 16, 2025 am 12:12 AM
Python更適合初學者,學習曲線平緩,語法簡潔;JavaScript適合前端開發,學習曲線較陡,語法靈活。 1.Python語法直觀,適用於數據科學和後端開發。 2.JavaScript靈活,廣泛用於前端和服務器端編程。
 Python vs. JavaScript:社區,圖書館和資源Apr 15, 2025 am 12:16 AM
Python和JavaScript在社區、庫和資源方面的對比各有優劣。 1)Python社區友好,適合初學者,但前端開發資源不如JavaScript豐富。 2)Python在數據科學和機器學習庫方面強大,JavaScript則在前端開發庫和框架上更勝一籌。 3)兩者的學習資源都豐富,但Python適合從官方文檔開始,JavaScript則以MDNWebDocs為佳。選擇應基於項目需求和個人興趣。
 從C/C到JavaScript:所有工作方式Apr 14, 2025 am 12:05 AM
從C/C 轉向JavaScript需要適應動態類型、垃圾回收和異步編程等特點。 1)C/C 是靜態類型語言,需手動管理內存,而JavaScript是動態類型,垃圾回收自動處理。 2)C/C 需編譯成機器碼,JavaScript則為解釋型語言。 3)JavaScript引入閉包、原型鍊和Promise等概念,增強了靈活性和異步編程能力。
 JavaScript引擎:比較實施Apr 13, 2025 am 12:05 AM
不同JavaScript引擎在解析和執行JavaScript代碼時,效果會有所不同,因為每個引擎的實現原理和優化策略各有差異。 1.詞法分析:將源碼轉換為詞法單元。 2.語法分析:生成抽象語法樹。 3.優化和編譯:通過JIT編譯器生成機器碼。 4.執行:運行機器碼。 V8引擎通過即時編譯和隱藏類優化,SpiderMonkey使用類型推斷系統,導致在相同代碼上的性能表現不同。
 超越瀏覽器:現實世界中的JavaScriptApr 12, 2025 am 12:06 AM
JavaScript在現實世界中的應用包括服務器端編程、移動應用開發和物聯網控制:1.通過Node.js實現服務器端編程,適用於高並發請求處理。 2.通過ReactNative進行移動應用開發,支持跨平台部署。 3.通過Johnny-Five庫用於物聯網設備控制,適用於硬件交互。
 使用Next.js(後端集成)構建多租戶SaaS應用程序Apr 11, 2025 am 08:23 AM
我使用您的日常技術工具構建了功能性的多租戶SaaS應用程序(一個Edtech應用程序),您可以做同樣的事情。 首先,什麼是多租戶SaaS應用程序? 多租戶SaaS應用程序可讓您從唱歌中為多個客戶提供服務


熱AI工具

Undresser.AI Undress
人工智慧驅動的應用程序,用於創建逼真的裸體照片

AI Clothes Remover
用於從照片中去除衣服的線上人工智慧工具。

Undress AI Tool
免費脫衣圖片

Clothoff.io
AI脫衣器

AI Hentai Generator
免費產生 AI 無盡。

熱門文章
熱工具

VSCode Windows 64位元 下載
微軟推出的免費、功能強大的一款IDE編輯器

MantisBT
Mantis是一個易於部署的基於Web的缺陷追蹤工具,用於幫助產品缺陷追蹤。它需要PHP、MySQL和一個Web伺服器。請查看我們的演示和託管服務。

ZendStudio 13.5.1 Mac
強大的PHP整合開發環境

Dreamweaver Mac版
視覺化網頁開發工具

MinGW - Minimalist GNU for Windows
這個專案正在遷移到osdn.net/projects/mingw的過程中,你可以繼續在那裡關注我們。 MinGW:GNU編譯器集合(GCC)的本機Windows移植版本,可自由分發的導入函式庫和用於建置本機Windows應用程式的頭檔;包括對MSVC執行時間的擴展,以支援C99功能。 MinGW的所有軟體都可以在64位元Windows平台上運作。

