這篇文章主要介紹了微信小程式中post方法與get方法的封裝的相關資料,希望透過本文能幫助到大家,讓大家掌握如何封裝,需要的朋友可以參考下
微信小程式開發post方法與get方法的封裝
第一步:在utils資料夾下建立httpUtil.js檔案
第二步:建立函數httpPost方法程式碼如下:
function Post(url, data, cb, isShow, showNetError, that, showLoading) {
 if (showLoading == true || showLoading == undefined){
  wx.showNavigationBarLoading();
  wx.showLoading({
   title: '加载中...',
  })
 }
 var basicData = {
  vloginPwd: api.vloginPwd,
  vtoken: api.vtoken
 }
 if (!isEmpty(data)) {
  for (var key in data) {
   try {
    basicData[key] = data[key];
   } catch (e) { }
  }
 }
 wx.request({
  url: url,
  header: { 'content-type': 'application/x-www-form-urlencoded' },
  method: 'POST',
  data: basicData,
  success: (res) => {
   if (res.data.state == 200) {
    typeof cb == "function" && cb(res.data, "");
   } else {
    if (isShow == true) {
     wx.showModal({
      title: '提示',
      content: res.data.msg,
      showCancel: false
     })
    }
   }
  },
  fail: (err) => {
   if (showNetError) {
    that.setData({
     errorDisplay:'',
     containHidden:true
    })
   }
  },
  complete: (res) => {
   setTimeout(function () {
    wx.hideNavigationBarLoading();
    wx.hideLoading();
   }, 100)
  }
 });
};
第三個步,在module裡加入:
##
module.exports = {
 httpGet: Get,
 httpPost: Post
};
#第四步,引入
var httpUtil = require('../../utils/HttpHelper.js')第五步,如何使用
onload:function(option){
  var that = this;
  httpUtil.httpPost(api.getListUrl, jsonData, function (res) {
   wx.showModal({
    title: '提示',
    content: res.msg,
    showCancel: false,
    confirmText:"查看",
    success: function (res) {
     console.log("res.data===", res.data);
     if (res.confirm) {
      that.toDetail(res.data);
     }
    }
   })
  }, true, true, this);
}
以上就是本文的全部內容,希望對大家的學習有所幫助,更多相關內容請關注PHP中文網! 相關推薦:
#
以上是微信小程式中post方法與get方法的封裝的詳細內容。更多資訊請關注PHP中文網其他相關文章!
 使用Python开发微信小程序Jun 17, 2023 pm 06:34 PM
随着移动互联网技术和智能手机的普及,微信成为了人们生活中不可或缺的一个应用。而微信小程序则让人们可以在不需要下载安装应用的情况下,直接使用小程序来解决一些简单的需求。本文将介绍如何使用Python来开发微信小程序。一、准备工作在使用Python开发微信小程序之前,需要安装相关的Python库。这里推荐使用wxpy和itchat这两个库。wxpy是一个微信机器
 小程序能用react吗Dec 29, 2022 am 11:06 AM
小程序能用react,其使用方法:1、基于“react-reconciler”实现一个渲染器,生成一个DSL;2、创建一个小程序组件,去解析和渲染DSL;3、安装npm,并执行开发者工具中的构建npm;4、在自己的页面中引入包,再利用api即可完成开发。
 用Python编写简单的聊天程序教程May 08, 2023 pm 06:37 PM
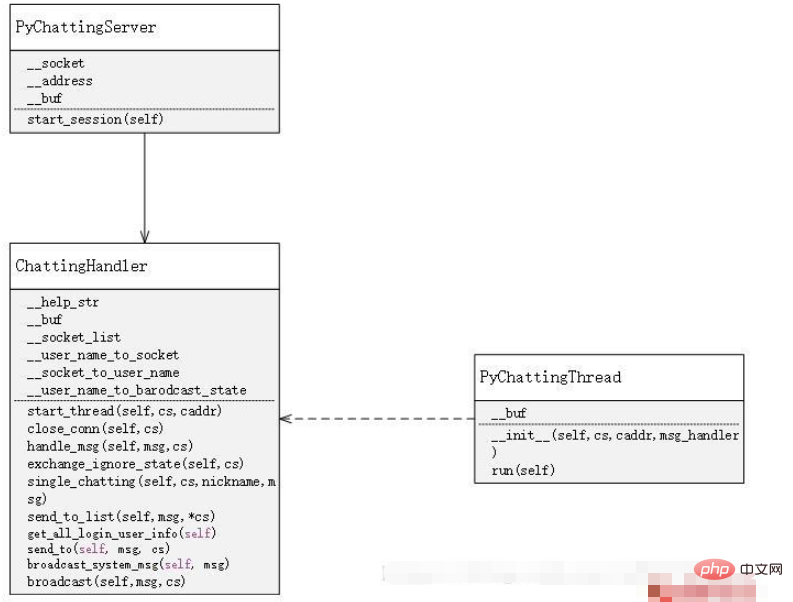
实现思路x01服务端的建立首先,在服务端,使用socket进行消息的接受,每接受一个socket的请求,就开启一个新的线程来管理消息的分发与接受,同时,又存在一个handler来管理所有的线程,从而实现对聊天室的各种功能的处理x02客户端的建立客户端的建立就要比服务端简单多了,客户端的作用只是对消息的发送以及接受,以及按照特定的规则去输入特定的字符从而实现不同的功能的使用,因此,在客户端这里,只需要去使用两个线程,一个是专门用于接受消息,一个是专门用于发送消息的至于为什么不用一个呢,那是因为,只
 Java语言中的微信小程序开发介绍Jun 09, 2023 pm 10:40 PM
微信小程序是一种轻量级的应用程序,可以在微信平台上运行,不需要下载安装,方便快捷。Java语言作为一种广泛应用于企业级应用开发的语言,也可以用于微信小程序的开发。在Java语言中,可以使用SpringBoot框架和第三方工具包来开发微信小程序。下面是一个简单的微信小程序开发过程。创建微信小程序首先,需要在微信公众平台上注册一个小程序。注册成功后,可以获取到
 教你如何在小程序中用公众号模板消息(附详细思路)Nov 04, 2022 pm 04:53 PM
本篇文章给大家带来了关于微信小程序的相关问题,其中主要介绍了如何在小程序中用公众号模板消息,下面一起来看一下,希望对大家有帮助。
 PHP与小程序的地理位置定位与地图显示Jul 04, 2023 pm 04:01 PM
PHP与小程序的地理位置定位与地图显示地理位置定位与地图显示在现代科技中已经成为了必备的功能之一。随着移动设备的普及,人们对于定位和地图显示的需求也越来越高。在开发过程中,PHP和小程序是常见的两种技术选择。本文将为大家介绍PHP与小程序中的地理位置定位与地图显示的实现方法,并附上相应的代码示例。一、PHP中的地理位置定位在PHP中,我们可以使用第三方地理位
 小程序中文件上传的PHP实现方法Jun 02, 2023 am 08:40 AM
随着小程序的广泛应用,越来越多的开发者需要将其与后台服务器进行数据交互,其中最常见的业务场景之一就是上传文件。本文将介绍在小程序中实现文件上传的PHP后台实现方法。一、小程序中的文件上传在小程序中实现文件上传,主要依赖于小程序APIwx.uploadFile()。该API接受一个options对象作为参数,其中包含了要上传的文件路径、需要传递的其他数据以及
 PHP与小程序的第三方登录与绑定功能实现Jul 04, 2023 am 08:57 AM
PHP与小程序的第三方登录与绑定功能实现随着互联网的发展和智能手机的普及,小程序成为了移动应用程序开发的热门选择。小程序不仅提供了优秀的用户体验,还具备各种强大的功能。其中,第三方登录与绑定是小程序中常见的功能之一。本文将介绍如何使用PHP与小程序实现第三方登录与绑定的功能,并为读者提供代码示例。第三方登录是指用户可以使用其他平台的账号信息登录到目标平台,而


熱AI工具

Undresser.AI Undress
人工智慧驅動的應用程序,用於創建逼真的裸體照片

AI Clothes Remover
用於從照片中去除衣服的線上人工智慧工具。

Undress AI Tool
免費脫衣圖片

Clothoff.io
AI脫衣器

AI Hentai Generator
免費產生 AI 無盡。

熱門文章

熱工具

Dreamweaver CS6
視覺化網頁開發工具

SAP NetWeaver Server Adapter for Eclipse
將Eclipse與SAP NetWeaver應用伺服器整合。

mPDF
mPDF是一個PHP庫,可以從UTF-8編碼的HTML產生PDF檔案。原作者Ian Back編寫mPDF以從他的網站上「即時」輸出PDF文件,並處理不同的語言。與原始腳本如HTML2FPDF相比,它的速度較慢,並且在使用Unicode字體時產生的檔案較大,但支援CSS樣式等,並進行了大量增強。支援幾乎所有語言,包括RTL(阿拉伯語和希伯來語)和CJK(中日韓)。支援嵌套的區塊級元素(如P、DIV),

PhpStorm Mac 版本
最新(2018.2.1 )專業的PHP整合開發工具

Dreamweaver Mac版
視覺化網頁開發工具


