
在ReactNative中有關FlatList的使用方法
- 亚连原創
- 2018-06-23 16:40:371734瀏覽
這篇文章主要介紹了ReactNative之FlatList的具體使用方法,小編覺得挺不錯的,現在分享給大家,也給大家做個參考。一起跟著小編過來看看吧
之前使用的元件是ListView,當時要新增一個下拉刷新,上拉載入的功能,所以對ListView做了一些封裝,但後來看官方文檔,不建議再使用ListView,因為效率問題,做過Android的朋友都知道,Android的ListView如果不自己處理一下,也是有效率問題的。所以官方又推出了FlatList,而且附帶上拉下拉的功能。
功能簡介
完全跨平台。
支援水平佈局模式。
行元件顯示或隱藏時可設定回呼事件。
支援單獨的頭部組件。
支援單獨的尾部元件。
支援自訂行間分隔線。
支援下拉刷新。
支援上拉載入。
支援跳到指定行(ScrollToIndex)。
如果需要分組/類別/區(section),請使用SectionList(這個我們會在之後的文章中介紹)
使用
FlatList如果只做簡單使用也是很簡單的,這裡我們會分難以程度,逐漸介紹:
直接使用
<FlatList
data={[{key: 'a'}, {key: 'b'}]}
renderItem={({item}) => <Text>{item.key}</Text>}
/>可以看出跟之前的ListView很像,但其中少了dataSource,這裡,我們只需要傳遞數據,其它的都交給FlatList處理好了。
屬性說明
ItemSeparatorComponent行與行之間的分隔線元件。不會出現在第一行之前和最後一行之後。這裡可以根據需要插入一個view
ListEmptyComponent列表為空時渲染該元件。可以是React Component, 也可以是一個render函數, 或是渲染好的element。
ListFooterComponent尾部元件
ListHeaderComponent頭部元件
columnWrapperStyle如果設定了多列佈局(即將numColumns值設為大於1的整數),則可以額外指定此樣式作用在每行容器上。
data為了簡化起見,data屬性目前只支援普通數組。如果需要使用其他特殊資料結構,例如immutable數組,請直接使用更底層的VirtualizedList元件。
extraData如果有data以外的資料用在清單中(無論是用在renderItem還是Header或Footer中),請在此屬性中指定。同時此資料在修改時也需要先修改其引用位址(例如先複製到新的Object或陣列中),然後再修改其值,否則介面很可能不會刷新。
getItem取得每個Item
getItemCount取得Item屬相
getItemLayout是一個可選的最佳化,用於避免動態測量內容尺寸的開銷,不過前提是你可以事先知道內容的高度。如果你的行高是固定的getItemLayout用起來就既有效率又簡單,類似下面這樣:getItemLayout={(data, index) => ( {length: 行高, offset: 行高* index, index} )}注意如果你指定了SeparatorComponent,請把分隔線的尺寸也考慮到offset的計算之中。
horizontal設定為true則變成水平佈局模式。
initialNumToRender指定一開始渲染的元素數量,最好剛剛夠填滿一個螢幕,這樣保證了用最短的時間給使用者呈現可見的內容。注意這第一批次渲染的元素不會在滑動過程中被卸載,這樣是為了確保使用者執行返回頂部的操作時,不需要重新渲染首批元素。
initialScrollIndex指定渲染開始的item index
keyExtractor此函數用於為給定的item產生一個不重複的key。 Key的作用是使React能夠區分同類元素的不同個體,以便在刷新時能夠確定其變化的位置,減少重新渲染的開銷。若不指定此函數,則預設抽取item.key作為key值。若item.key也不存在,則使用陣列下標。
legacyImplementation設定為true則使用舊的ListView的實作。
numColumns多列佈局只能在非水平模式下使用,即必須是horizontal={false}。此時組件內元素會從左到右從上到下按Z字形排列,類似啟用了flexWrap的佈局。元件內元素必須是等高的-暫時還無法支援瀑布流佈局。
onEndReached當列表被捲動到距離內容最底部不足onEndReachedThreshold的距離時呼叫。
onEndReachedThreshold決定當距離內容最底部還有多遠時觸發onEndReached回呼。注意此參數是一個比值而非像素單位。例如,0.5表示距離內容最底部的距離為目前清單可見長度的一半時觸發。
onRefresh如果设置了此选项,则会在列表头部添加一个标准的RefreshControl控件,以便实现“下拉刷新”的功能。同时你需要正确设置refreshing属性。
onViewableItemsChanged在可见行元素变化时调用。可见范围和变化频率等参数的配置请设置viewabilityconfig属性
refreshing在等待加载新数据时将此属性设为true,列表就会显示出一个正在加载的符号。
renderItem根据行数据data,渲染每一行的组件。这个参照下面的demo
viewabilityConfig请参考ViewabilityHelper 的源码来了解具体的配置。
方法
scrollToEnd
滚动到底部。如果不设置getItemLayout
属性的话,可能会比较卡。
scrollToIndex
滚动到指定index的item
如果不设置getItemLayout
属性的话,无法跳转到当前可视区域以外的位置。
scrollToItem
滚动到指定item,如果不设置getItemLayout
属性的话,可能会比较卡。
scrollToOffset
滚动指定距离
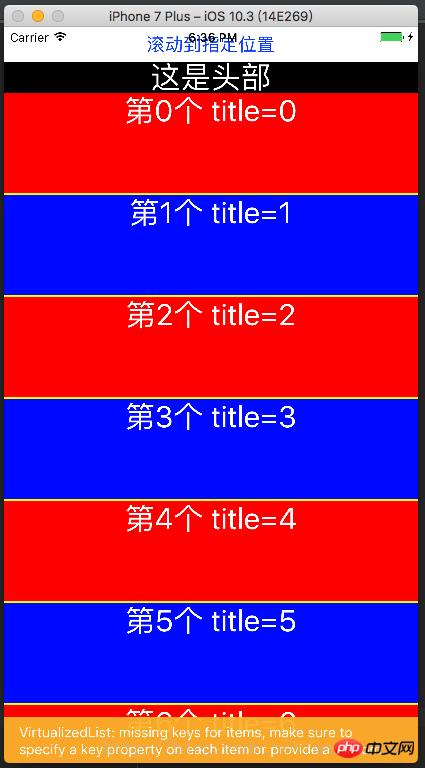
Demo:
import React, {Component} from 'react';
import {
StyleSheet,
View,
FlatList,
Text,
Button,
} from 'react-native';
var ITEM_HEIGHT = 100;
export default class FlatListDemo extends Component {
_flatList;
_renderItem = (item) => {
var txt = '第' + item.index + '个' + ' title=' + item.item.title;
var bgColor = item.index % 2 == 0 ? 'red' : 'blue';
return <Text style={[{flex:1,height:ITEM_HEIGHT,backgroundColor:bgColor},styles.txt]}>{txt}</Text>
}
_header = () => {
return <Text style={[styles.txt,{backgroundColor:'black'}]}>这是头部</Text>;
}
_footer = () => {
return <Text style={[styles.txt,{backgroundColor:'black'}]}>这是尾部</Text>;
}
_separator = () => {
return <View style={{height:2,backgroundColor:'yellow'}}/>;
}
render() {
var data = [];
for (var i = 0; i < 100; i++) {
data.push({key: i, title: i + ''});
}
return (
<View style={{flex:1}}>
<Button title='滚动到指定位置' onPress={()=>{
//this._flatList.scrollToEnd();
//this._flatList.scrollToIndex({viewPosition:0,index:8});
this._flatList.scrollToOffset({animated: true, offset: 2000});
}}/>
<View style={{flex:1}}>
<FlatList
ref={(flatList)=>this._flatList = flatList}
ListHeaderComponent={this._header}
ListFooterComponent={this._footer}
ItemSeparatorComponent={this._separator}
renderItem={this._renderItem}
//numColumns ={3}
//columnWrapperStyle={{borderWidth:2,borderColor:'black',paddingLeft:20}}
//horizontal={true}
//getItemLayout={(data,index)=>(
//{length: ITEM_HEIGHT, offset: (ITEM_HEIGHT+2) * index, index}
//)}
//onEndReachedThreshold={5}
//onEndReached={(info)=>{
//console.warn(info.distanceFromEnd);
//}}
//onViewableItemsChanged={(info)=>{
//console.warn(info);
//}}
data={data}>
</FlatList>
</View>
</View>
);
}
}
const styles = StyleSheet.create({
txt: {
textAlign: 'center',
textAlignVertical: 'center',
color: 'white',
fontSize: 30,
}
});效果图:
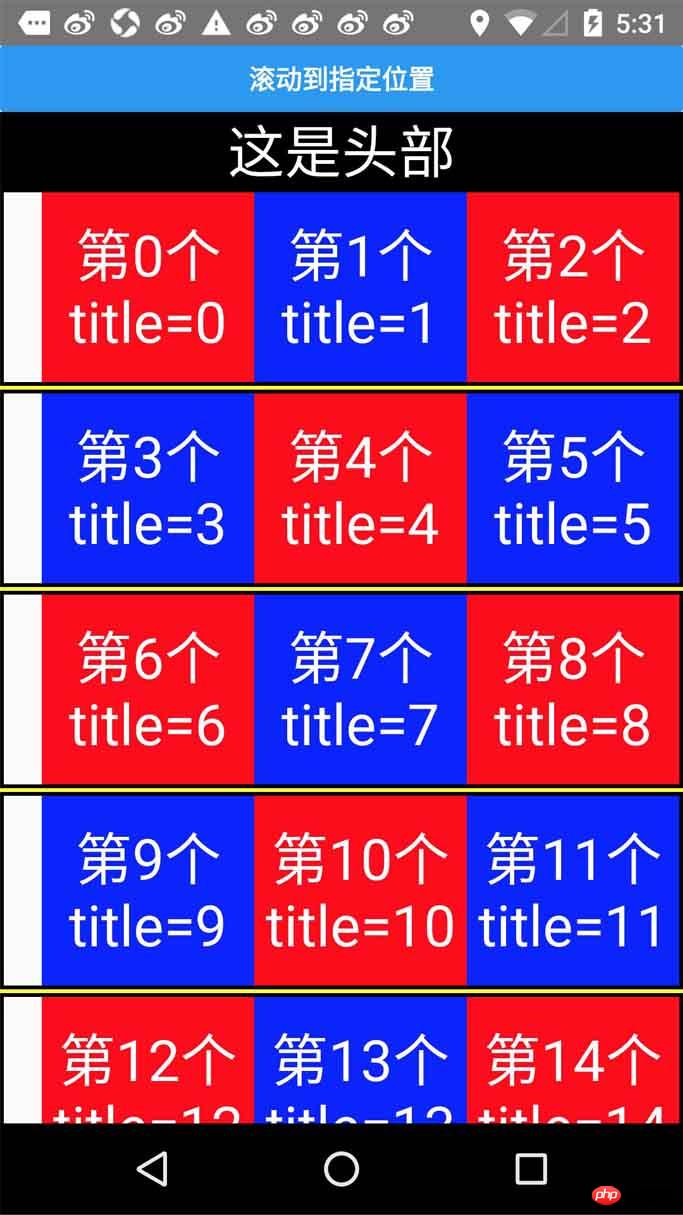
进阶使用
在这里我准备了一份代码示例:
const {width,height}=Dimensions.get('window')
export default class Main extends Component{
// 构造
constructor(props) {
super(props);
}
refreshing(){
let timer = setTimeout(()=>{
clearTimeout(timer)
alert('刷新成功')
},1500)
}
_onload(){
let timer = setTimeout(()=>{
clearTimeout(timer)
alert('加载成功')
},1500)
}
render() {
var data = [];
for (var i = 0; i < 100; i++) {
data.push({key: i, title: i + ''});
}
return (
<View style={{flex:1}}>
<Button title='滚动到指定位置' onPress={()=>{
this._flatList.scrollToOffset({animated: true, offset: 2000});
}}/>
<View style={{flex:1}}>
<FlatList
ref={(flatList)=>this._flatList = flatList}
ListHeaderComponent={this._header}
ListFooterComponent={this._footer}
ItemSeparatorComponent={this._separator}
renderItem={this._renderItem}
onRefresh={this.refreshing}
refreshing={false}
onEndReachedThreshold={0}
onEndReached={
this._onload
}
numColumns ={3}
columnWrapperStyle={{borderWidth:2,borderColor:'black',paddingLeft:20}}
//horizontal={true}
getItemLayout={(data,index)=>(
{length: 100, offset: (100+2) * index, index}
)}
data={data}>
</FlatList>
</View>
</View>
);
}
_renderItem = (item) => {
var txt = '第' + item.index + '个' + ' title=' + item.item.title;
var bgColor = item.index % 2 == 0 ? 'red' : 'blue';
return <Text style={[{flex:1,height:100,backgroundColor:bgColor},styles.txt]}>{txt}</Text>
}
_header = () => {
return <Text style={[styles.txt,{backgroundColor:'black'}]}>这是头部</Text>;
}
_footer = () => {
return <Text style={[styles.txt,{backgroundColor:'black'}]}>这是尾部</Text>;
}
_separator = () => {
return <View style={{height:2,backgroundColor:'yellow'}}/>;
}
}
const styles=StyleSheet.create({
container:{
},
content:{
width:width,
height:height,
backgroundColor:'yellow',
justifyContent:'center',
alignItems:'center'
},
cell:{
height:100,
backgroundColor:'purple',
alignItems:'center',
justifyContent:'center',
borderBottomColor:'#ececec',
borderBottomWidth:1
},
txt: {
textAlign: 'center',
textAlignVertical: 'center',
color: 'white',
fontSize: 30,
}
})运行效果如下:
上面是我整理给大家的,希望今后会对大家有帮助。
相关文章:
在Webstorm中利用babel将ES6自动转码成ES5如何实现
以上是在ReactNative中有關FlatList的使用方法的詳細內容。更多資訊請關注PHP中文網其他相關文章!