在vue中如何渲染函數render(詳細教學)
- 亚连原創
- 2018-06-21 11:33:223434瀏覽
這篇文章主要介紹了vue渲染函數render的使用,小編覺得還挺不錯的,現在分享給大家,也給大家做個參考。一起跟著小編過來看看吧
1.什麼是render函數?
vue透過 template 來建立你的 HTML。但是,在特殊情況下,這種寫死的模式無法滿足需求,必須需要js的程式設計能力。此時,需要用render來建立HTML。
例如如下我想要實作如下html:
<p id="container">
 <h1>
  <a href="#" rel="external nofollow" rel="external nofollow" >
   Hello world!
  </a>
 </h1>
</p>
我們會如下使用:
<!DOCTYPE html>
<html>
<head>
<title>演示Vue</title>
<style>
</style>
</head>
<body>
<p id="container">
<tb-heading :level="1">
<a href="#" rel="external nofollow" rel="external nofollow" >Hello world!</a>
</tb-heading>
</p>
</body>
<script src="./vue.js"></script>
<script type="text/x-template" id="templateId">
<h1 v-if="level === 1">
<slot></slot>
</h1>
<h2 v-else-if="level === 2">
<slot></slot>
</h2>
</script>
<script>
Vue.component('tb-heading', {
template: '#templateId',
props: {
level: {
type: Number,
required: true
}
}
});
new Vue({
el: '#container'
});
</script>
</html>2.範例:
##遇到的問題:在工作中,我創建了一個button元件,又創建了一個button-group元件button元件較為簡單,就是一個可以輸入type/size/icon等屬性的button

<script>
 export default {
  name: "XButtonGroup",
  props: {
   compact: { //自定义的button-group属性,影响其classname
    type: Boolean,
    default: true
   }
  },
  render(createElement) {
   //此处创建element
  },
  computed: {
   groupClass() {
    const className = ["field"];  //通过计算属性监听compact属性传入className
    className.push(this.compact ? "has-addons" : "is-grouped");
    return className;
   }
  }
 };
</script>
接下來就要看render函數了。 render函數中的createElement方法有三個參數。第一個參數為外層標籤名,第二個為外層標籤的屬性對象,第三個為外層標籤中的內容所以第一步
  render(createElement) {
   return createElement(
    'p', {
     class: this.groupClass
    }, '内容',
   )
  }
渲染結果:

  render(createElement) {
   return createElement(
    'p', {
     class: this.groupClass
    }, this.$slots.default,
   )
  },
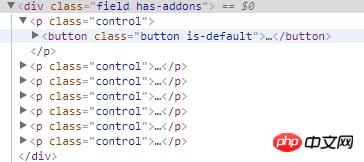
渲染結果: 
  render(createElement) {
   //遍历每一个VNode,用createElement函数在外层包裹class为control的p标签,组成新的VNode数组
   const arry = this.$slots.default.map(VNode => {
    return createElement('p', {
     class: 'control'
    }, [VNode])
   })
   return createElement(
    'p', {
     class: this.groupClass
    }, arry,
   )
  },
渲染結果: 
<x-button-group :compact="true">
  <x-button v-for="(item,index) in buttonType" :key="index" :type="item">{{item}}</x-button>
</x-button-group>
<x-button-group :compact="false">
  <x-button v-for="(item,index) in buttonType" :key="index" :type="item">{{item}}</x-button>
</x-button-group> 
以上是在vue中如何渲染函數render(詳細教學)的詳細內容。更多資訊請關注PHP中文網其他相關文章!
陳述:
本文內容由網友自願投稿,版權歸原作者所有。本站不承擔相應的法律責任。如發現涉嫌抄襲或侵權的內容,請聯絡admin@php.cn

