透過在ionic2中使用自動產生器的方法步驟有哪些?
- 亚连原創
- 2018-06-01 14:59:011497瀏覽
這篇文章主要介紹了ionic2中使用自動生成器的方法,需要的朋友可以參考下
ionic generator是命令行的功能,ionic2自動幫我們創建應用程序,從而節省了大量的時間,並增加我們的速度來開發專案的關鍵部分。
ionic generator讓我們可以自動建立以下幾部分:
•component
•directive
•page
•provider
#一、建立頁面:ionic g page [PageName]
透過這個指令建立一個新的頁面,ionic2專案中這個指令使用最多
我們只需要進入我們的命令列中,並執行下面的命令:
ionic g page login
# Results:
√ Create app/pages/login/login.html
√ Create app/pages/login/login.scss
√ Create app/pages/login/login.ts
login.ts:
import {Component} from '@angular/core';
import {NavController} from 'ionic-angular';
@Component({
 templateUrl: 'build/pages/login/login.html',
})
export class LoginPage {
 constructor(public nav: NavController) {}
}
login.html:
<ion-header>
 <ion-navbar>
 <ion-title>
  login
 </ion-title>
 </ion-navbar>
</ion-header>
<ion-content padding class="login">
</ion-content>
二、建立元件:ionic g component [ComponentName ]
元件是一段程式碼,可以在我們的應用程式的任何部分使用
透過這個指令建立一個元件:
ionic g component myComponent
# Results:
√ Create app/components/my-component/my-component.html
√ Create app/components/my-component/my-component.ts
my-component.ts :
import {Component} from '@angular/core';
@Component({
 selector: 'my-component',
 templateUrl: 'build/components/my-component/my-component.html'
})
export class MyComponent {
 text: string = "";
 constructor() {
 this.text = 'Hello World';
 }
}
三、建立指令:ionic g directive [DirectiveName]
指令,我們的應用程式可以在任何元素上使用的修飾符屬性.
ionic g directive myDirective
# Results:
√ Create app/components/my-directive/my-directive.ts
my-directive.ts:
import {Directive} from '@angular/core';
@Directive({
 selector: '[my-directive]' // Attribute selector
})
export class MyDirective {
 constructor() {
 console.log('Hello World');
 }
}
四、建立服務提供者:ionic g provider [ProviderName]
現在建立一個新的服務(提供者),提供者負責處理資料的REST API的連接,本地存儲,SQLite的等等。
要建立它,我們去執行以下命令我們的終端:
ionic g provider userService
# Results:
√ Create app/providers/user-service/user-service.ts
服務代碼如下:
user-service.ts:
import {Injectable} from '@angular/core';
import {Http} from '@angular/http';
import 'rxjs/add/operator/map';
@Injectable()
export class UserService {
 data: any = null;
 constructor(public http: Http) { }
 load() { if (this.data) {
 }
 return new Promise(resolve => {
 this.http.get('path/to/data.json')
  .map(res => res.json())
  .subscribe(data => {
  this.data = data;
  resolve(this.data);
  });
 });
 }
}
五、創建管道pipe:ionic g pipe [PipeName]
該管道的變化,我們可以對任何數據使用我們的模板,如以大寫字母顯示文本,顯示貨幣值,日期格式等。
ionic g pipe myPipe
# Results:
√ Create app/pipes/myPipe.ts
我們的管道的程式碼如下
myPipe.ts:
import {Injectable, Pipe} from '@angular/core';
@Pipe({
 name: 'my-pipe'
})
@Injectable()
export class MyPipe {
 transform(value: string, args: any[]) {
 value = value + ''; // make sure it's a string
 return value.toLowerCase();
 }
}
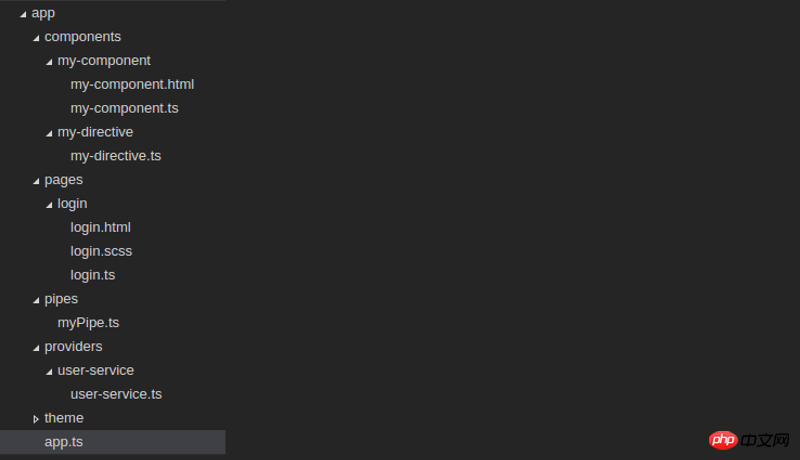
最後,我們產生的應用程式結構如下圖:

#上面是我整理給大家的,希望今後對大家有幫助。
相關文章:
Angular使用操作事件指令ng-click傳遞多個參數範例
#以上是透過在ionic2中使用自動產生器的方法步驟有哪些?的詳細內容。更多資訊請關注PHP中文網其他相關文章!

