使用vue自動化表單(附程式碼)
- php中世界最好的语言原創
- 2018-05-31 10:54:473988瀏覽
這次帶給大家使用vue自動化表單(附程式碼),使用vue自動化表單的注意事項有哪些,以下就是實戰案例,一起來看一下。
背景
B端系統表單較多,且表單可能含有較多欄位
欄位較多的表單帶來了大片HTML程式碼
在大片HTML中,混雜著參數綁定、事件處理等邏輯,不利於維護
技術堆疊Vue,Element(預設表單佈局)適合中後台專案快速開發
目標
透過json設定快速產生表單的vue plugin。
設計目標
減少html 重複片段
#表單欄位元件可擴充
-
事件、連動透過eventbus 解耦
校驗可擴充
表單版面可自訂
視覺化設定
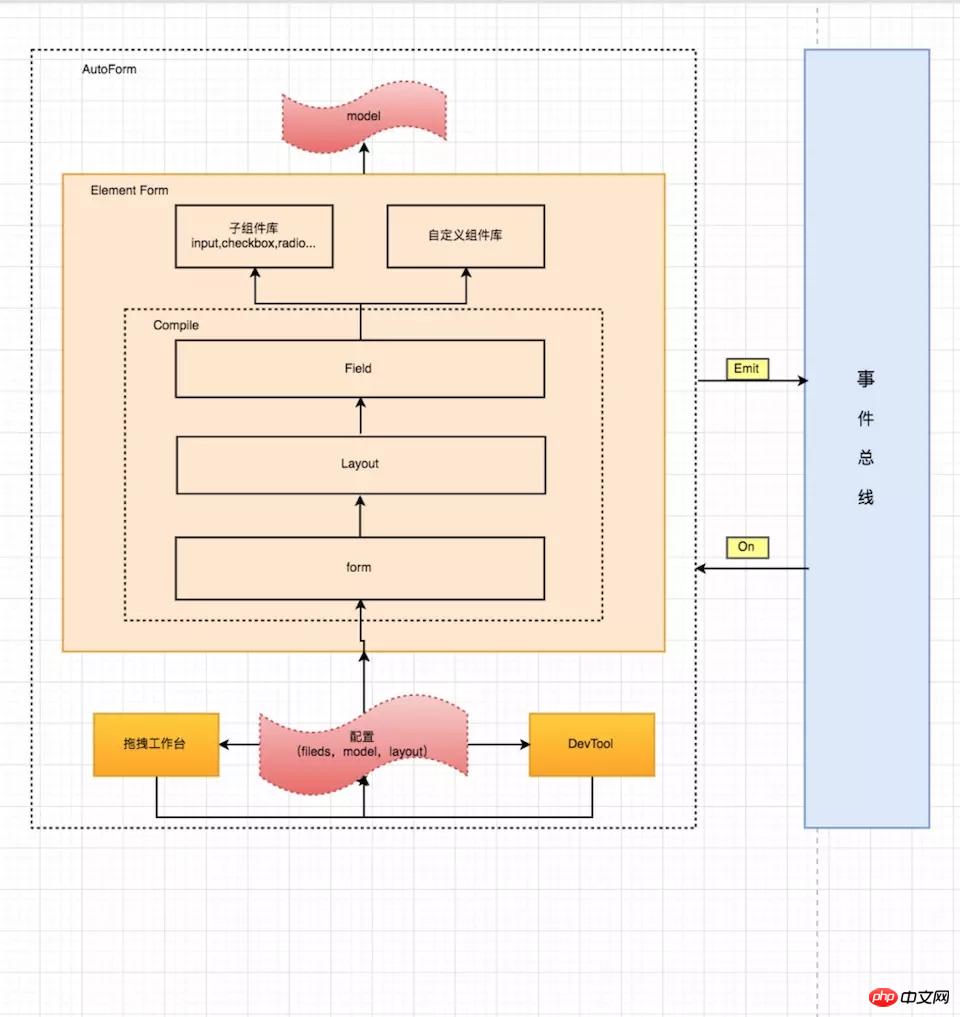
大概方案設計

#使用
##安裝npm install charlie-autoform charlie-autoform_component_lib引入插件
import AutoForm from 'charlie-autoform';
import AutoForm_component_lib from 'charlie-autoform_component_lib';
Vue.use(AutoForm);
Vue.use(AutoForm_component_lib);
demo.vue
<template>
 <p>
  <auto-form ref="tagForm1" :model="model1" :fields="fields1" :layout="layout">
   <el-form-item class="clearfix">
   <el-button type="primary">立即创建</el-button>
   <el-button>取消</el-button>
   </el-form-item>
  </auto-form>
 </p>
</template>
<script>
 export default {
 data() {
  return {
  model2: {
   name: '',
   type: []
  },
  layout2: {
   align: 'left',
   labelWidth: '100px',
   custom: false, //是否自定义布局
   inline: true //是否内联
  },
  fields2: [
   {
   key: 'name',
   type: 'input',
   templateOptions: {
    label: '审批人'
   }
   },
   {
   key: 'region',
   type: 'select',
   templateOptions: {
    label: '活动区域',
    placeholder: '请选择活动区域',
    options: [
    {
     label: '区域一',
     value: 'shanghai'
    },
    {
     label: '区域二',
     value: 'beijing'
    }
    ],
    validators:[ //校验
    // {required:true,message:'必填'}
    // ""
    ]
   }
   }
  ]
  };
 }
 };
</script>
最終效果

定義元件或元件目錄
Vue.$autoform.RegisterDir(()=>require.context('./components/autoform', 'c'));//目录
Vue.$autoform.Register(Vue,[Components...],{prefix: "c"}) //组件对象
#cHello.vue
// PATH:/components/autoform/cHello.vue
<template>
 <p>
  <p>
   <p>基本的变量可以通过"mixins"获取,这里有开发组件需要的一些变量</p>
   <p>自定义子组件:Hello</p>
   <p>当前field: {{field}}</p>
   <p>整个model: {{model}}</p>
   <p>当前model: {{model[field.name]}}</p>
   <p>layout: {{layout}}</p>
   <p>字段相关配置to: {{to}}</p>
  </p>
 </p>
</template>
<script>
 import {baseField} from "charlie-autoform";
 export default {
  mixins: [baseField],
  name: 'cHello',
  data () {
   return {};
  },
  methods: {},
  mounted(){
   //this.eventBus 事件总线
  }
 };
</script>
成果
目前應用再多個系統定性: 維護成本降低、關注點分離相信看了本文案例你已經掌握了方法,更多精彩請關注php中文網其它相關文章! 推薦閱讀:定量:表單開發效率提升50%
以上是使用vue自動化表單(附程式碼)的詳細內容。更多資訊請關注PHP中文網其他相關文章!
陳述:
本文內容由網友自願投稿,版權歸原作者所有。本站不承擔相應的法律責任。如發現涉嫌抄襲或侵權的內容,請聯絡admin@php.cn

