
PHP本地進行API介面測試步驟詳解
- php中世界最好的语言原創
- 2018-05-17 15:12:382553瀏覽
這次帶給大家PHP本地進行API介面測試步驟詳解,PHP本地進行API介面測試的注意事項有哪些,以下就是實戰案例,一起來看一下。
最近寫API接口,每寫一個接口,我自己需要先測試一下,看有沒有語法錯誤,請求的資料對不對,但是很多都是POST請求,沒法直接在瀏覽器中開啟連結進行測試,所以必須要有個可以在本地發送HTTP請求的模擬工具,模擬資料請求。
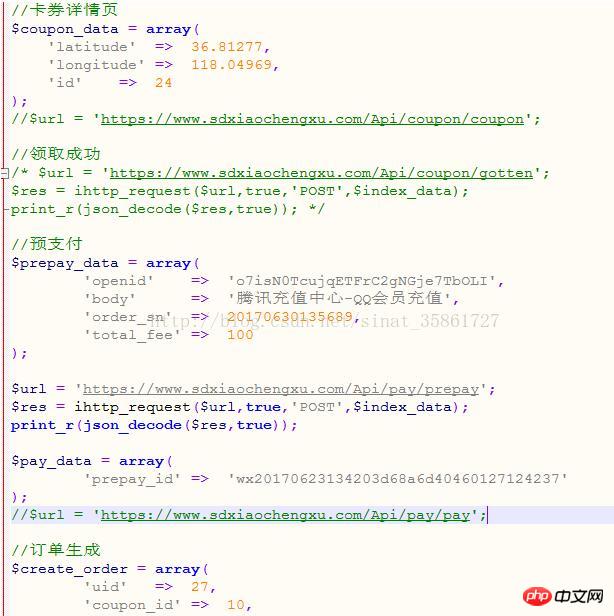
一開始我是這麼乾的,在本機wampserver#運行目錄下創建一個文件,在裡邊寫Curl請求,進行模擬請求測試,但是每個介面需要的參數都不一樣,我需要不斷修改請求的參數和API,很不方便。到後來我的這個請求文件裡邊亂糟糟的數據,我都分不清了:
在網上找了找相關的工具,有不少在線測試的,例如:ATOOL線上工具、Apizza等等,看了下他們做的都很好,使用非常方便,介面很漂亮,服務也很周到。但是我在考慮安全性問題,同時它給我返回的是原始的JSON格式的資料,我習慣於看數組格式的,比較直觀。
於是乎,本著自己動手豐衣足食的理念,我就在本地寫一個簡易的API測試頁面,提交數據之後在本地實現API請求測試功能,既不用考慮安全問題,又可以對結果隨便轉換。只需要兩個檔案就搞定,一個是填寫資料的頁面post.html,另一個是接收post.html頁面傳過來的資料並處理請求實作功能的post.php檔案。
1、前端頁面檔案post.html
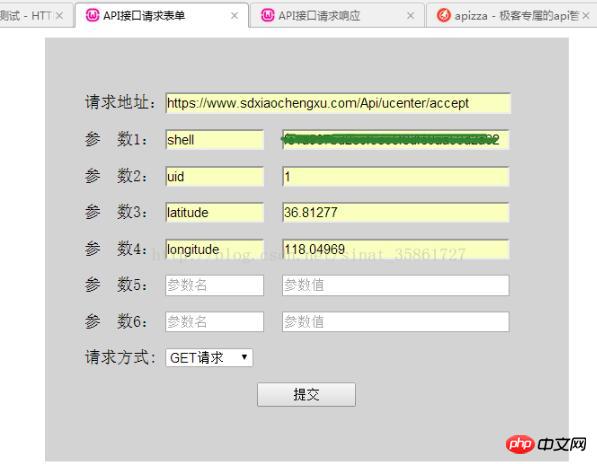
#只是是簡易的頁面,沒有複雜的佈局,沒有JS特效,暫時只寫了6個參數,一般來說也夠了,不夠的可以自行加入。這裡預設傳的都是body請求參數,請求方式也只使用了GET和POST。
<html xmlns="http://blog.csdn.net/sinat_35861727?viewmode=contents">
<head>
	<meta http-equiv = "Content-Type" content = "text/html;charset = utf8">
	<meta name = "description" content = "提交表单">
	<title>API接口请求表单</title>
</head>
	<style type="text/css">
		.key1{
			width:100px;
		}
		.value1{
			width:230px;
			margin:0 0 0 10px;
		}
		.main{
			margin:0 auto;
			width:450px;
			height:auto;
			background:lightgray;
			padding:40px 40px;
		}
		.refer{
			width:100px;
			height:24px;
		}
		.url{
			width:350px;
		}
	</style>
<body>
<p class="main">
	<form method="POST" action="post.php" target="_blank">
		<p>请求地址:<input class="url" type="text" name="curl" placeholder="API接口地址"></p>
		<p>参 数1: <input class="key1" type="text" name="key1" placeholder="参数名">
					 <input class="value1" type="text" name="value1" placeholder="参数值"></p>
		<p>参 数2: <input class="key1" type="text" name="key2" placeholder="参数名">
					 <input class="value1" type="text" name="value2" placeholder="参数值"></p>
		<p>参 数3: <input class="key1" type="text" name="key3" placeholder="参数名">
					 <input class="value1" type="text" name="value3" placeholder="参数值"></p>
		<p>参 数4: <input class="key1" type="text" name="key4" placeholder="参数名">
					 <input class="value1" type="text" name="value4" placeholder="参数值"></p>
		<p>参 数5: <input class="key1" type="text" name="key5" placeholder="参数名">
					 <input class="value1" type="text" name="value5" placeholder="参数值"></p>
		<p>参 数6: <input class="key1" type="text" name="key6" placeholder="参数名">
					 <input class="value1" type="text" name="value6" placeholder="参数值"></p>
		<p>请求方式: <select name="method">
			<option value="POST">POST请求</option>
			<option value="GET">GET请求</option>
		</select></p>
		<p style="text-align:center;"><input class="refer" type="submit" value="提交"></p>
	</form>
</p>
</body>
</html>
2、資料處理檔案post.php
#接收post.html頁面傳過來的數據,並發送請求接著處理請求結果,前端頁面傳過來的都是Body請求參數,如果還需要Header參數的話,可以在這個檔案手動加入上去。
<?php
echo '<title>API接口请求响应</title>';
/**
 * 设置网络请求配置
 * @param [string] $curl 请求的URL
 * @param [bool] true || false 是否https请求
 * @param [string] $method 请求方式,默认GET
 * @param [array] $header 请求的header参数
 * @param [object] $data PUT请求的时候发送的数据对象
 * @return [object] 返回请求响应
 */
function ihttp_request($curl,$https=true,$method='GET',$header=array(),$data=null){
	// 创建一个新cURL资源
	$ch = curl_init();

	// 设置URL和相应的选项
	curl_setopt($ch, CURLOPT_URL, $curl); //要访问的网站
	//curl_setopt($ch, CURLOPT_HEADER, false);
	curl_setopt($ch, CURLOPT_HTTPHEADER, $header);
	curl_setopt($ch, CURLOPT_RETURNTRANSFER, true);
	if($https){
		curl_setopt($ch, CURLOPT_SSL_VERIFYPEER, false);
		//curl_setopt($ch, CURLOPT_SSL_VERIFYHOST, true);
	}
	if($method == 'POST'){
		curl_setopt($ch, CURLOPT_POST, true); //发送 POST 请求
		curl_setopt($ch, CURLOPT_POSTFIELDS, $data);
	}


	// 抓取URL并把它传递给浏览器
	$content = curl_exec($ch);
	if ($content === false) {
	 return "网络请求出错: " . curl_error($ch);
	 exit();
	}
	//关闭cURL资源,并且释放系统资源
	curl_close($ch);

	return $content;
}
//检查是否是链接格式
function checkUrl($C_url){
 $str="/^http(s?):\/\/(?:[A-za-z0-9-]+\.)+[A-za-z]{2,4}(?:[\/\?#][\/=\?%\-&~`@[\]\':+!\.#\w]*)?$/";
 if (!preg_match($str,$C_url)){
 return false;
 }else{
		return true;
 }
}
//检查是不是HTTPS
function check_https($url){
	$str="/^https:/";
	if (!preg_match($str,$url)){
 return false;
 }else{
		return true;
 }
}
if($_SERVER['REQUEST_METHOD'] != 'POST') exit('请求方式错误!');
//发送请求
function curl_query(){
	$data = array(
		$_POST['key1'] => $_POST['value1'],
		$_POST['key2'] => $_POST['value2'],
		$_POST['key3'] => $_POST['value3'],
		$_POST['key4'] => $_POST['value4'],
		$_POST['key5'] => $_POST['value5'],
		$_POST['key6'] => $_POST['value6']
	);
	//数组去空
	$data = array_filter($data);					//post请求的参数
	if(empty($data)) exit('请填写参数');

	$url = $_POST['curl'];							//API接口
	if(!checkUrl($url)) exit('链接格式错误');		//检查连接的格式
	$is_https = check_https($url); 				//是否是HTTPS请求
	$method = $_POST['method'];						//请求方式(GET POST)

	$header = array();								//携带header参数
	//$header[] = 'Cache-Control: max-age=0';
	//$header[] = 'Connection: keep-alive';

	if($method == 'POST'){
		$res = ihttp_request($url,$is_https,$method,$header,$data);
		print_r(json_decode($res,true));
	}else if($method == 'GET'){
		$curl = $url.'?'.http_build_query($data);	//GET请求参数拼接
		$res = ihttp_request($curl,$is_https,$method,$header);
		print_r(json_decode($res,true));
	}else{
		exit('error request method');
	}
}
curl_query();
?>
寫的很簡單,功能也不是很全面,正常情況下的POST和GET請求還是可以滿足的,至少本地測試查看結果是沒有問題的,有需要的小伙伴可下載代碼下來,然後依自己的需求自行修改完善功能。
相信看了本文案例你已經掌握了方法,更多精彩請關注php中文網其它相關文章!
推薦閱讀:
#以上是PHP本地進行API介面測試步驟詳解的詳細內容。更多資訊請關注PHP中文網其他相關文章!