
樹狀控制項修改iview步驟說明
- php中世界最好的语言原創
- 2018-05-11 13:41:113933瀏覽
這次帶給大家樹狀控制修改iview步驟說明,樹狀控制修改iview的注意事項有哪些,下面就是實戰案例,一起來看一下。
實作原則
修改了element-ui原始碼,把原始碼裡面的tree模組提取出來
然後修改element自帶checkbox等元件為iview的checkbox,並且相容方法
最後修改element樣式,改為iview風格,自己也加入了一些樣式
新的tree元件可以說是element的邏輯,iview的風格
<template>
<p
@click.stop="handleClick"
v-show="node.visible">
<p class="chu-tree-nodecontent"
:style="{ 'padding-left': (node.level - 1) * tree.indent + 'px' }">
<span :class="arrowClasses" @click.stop="handleExpandIconClick">
<Icon v-if="!node.isLeaf" type="arrow-right-b"></Icon>
</span>
<Checkbox
v-if="showCheckbox"
:value="node.checked"
:indeterminate="node.indeterminate"
:disabled="!!node.disabled"
@click.native.stop
@on-change="handleCheckChange"></Checkbox>
<span
v-if="node.loading"
class="ivu-load-loop">
</span>
<node-content :node="node"></node-content>
</p>
<collapse-transition>
<p
v-show="expanded">
<el-tree-node
:render-content="renderContent"
v-for="child in node.childNodes"
:key="getNodeKey(child)"
:node="child"
@node-expand="handleChildNodeExpand">
</el-tree-node>
</p>
</collapse-transition>
</p>
</template>
修改handleCheckChange,因為iview的checkbox元件邏輯不同,函數的傳回不一樣,需要相容
handleCheckChange(ev) {
    this.node.setChecked(ev, !this.tree.checkStrictly);
   },
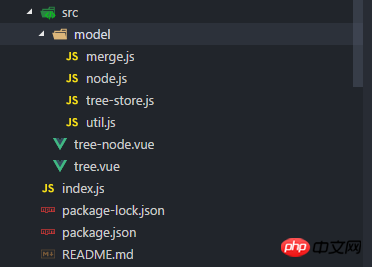
擷取完成後的專案結構,以及封裝成npm外掛程式
使用方法
必須安裝iview
#樣式風格全部替換成了ivew
功能全部按照element- ui原先一樣
npm i chu-tree-iview
import chuView from 'chu-tree-iview'
Vue.use(chuView)
<chu-tree></chu-tree>
相信看了本文案例你已經掌握了方法,更多精彩請關注php中文網其它相關文章!
推薦閱讀:
以上是樹狀控制項修改iview步驟說明的詳細內容。更多資訊請關注PHP中文網其他相關文章!
陳述:
本文內容由網友自願投稿,版權歸原作者所有。本站不承擔相應的法律責任。如發現涉嫌抄襲或侵權的內容,請聯絡admin@php.cn
上一篇:vue 父子元件相互呼叫的實現下一篇:vue 父子元件相互呼叫的實現