Vue中component組件使用步驟詳解
- php中世界最好的语言原創
- 2018-05-03 10:36:043020瀏覽
這次帶給大家Vue中component元件使用步驟詳解,Vue中component元件所使用的注意事項有哪些,以下就是實戰案例,一起來看一下。
官方的說明
渲染一個「元元件」為動態元件。依 is 的值,來決定哪個元件被渲染。
<!-- 动态组件由 vm 实例的属性值 `componentId` 控制 -->
<component :is="componentId"></component>
具體可以官網文件中的
動態元件
內建的元件component
場景
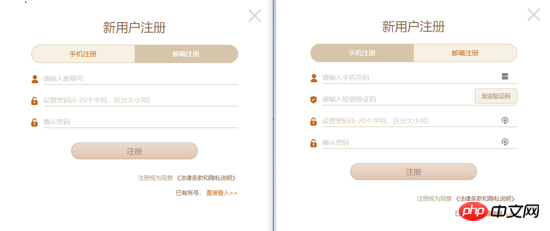
#這裡透過一個業務場景來闡述vue內建component元件的應用。如圖所示,這裡展示經典註冊頁面,註冊分為郵箱註冊和手機註冊,彈跳窗頂部有標籤可以切換註冊類型,中間是註冊表單信息,郵箱註冊和手機註冊有著不一樣的表單內容,底部是註冊按鈕以及其他操作。經過分析手機註冊介面與郵箱註冊除了中間的表單內容不一致之外,其他的介面內容是一樣的。

在實際專案程式碼設計中,為了確保多用性和可維護性,是會有一些可行的方案。這裡我們採用vue內建的component元件來實現這一點。
核心程式碼實作
頂部tab切換的時候,type值發生改變,對應的表單的元件也發生了變化
<template>
<p>
<a href="javascript:;" rel="external nofollow" rel="external nofollow" @click.prevent="handleCloseBtnClick"></a>
<p>
<h3>新用户注册</h3>
<p>
<span :class="{active: type === 'mobileForm'}" @click="type = mobileForm">手机注册</span>
<span :class="{active: type === 'emailForm'}" @click="type = emailForm">邮箱注册</span>
</p>
</p>
<component :is="type" ref="form">
<button @click="handleRegisterBtnClick">注册</button>
<p ><span ><span>注册视为同意</span><a> 《法律条款和隐私说明》</a></span></p>
<p><span>已有账号<a href="javascript:;" rel="external nofollow" rel="external nofollow" @click.prevent="handleLoginBtnClick">直接登入>></a></span></p>
</component>
</p>
</template>
<script>
export default {
methods: {
handleRegisterBtnClick () {
this.$refs.form.validateData().then(() => {
this.$refs.form.getFormData()
})
}
}
}
</script>
mixins混合
用Vue內建component元件情況下,一般實際被渲染的元件具有一定的共通性,例如相同的屬性,相同的方法或相同的初始化銷毀過程。例如目前這個場景中郵件表單和手機表單都具有校驗方法(validateData)和取得表單資料方法(getFormData)。這種情況下可以使用vue提供的混合的功能。進一步抽離 mixins.js
export default {
 methods: {
  validateData() {
   return Promise.resolve()
  },
  getFormData() {
   return {}
  }
 }
}
email-form.vue
<script>
import minx from './mixins'
export default {
 mixins: [mixins],
 methods: {
  getFormData() {
   return { email: 'example@example.com' }
  }
 }
}
</script>
如果有自訂的需求,可以重寫mixins中的方法。
表格的應用程式
在管理後台專案中,表格常常會被用到。我們希望表格的td是文字、進度條、checkbox等等,並且希望透過傳一個json配置就可以渲染出。使用vue內建的component組件可以發揮很讚的作用。

例如這樣的table使用方式
<template>
 <vue-table ref="table" :columns="columns" :datum="datum"></vue-table>
</template>
<script>
export default {
  data () {
   return {
    columns: [
     { title: 'ID', width: '30', dataKey: 'id' },
     { title: '进度组件', dataKey: 'progress', render: { type: 'progress2', max: 100, precision: 2 } }
    ],
    datum: [{ id: '1', name: '进度0', progress: 10 }]
   }
  }
 }
</script>
table中使用component的實作
<td v-for="column of columns">
	<component :is="`${TYPE_PRE}${columns.render.type}`" :row-data="rowData" :params="columns.render"></component>
</td>
#表單的應用
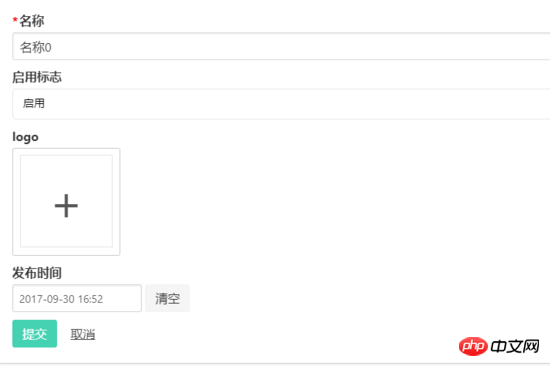
在管理後台專案中,表單也經常需要用到,我們也同樣希望表單的某一項是文字框,下拉框,時間選擇框,富文本等等等等,且希望透過傳一個json配置就可以渲染出。 vue內建的component元件可以依然可以實現如此美好的願景。

例如這樣的一個form使用方式
<template>
<c-form :cells="cells" ref="form">
<button class="button is-primary" :class="{ 'is-disabled': isSubmitBtnDisabled }" @click.prevent="submit">提交</button>
</c-form>
</template>
<script>
export default {
computed: {
cells () {
return [
{
field: 'name',
label: '名称',
type: 'textfield',
attrs: { placeholder: '名称' },
validate: { required: { message: '请输入名称'} }
},
{
field: 'enable',
label: '启用标志',
type: 'dropdown',
extra: {options: [{ label: '启用', value: 1 }, { label: '禁用', value: 2 }] }
}
]
}
}
}
</script>
form中使用component的實作
<form>
 <c-form-cell v-for="cell of cellList" :key="cell.field" :field="cell.field">
  <component
	 :is="`${TYPE_PRE}${cell.type}`"
	 :field="cell.field"
	 :attrs="cell.attrs"
	 :extra="cell.extra"
	 :validate="cell.validate"
	 :cells="cell.cells">
  </component>
 </c-form-cell>
</form>
表單和表格在基於VUE的後台引擎開源專案中都有實現,歡迎star和fork。
相信看了本文案例你已經掌握了方法,更多精彩請關注php中文網其它相關文章!
推薦閱讀:
以上是Vue中component組件使用步驟詳解的詳細內容。更多資訊請關注PHP中文網其他相關文章!

