
Python微信庫:itchat的用法詳解

- 不言原創
- 2018-04-28 14:35:1446267瀏覽
本篇文章主要介紹了Python微信庫:itchat的用法詳解,現在分享給大家,也給大家做個參考。一起來看看吧
在論壇上看到了用Python登入微信並實現自動簽到,才了解到一個新的Python庫: itchat
庫文檔說明連結在這: itchat
我把我網站存檔(主要是我打開很慢),以便以後閱讀。
0x01 Start
最簡單的回覆
透過以下程式碼,可以完成回覆所有文字訊息(包括群組聊天)。
import itchat
from itchat.content import TEXT

@itchat.msg_register
def simple_reply(msg):
  if msg['Type'] == TEXT:
    return 'I received: %s' % msg['Content']

itchat.auto_login()
itchat.run()
常用訊息的設定
itchat支援所有的訊息類型與群組聊天,在下面的範例中示範了對於這些訊息類型簡單的配置。
#coding=utf8
import itchat
from itchat.content import *

@itchat.msg_register([TEXT, MAP, CARD, NOTE, SHARING])
def text_reply(msg):
  itchat.send('%s: %s' % (msg['Type'], msg['Text']), msg['FromUserName'])

# 以下四类的消息的Text键下存放了用于下载消息内容的方法,传入文件地址即可
@itchat.msg_register([PICTURE, RECORDING, ATTACHMENT, VIDEO])
def download_files(msg):
  msg['Text'](msg['FileName'])
  return '@%s@%s' % ({'Picture': 'img', 'Video': 'vid'}.get(msg['Type'], 'fil'), msg['FileName'])

# 收到好友邀请自动添加好友
@itchat.msg_register(FRIENDS)
def add_friend(msg):
  itchat.add_friend(**msg['Text']) # 该操作会自动将新好友的消息录入,不需要重载通讯录
  itchat.send_msg('Nice to meet you!', msg['RecommendInfo']['UserName'])

# 在注册时增加isGroupChat=True将判定为群聊回复
@itchat.msg_register(TEXT, isGroupChat = True)
def groupchat_reply(msg):
  if msg['isAt']:
    itchat.send(u'@%s\u2005I received: %s' % (msg['ActualNickName'], msg['Content']), msg['FromUserName'])

itchat.auto_login(True)
itchat.run()
當然這裡不需要深究為什麼這些東西可以這麼寫,我在這裡放出了範例程式只是為了給你一個該sdk相關程式碼大概樣子的概念。
有了大概的模式的了解之後我們就可以進入下一部分的介紹。
0x02 Login
在上一部分你看到了基本的註冊與登陸,而顯然登陸使用的是itchat提供了auto_login方法,呼叫即可完成登入。
一般而言,我們都會在完成訊息的註冊後登陸。
當然這裡需要特別強調的是三點,分別是短時間關閉重連、命令列二維碼與自訂登陸內容。 itchat提供了登陸狀態暫存,關閉程式後一定時間內不需要掃碼即可登入。為了方便在無圖形介面使用itchat,程式內建了命令列二維碼的顯示。 * 如果你需要就登入狀態就一些修改(例如更改提示語、二維碼出現後郵件發送等)。
**0x01-1 短時間關閉程式後重連**
這樣即使程式關閉,一定時間內重新開啟也可以不用重新掃碼。
最簡單的用法就是給 auto_login 方法傳入值為真的 hotReload 。
此方法會產生靜態檔案 itchat.pkl ,用於儲存登陸的狀態。
import itchat
from itchat.content import TEXT

@itchat.msg_register(TEXT)
def simple_reply(msg):
  print(msg['Text'])

itchat.auto_login(hotReload=True)
itchat.run()
itchat.dump_login_status()
透過設定statusStorageDir可以將靜態檔案指定為其他的值。
這個內建選項其實相當於使用了以下兩個函數的這一段程式:
import itchat
from itchat.content import TEXT

if itchat.load_login_status():
  @itchat.msg_register(TEXT)
  def simple_reply(msg):
    print(msg['Text'])
  itchat.run()
  itchat.dump_login_status()
else:
  itchat.auto_login()
  itchat.dump_login_status()
  print('Config stored, so exit.')
其中load_login_status與dump_login_status分別對應讀取與導出設定。
透過設定傳入的fileDir的值可以設定匯入匯出的檔案。
**0x01-2 命令列二維碼顯示**
透過以下命令可以在登陸的時候使用命令列顯示二維碼:
itchat.auto_login(enableCmdQR=True)
部分系統可能字幅寬度有出入,可以透過將enableCmdQR賦值為特定的倍數進行調整:
# 如部分的linux系统,块字符的宽度为一个字符(正常应为两字符),故赋值为2
itchat.auto_login(enableCmdQR=2)
預設控制台背景色為暗色(黑色),若背景色為淺色(白色),可以將enableCmdQR賦值為負值:
itchat.auto_login(enableCmdQR=-1)
**0x01-2 自訂登入程序**
如果需要控制登入的過程,可以閱讀下面的內容。
同時itchat也提供了登陸所需的每一步的方法,登陸的過程按順序為: 獲取二維碼uuid->獲取二維碼->判斷是否已經登陸成功->取得初始化資料->更新微信相關資訊(通訊錄、手機登陸狀態)->循環掃描新資訊(開啟心跳)
#取得二維碼uuid
取得產生二維碼所需的uuid,並回傳。
方法名稱: get_QRuuid
所需值:無
傳回值:成功->uuid,失敗->None
取得二維碼
根據uuid取得二維碼並打開,回傳是否成功。
方法名稱: get_QR
所需值:uuid
傳回值:成功->True,失敗->False
## 判斷是否已經登陸成功
判斷是否已經登陸成功,回傳掃描的狀態碼。 方法名稱: check_login所需值:uuid
返回值:登陸成功->'200',已掃描二維碼->'201',二維碼失效- >'408',未獲取到信息->'0'
#獲取初始化數據
獲取微信用戶資訊以及心跳所需的數據。 方法名稱:web_init 所需值:無
傳回值:儲存登入微信使用者資訊的字典
取得微信通訊錄
取得微信的所有好友資訊並更新。 方法名稱:get_contract所需值:無
傳回值:儲存好友資訊的清單
更新微信手機登陸狀態
在手機上顯示登入狀態。 方法名稱: show_mobile_login所需值:無
傳回值:無
循環掃描新資訊(開啟心跳)
#循環掃描是否有新的訊息,開啟心跳包。方法名称: start_receiving
所需值:无
返回值:无
EG:
一个登录例子:
import itchat, time, sys

def output_info(msg):
  print('[INFO] %s' % msg)

def open_QR():
  for get_count in range(10):
    output_info('Getting uuid')
    uuid = itchat.get_QRuuid()
    while uuid is None: uuid = itchat.get_QRuuid();time.sleep(1)
    output_info('Getting QR Code')
    if itchat.get_QR(uuid): break
    elif get_count >= 9:
      output_info('Failed to get QR Code, please restart the program')
      sys.exit()
  output_info('Please scan the QR Code')
  return uuid

uuid = open_QR()
waitForConfirm = False
while 1:
  status = itchat.check_login(uuid)
  if status == '200':
    break
  elif status == '201':
    if waitForConfirm:
      output_info('Please press confirm')
      waitForConfirm = True
  elif status == '408':
    output_info('Reloading QR Code')
    uuid = open_QR()
    waitForConfirm = False
userInfo = itchat.web_init()
itchat.show_mobile_login()
itchat.get_contract()
output_info('Login successfully as %s'%userInfo['NickName'])
itchat.start_receiving()

# Start auto-replying
@itchat.msg_register
def simple_reply(msg):
  if msg['Type'] == 'Text':
    return 'I received: %s' % msg['Content']
itchat.run()
0x03 Register
注册消息方法
itchat将根据接收到的消息类型寻找对应的已经注册的方法。
如果一个消息类型没有对应的注册方法,该消息将会被舍弃。
在运行过程当中也可以动态注册方法,注册方式与结果不变。
注册
你可以通过两种方式注册消息方法
import itchat
from itchat.content import *

# 不带参数注册,所有消息类型都将调用该方法(包括群消息)
@itchat.msg_register
def simple_reply(msg):
  if msg['Type'] == 'Text':
    return 'I received: %s' % msg['Text']

# 带参数注册,该类消息类型将调用该方法
@itchat.msg_register([TEXT, MAP, CARD, NOTE, SHARING])
def text_reply(msg):
  itchat.send('%s: %s' % (msg['Type'], msg['Text']), msg['FromUserName'])
消息类型
向注册方法传入的msg包含微信返回的字典的所有内容。
本api增加Text、Type(也就是参数)键值,方便操作。
itchat.content中包含所有的消息类型参数,内容如下表所示:
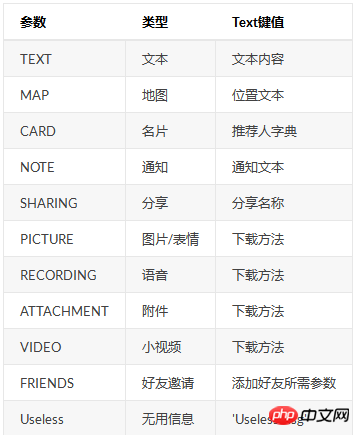
比如你需要存储发送给你的附件:
@itchat.msg_register(ATTACHMENT)
def download_files(msg):
  msg['Text'](msg['FileName'])
值得注意的是,群消息增加了三个键值: isAt: 判断是否@本号 ActualNickName: 实际NickName * Content: 实际Content
可以通过本程序测试:
import itchat
from itchat.content import TEXT

@itchat.msg_register(TEXT, isGroupChat = True)
def text_reply(msg):
  print(msg['isAt'])
  print(msg['ActualNickName'])
  print(msg['Content'])

itchat.auto_login()
itchat.run()
注册消息的优先级
优先级分别为:后注册消息先于先注册消息,带参数消息先于不带参数消息。
以下面的两个程序为例:
import itchat
from itchat.content import *

itchat.auto_login()

@itchat.msg_register(TEXT)
def text_reply(msg):
  return 'This is the old register'

@itchat.msg_register(TEXT)
def text_reply(msg):
  return 'This is a new one'

itchat.run()
在私聊发送文本时将会回复This is a new one。
import itchat
from itchat.content import *

itchat.auto_login()

@itchat.msg_register
def general_reply(msg):
  return 'I received a %s' % msg['Type']

@itchat.msg_register(TEXT)
def text_reply(msg):
  return 'You said to me one to one: %s' % msg['Text']

itchat.run()
仅在私聊发送文本时将会回复You said to me one to one,其余情况将会回复I received a ...。
动态注册消息
动态注册时可以选择将 itchat.run() 放入另一线程或使用 configured_reply() 方法处理消息。
两种方法分别是:
# 使用另一线程,但注意不要让程序运行终止
import thread

thread.start_new_thread(itchat.run, ())

# 使用configured_reply方法
while 1:
  itchat.configured_reply()
  # some other functions
  time.sleep(1)
以下给出一个动态注册的例子:
#coding=utf8
import thread

import itchat
from itchat.content import *

replyToGroupChat = True
functionStatus = False

def change_function():
  if replyToGroupChat != functionStatus:
    if replyToGroupChat:
      @itchat.msg_register(TEXT, isGroupChat = True)
      def group_text_reply(msg):
        if u'关闭' in msg['Text']:
          replyToGroupChat = False
          return u'已关闭'
        elif u'开启' in msg['Text']:
          return u'已经在运行'
        return u'输入"关闭"或者"开启"测试功能'
    else:
      @itchat.msg_register(TEXT, isGroupChat = True)
      def group_text_reply(msg):
        if u'开启' in msg['Text']:
          replyToGroupChat = True
          return u'重新开启成功'
    functionStatus = replyToGroupChat

thread.start_new_thread(itchat.run, ())

while 1:
  change_function()
  time.sleep(.1)
0x04 Reply
回复
itchat提供五种回复方法,建议直接使用send方法。
send方法
方法:
send(msg='Text Message', toUserName=None)
所需值:
1.msg:消息内容
2.'@fil@文件地址'将会被识别为传送文件,'@img@图片地址'将会被识别为传送图片,'@vid@视频地址'将会被识别为小视频
3.toUserName:发送对象,如果留空将会发送给自己
返回值:发送成功->True, 失败->False
#coding=utf8
import itchat

itchat.auto_login()
itchat.send('Hello world!')
# 请确保该程序目录下存在:gz.gif以及xlsx.xlsx
itchat.send('@img@%s' % 'gz.gif')
itchat.send('@fil@%s' % 'xlsx.xlsx')
itchat.send('@vid@%s' % 'demo.mp4')
send_msg方法
方法:
send_msg(msg='Text Message', toUserName=None)
所需值:
msg:消息内容
toUserName:发送对象,如果留空将会发送给自己
返回值:发送成功->True, 失败->False
程序示例:
import itchat

itchat.auto_login()

itchat.send_msg('Hello world')
send_file方法
方法:
send_file(fileDir, toUserName=None)
所需值:
fileDir:文件路径(不存在该文件时将打印无此文件的提醒)
toUserName:发送对象,如果留空将会发送给自己
返回值:发送成功->True, 失败->False
#coding=utf8

import itchat

itchat.auto_login()

#请确保该程序目录下存在:xlsx.xlsx

itchat.send_file('xlsx.xlsx')
send_img方法
方法:
send_img(fileDir, toUserName=None)
所需值:
fileDir:文件路径(不存在该文件时将打印无此文件的提醒)
toUserName:发送对象,如果留空将会发送给自己
返回值:发送成功->True, 失败->False
#coding=utf8
import itchat

itchat.auto_login()
# 请确保该程序目录下存在:gz.gif
itchat.send_img('gz.gif')
send_video方法
方法:
send_video(fileDir, toUserName=None)
所需值:
fileDir:文件路径(不存在该文件时将打印无此文件的提醒)
toUserName:发送对象,如果留空将会发送给自己
返回值:发送成功->True, 失败->False
需要保证发送的视频为一个实质的mp4文件
#coding=utf8

import itchat

itchat.auto_login()

#请确保该程序目录下存在:demo.mp4

itchat.send_file('demo.mp4')
0x05 Memmber stuff
在使用个人微信的过程当中主要有三种账号需要获取,分别为: 好友 公众号 * 群聊
itchat为这三种账号都提供了整体获取方法与搜索方法。
而群聊多出获取用户列表方法以及创建群聊、增加、删除用户的方法。
这里我们分这三种分别介绍如何使用。
好友
好友的获取方法为 get_friends ,将会返回完整的好友列表。 其中每个好友为一个字典 列表的第一项为本人的账号信息 * 传入update键为True将可以更新好友列表并返回
好友的搜索方法为 search_friends ,有四种搜索方式: 1. 仅获取自己的用户信息 2. 获取特定 UserName 的用户信息 3. 获取备注、微信号、昵称中的任何一项等于 name 键值的用户 4. 获取备注、微信号、昵称分别等于相应键值的用户
其中三、四项可以一同使用,下面是示例程序:
# 获取自己的用户信息,返回自己的属性字典
itchat.search_friends()
# 获取特定UserName的用户信息
itchat.search_friends(userName='@abcdefg1234567')
# 获取任何一项等于name键值的用户
itchat.search_friends(name='littlecodersh')
# 获取分别对应相应键值的用户
itchat.search_friends(wechatAccount='littlecodersh')
# 三、四项功能可以一同使用
itchat.search_friends(name='LittleCoder机器人', wechatAccount='littlecodersh')
公众号
公众号的获取方法为 get_mps ,将会返回完整的公众号列表。 其中每个公众号为一个字典 传入update键为True将可以更新公众号列表并返回
公众号的搜索方法为 search_mps ,有两种搜索方法: 1. 获取特定 UserName 的公众号 2. 获取名字中含有特定字符的公众号
如果两项都做了特定,将会仅返回特定 UserName 的公众号,下面是示例程序:
# 获取特定UserName的公众号,返回值为一个字典
itchat.search_mps(userName='@abcdefg1234567')
# 获取名字中含有特定字符的公众号,返回值为一个字典的列表
itcaht.search_mps(name='LittleCoder')
# 以下方法相当于仅特定了UserName
itchat.search_mps(userName='@abcdefg1234567', name='LittleCoder')
群聊
群聊的获取方法为 get_chatrooms ,将会返回完整的群聊列表。 其中每个群聊为一个字典 传入update键为True将可以更新群聊列表并返回
群聊的搜索方法为 search_chatrooms ,有两种搜索方法: 1. 获取特定UserName的群聊 2. 获取名字中含有特定字符的群聊
如果两项都做了特定,将会仅返回特定UserName的群聊,下面是示例程序:
# 获取特定UserName的群聊,返回值为一个字典
itchat.search_chatrooms(userName='@abcdefg1234567')
# 获取名字中含有特定字符的群聊,返回值为一个字典的列表
itcaht.search_chatrooms(name='LittleCoder')
# 以下方法相当于仅特定了UserName
itchat.search_chatrooms(userName='@abcdefg1234567', name='LittleCoder')
群聊用户列表的获取方法为 update_chatroom 。 群聊在首次获取中不会获取群聊的用户列表,所以需要调用该命令才能获取群聊的成员 该方法需要传入群聊的UserName,返回特定群聊的用户列表
memberList = itchat.update_chatroom('@abcdefg1234567')
创建群聊、增加、删除群聊用户的方法如下所示: 由于之前通过群聊检测是否被好友拉黑的程序,目前这三个方法都被严格限制了使用频率 删除群聊需要本账号为群管理员,否则会失败
memberList = itchat.get_friends()[1:]
# 创建群聊,topic键值为群聊名
chatroomUserName = itchat.create_chatroom(memberList, 'test chatroom')
# 删除群聊内的用户
itchat.delete_member_from_chatroom(chatroomUserName, memberList[0])
# 增加用户进入群聊
itchat.add_member_into_chatroom(chatroomUserName, memberList[0])
0x06 QAQ
Q: 为什么我在设定了itchat.auto_login()的enableCmdQR为True后还是没有办法在命令行显示二维码?
A: 这是由于没有安装可选的包 pillow ,可以使用右边的命令安装: pip install pillow
0x07 Eg
def signin():
    # 查找公众号,进行签到
    user = itchat.search_mps(name='Nulll.me')
    UserName = user[0]['UserName']
    itchat.send(msg=u'3', toUserName=UserName)
    itchat.dump_login_status()
    pickleDumps('flag', localDay) # 如果执行成功写入标致文件
    exit()


if __name__ == '__main__':
    # 如果不是在登陆状态,就循环登陆
    while not itchat.load_login_status():
        sendMail()
        itchat.auto_login(hotReload=True)
        itchat.dump_login_status()
        signin() # 签到
        time.sleep(3600)
    signin() # 签到
相关推荐:
python微信库itchat如何实现微信自动回复功能的代码实例
以上是Python微信庫:itchat的用法詳解的詳細內容。更多資訊請關注PHP中文網其他相關文章!