
Pastate.js 響應式框架多重元件應用

- 不言原創
- 2018-04-10 16:20:571584瀏覽
這篇文章給大家分享的內容是關於Pastate.js 響應式框架之多元件應用 ,有著一定的參考價值,有需要的朋友可以參考一下
這是pastate 系列教學的第二章,歡迎關注,持續更新。
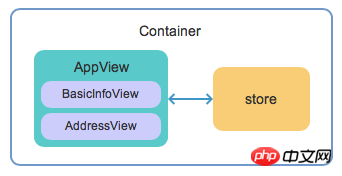
這一章,我們在上一章的 state 結構中加入多一些訊息,並用多個元件來組織 pastate 應用程式。
更新state 結構
我們把上一章的個人基本資訊資料包裝為state.basicInfo 屬性的對象,並向state 中新增address 屬性,儲存個人位址資訊:
const initState = {
    basicInfo: {
        name: 'Peter',
        isBoy: true,
        age: 10
    },
    address: {
        country: 'China',
        city: 'Guangzhou'
    }
}
由於JavaScript 語言的限制,pastate 無法偵測到透過賦值來為物件新增屬性,以自動將新屬性轉換為回應式節點。所以你應該在 initState 中把需要用到的 state 屬性都定義出來,把屬性值初始化為 null 或空數組都是可以的。以下是個錯誤的範例:
const initState = {
    basicInfo: ...,
    address: ...
}
const store = new Pastore(initState)
const state = store.state

state.hobby = 'coding'  // 错误,state.hobby 属性不具有受 pastate 控制,不具有响应式特点
即使支援這個特性,它也會讓開發者難以完全掌握state 的結構,導致應用程式難以開發與維護,所以我們應該在initState裡對state 的結構進行完整的定義。
分別開發basicInfo 和address 的視圖元件
我們先用簡單暫時的方式來建構子元件:
...
/** @type {initState} */
const state = store.state;

class BasicInfoView extends Component {
    render(){
        return (
            <p style={{padding: 10, margin: 10}}>
                <strong>Basic info:</strong><br/>
                My name is {state.basicInfo.name}.<br/>
                I am a {state.basicInfo.isBoy == true ? "boy" : "girl"}.<br/>
                I am {state.basicInfo.age} years old.<br/>
            </p>
        )
    }
}
class AddressView extends Component {
render(){
return (
<p style={{padding: 10, margin: 10}}>
<strong>Address:</strong><br/>
My country is {state.address.country}.<br/>
My city is {state.address.city}.<br/>
</p>
)
}
}可以看到,BasicInfoView 元件直接引用store .state.basicInfo 的值,AddressView 元件直接引用store.state.address 的值。接著修改原來的AppView 父元件,把這兩個子元件巢狀進去,同時增加一個方法來修改address.city 的值:
...
class AppView extends Component {
    increaseAge(){
        state.basicInfo.age += 1
    }
    decreaseAge(){
        state.basicInfo.age -= 1
    }
    changeCity(){
        state.address.city += '!'
    }
    render() {
        return (
            <p style={{padding: 10, margin: 10, display: "inline-block"}}>
                <BasicInfoView />
                <AddressView />
                <button onClick={this.decreaseAge}> decrease age </button>
                <button onClick={this.increaseAge}> increase age </button>
                <button onClick={this.changeCity}> change city </button>
            </p>
        )
    }
}
...
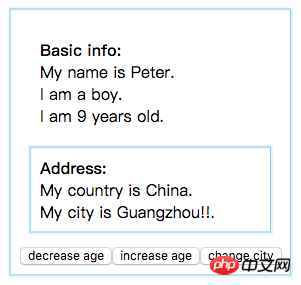
完成!讓我們運行一下:
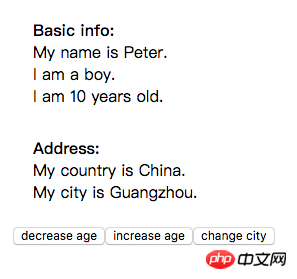
點擊按鈕,看起來一切正常!我們透過 Chrome 的 react dev tools 來觀察一下當 state 改變時,各個元件的渲染情況。開啟瀏覽器的開發者工具,選擇 react 標籤,勾選上 Highlight Updates, 這時當元件重新渲染時,會被帶有顏色的方塊框起來。

我們點選頁面上decrease age 按鈕試試,元件重新渲染的結果如下:
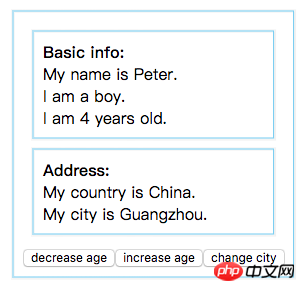
我們可以發現,當只有state.basicInfo.age 改變時,AppView、BasicInfoView 和AddressView 3個元件都會被重新渲染,即使AddressView 所引用的資料沒有發生任何改變!這是react 多元件渲染的通常情況,當應用元件簡單、嵌套層級不多時,我們不會感覺到這種模式會帶來什麼明顯的影響;但是當應用元件的嵌套關係變得比較複雜的時候,會帶來性能隱患,我們需要來關注這個問題。
store.imState 與store.state
先介紹一下store 中的兩個不同的state:store.imState 和store.state ,你可以試著了解:
store.imState 是應用程式狀態的資料實體,它被pastate 使用immutable 的機制來管理,當節點的內容更新時,該節點的所有祖先的「引用」都會被更新。 imState 的每個節點值除了 null 或 undefined 外,都是包裝類型(String, Number, Boolean, Object, Array)。
store.state 是store.imState 的
響應式陰影, 可以直接對store.state 任何節點進行賦值修改,pastate 會把修改結果作用到store.imState,並非同步觸發視圖更新。
或簡化為以下兩點:
#store.imState 用來渲染視圖
store.state 用來操作資料
這兩個概念對於沒有使用過redux 和沒了解過vue.js 原理的人來說可能有點難懂。不過沒關係,不理解這兩個概念並不妨礙你使用 pastate,你可以在使用 pastate 的過程中完全感覺不到 imState 的存在。 pastate 的理念就是封裝複雜概念,讓你可以用簡單的方式去實現複雜的功能。
如果你想要理解 pastate 的詳細原理,可以查看原理章節。
使用props 接收imState,實作元件的按需渲染
當一個component 與store 連接時,store 會把imState 傳遞到component 的props
.state 中,因此我們可以在AppView 元件的props 中接收state,同時把AppView 元件的基類改為react 純元件PureComponent,這樣就開啟了元件按需渲染效果:
import React, { PureComponent } from 'react'; // 1. 改用 PureComponent 代替 Component
...
class AppView extends PureComponent { // 1. 改用 PureComponent
    ...
    render() {
        /** @type {initState} */
        let state = this.props.state; // 2. 从 props 接收 state
        return (
            <p style={{padding: 10, margin: 10, display: "inline-block"}}>

                {/**  3. 把 state 的子节点传递给对于的子组件 */}

                <BasicInfoView state={state.basicInfo}/>
                <AddressView state={state.address}/>
                ...
            </p>
        )
    }
}
...
注意上面代码的第3点注释,我们把 state 数据的子节点通过 props 传递给子组件: dd060b8dbff0e68e466b47a5601465f4。对于不直接与 store 直接连接的子组件,我们同样也需要修改为从
props 获取 state, 并把组件的基类改成 PureComponent:
class BasicInfoView extends PureComponent { // 1. 基类改为 PureComponent
    render(){
        let state = this.props.state; // 2. 从 props 接收 state
        return (
            <p style={{padding: 10, margin: 10}}>
                <strong>Basic info:</strong><br/>

                {/**  3. 这里的 state 是 basicInfo 对象 */}

                My name is {state.name}.<br/>
                I am a {state.isBoy == true ? "boy" : "girl"}.<br/>
                I am {state.age} years old.<br/>
            </p>
        )
    }
}
class AddressView extends PureComponent { // 1. 基类改为 PureComponent
render(){
let state = this.props.state; // 2. 从 props 接收 state
return (
<p style={{padding: 10, margin: 10}}>
<strong>Address:</strong><br/>
{/** 3. 这里的 state 是 address 对象 */}
My country is {state.country}.<br/>
My city is {state.city}.<br/>
</p>
)
}
}可以看到,分配到子组件的 props 中的 state 是 根state 的子节点。因此在 BasicInfoView 中的 this.props.state 是 basicInfo 对象, 而在 AddressView 中的 this.props.state 是 address 对象。
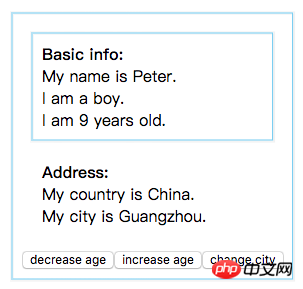
完成!我们来看看运行效果!
点击
decrease age按钮或increase age按钮,我们看到的组件重新渲染情况是:
点击
change city按钮,我们看到的组件重新渲染情况是:
Amazing!可以看到当我们点击按钮改变 state 节点时,只有引用被改变的 state 节点的组件才会进行重新渲染, 我们成功地实现了多组件按需渲染的效果!当应用具有大量不与 store 直接连接的子组件时,这种按需渲染的策略可以大幅提高应用的渲染性能。
使用 imState 渲染视图的注意事项
从 props 中接收到的 state 的每个节点都是特殊的包装类型 , 当需要在 if(...) 语句或 ... ? A : B 使用其布尔值结果时, 需要使用 == 进行显式比较来获取,如下
class BasicInfoView extends PureComponent {

    render() {
        /** @type {initState['basicInfo']} */
        let state = this.props.state;
        return (
            <p style={{ padding: 10, margin: 10 }}>

               {state.isBoy == true ? "boy" : "girl"}  {/* 正确 */}
               {state.isBoy ? "boy" : "girl"}  {/* 错误 */}

               {state.age != 0 ? "Not 0" : "0"}  {/* 正确 */}
               {state.age ? "Not 0" : "0"}  {/* 错误 */}

            </p>
        )
    }
}
了解 PureComponent
React 的 PureComponent 会在渲染前对新的 props / state 与老的 props / state 进行浅层比较( shallow comparison),仅当发现 props / state 发生改变时,才执行重新渲染。浅层比较即是比较 props / state 的根级属性值是否改变,如果属性值是数组 / 对象类型,比较的结果使其引用是否相等:
console.log(["a"] == ["a"]) // 结果是 false

let a = ["a"]
console.log(a == a) // 结果是 true
console.log({a: "a"} == {a: "a"}) // 结果是 false

let a = {a: "a"}
console.log(a == a) // 结果是 true
Pastate 符合 immutable data 规范的 state 数据,可以确保当某个 state 节点改变时,其祖先节点的引用都会进行更新,所以可以配合使用 PureComponent 实现高效的按需渲染。
按需渲染时需要对 state 的结构进行模块化设计,如果把所有的属性都放在 state 根节点上,就没法实现按需渲染了:
// 注意:这样的 state 设计无法实现子组件的按需渲染
initState = {
     name: 'Peter',
     isBoy: true,
     age: 10,
     country: 'China',
     city: 'Guangzhou'
}
当然,只有当应用的 state 比较复杂且对 state 的操作比较繁多时候,才会体现按需渲染对性能的提升;当应用比较简单的时候,不一定要对 state 和视图进行太详细的划分。
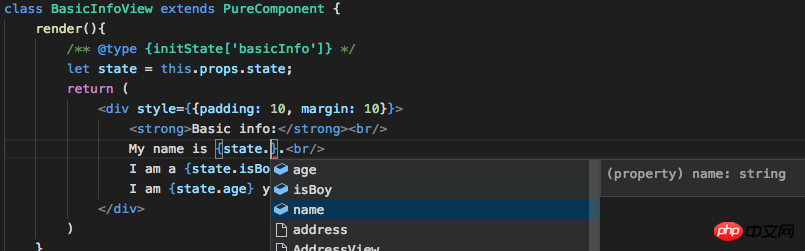
子组件 state 的 intelliSense
同样,我们可以使用 jsDoc 注释让子组件中 state 的具有智能提示,如下:
class BasicInfoView extends PureComponent {
    render(){
        /** @type {initState['basicInfo']} */
        let state = this.props.state;
        ...
    }
}
class AddressView extends PureComponent {
render(){
/** @type {initState['address']} */
let state = this.props.state;
...
}
}请使用 xxx['xxx'] 的格式指明对象的子节点: /** @type {initState['address']} */。在 vs code 里,暂时无法使用 xxx.xxx 的嵌套格式指定一个变量的类型。
单实例子组件
如果某组件只在视图中出现一次,那么这种组件被称为单实例组件。这种组件可以把对子组件设计的 state 操作函数简单地封装在子组件内部,提高组件的内聚性,便于维护管理。下面以 BasicInfoView 为例,把操作按钮移入子组件,并把两个操作函数移入子组件:
...
class BasicInfoView extends PureComponent {

    increaseAge(){
        state.basicInfo.age += 1
    }

    decreaseAge(){
        state.basicInfo.age -= 1
    }

    render(){
        /** @type {initState['basicInfo']} */
        let state = this.props.state;
        return (
            <p style={{padding: 10, margin: 10}}>
                ...
                <button onClick={this.decreaseAge}> decrease age </button>
                <button onClick={this.increaseAge}> increase age </button>
            </p>
        )
    }
}
...
同样,你也可以对 AddressView 做类似的处理。
下一章, 我们将会介绍如何在 pastate 中渲染和操作 state 中的数组。
这是 pastate 系列教程的第二章,欢迎关注,持续更新。
这一章,我们在上一章的 state 结构中添加多一些信息,并用多个组件来组织 pastate 应用。
相关推荐:
Pastate.js 之响应式 react state 管理框架
以上是Pastate.js 響應式框架多重元件應用的詳細內容。更多資訊請關注PHP中文網其他相關文章!