
Bootstrap圖片輪播效果實現方法

- PHPz原創
- 2018-05-29 17:42:392934瀏覽
本文主要為大家詳細介紹了Bootstrap圖片輪播效果,具有一定的參考價值,有興趣的小夥伴們可以參考一下,希望能幫助到大家。
導言
Bootstrap 輪播(Carousel)外掛程式是一種靈活的響應式的向網站添加滑桿的方式。除此之外,內容也是足夠靈活的,可以是影像、內嵌框架、影片或其他您想要放置的任何類型的內容。
【相關影片推薦:Bootstrap教學】
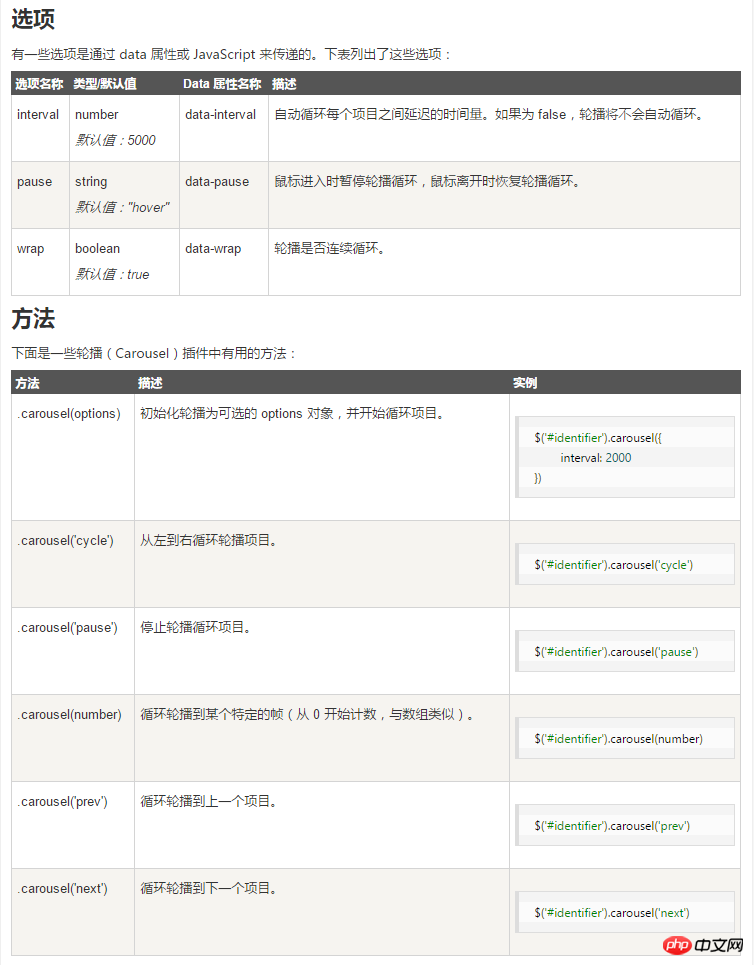
範例
下面示範圖片的輪播,使用bootstrap中的Carousel顯示循環播放元素插件。
<p id="carousel-example-generic" class="carousel slide" data-ride="carousel">
 <!-- Indicators -->
 <ol class="carousel-indicators">
  <li data-target="#carousel-example-generic" data-slide-to="0" class="active"></li>
  <li data-target="#carousel-example-generic" data-slide-to="1"></li>
  <li data-target="#carousel-example-generic" data-slide-to="2"></li>
 </ol>

 <!-- Wrapper for slides -->
 <p class="carousel-inner" role="listbox">
  <p class="item active">
   <img src="..." alt="...">
   <p class="carousel-caption">
    ...
   </p>
  </p>
  <p class="item">
   <img src="..." alt="...">
   <p class="carousel-caption">
    ...
   </p>
  </p>
  ...
 </p>

 <!-- Controls -->
 <a class="left carousel-control" href="#carousel-example-generic" role="button" data-slide="prev">
  <span class="glyphicon glyphicon-chevron-left" aria-hidden="true"></span>
  <span class="sr-only">Previous</span>
 </a>
 <a class="right carousel-control" href="#carousel-example-generic" role="button" data-slide="next">
  <span class="glyphicon glyphicon-chevron-right" aria-hidden="true"></span>
  <span class="sr-only">Next</span>
 </a>
</p>
在src中插入圖片已為圖片設定大小

#也可以為其加上標題
<p class="item">
 <img src="..." alt="...">
 <p class="carousel-caption">
 <h3>...</h3>
 <p>...</p>
 </p>
</p>
相關推薦:
以上是Bootstrap圖片輪播效果實現方法的詳細內容。更多資訊請關注PHP中文網其他相關文章!
陳述:
本文內容由網友自願投稿,版權歸原作者所有。本站不承擔相應的法律責任。如發現涉嫌抄襲或侵權的內容,請聯絡admin@php.cn