
深入理解Vue全域API

- 小云云原創
- 2017-12-18 13:50:342483瀏覽
大家都了解API嗎?本文主要介紹了深入理解Vue官方文件梳理之全局API,小編覺得挺不錯的,現在分享給大家,也給大家做個參考。一起跟著小編過來看看吧,希望能幫助大家。
Vue.extend
配置項目data必須為function,否則配置無效。 data的合併規則(可看《Vue官方文檔梳理-全域配置》)原始碼如下:
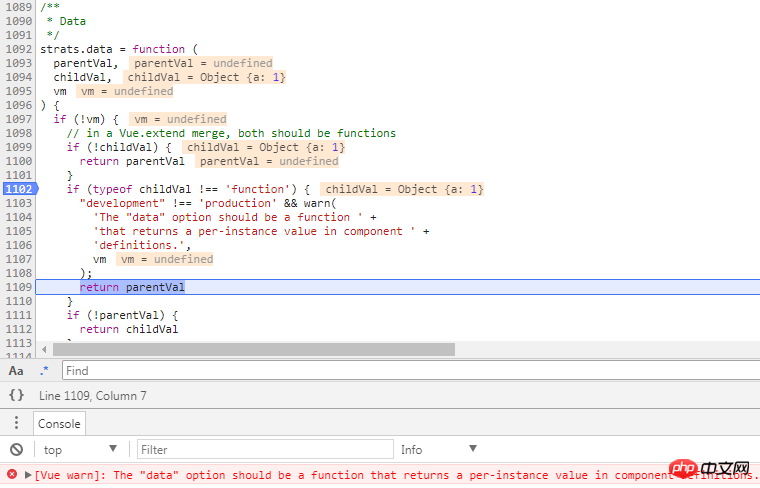
#傳入非function類型的data(上圖中data配置為{a:1}),在合併options時,如果data不是function類型,開發版會發出警告,然後直接回傳了parentVal,這表示extend傳入的data選項被無視了。
我們知道實例化Vue的時候,data可以是對象,這裡的合併規則不是通用的嗎?注意上面有if(!vm)的判斷,實例化的時候vm是有值的,因此不同於Vue.extend,其實下面的註解也做了說明(in a Vue.extend merge, both should be function) ,這也是官方文件為何說data是特例。
另外官方文件所說的“子類別”,是因為Vue.extend返回的是一個“繼承”Vue的函數,原始碼結構如下:
Vue.extend = function (extendOptions) {
  //***
  var Super = this;
  var SuperId = Super.cid;
  //***
  var Sub = function VueComponent(options) {
    this._init(options);
  };
  Sub.prototype = Object.create(Super.prototype);
  Sub.prototype.constructor = Sub;
  //***
  return Sub
};
Vue.nextTick
既然使用vue,當然要沿著資料驅動的方式思考,所謂資料驅動,就是不要直接去操作dom,dom的所有操作完全可以利用vue的各種指令來完成,指令將資料和dom進行了“綁定”,操作資料不僅能實現dom的更新,而且更方便。
如果瀏覽器支援Promise,或者用了Promise庫(但是對外暴露的必須叫Promise,因為源碼中的判斷為typeof Promise !== 'undefined'),nextTick返回的就是Promise對象。
Vue.nextTick().then(() => {
  // do sth
})
Vue執行nextTick的回呼採用call的方式cb.call(ctx);ctx就是目前Vue實例,因此在回呼中可以直接使用this調用實例的配置。
nextTick可以簡單理解為將回調放到末尾執行,原始碼中如果目前不支援Promise和MutationObserver,那麼會採用setTimeout的方式來執行回調,這不就是我們常用的延遲執行程式碼的方式。
 if (typeof Promise !== 'undefined' && isNative(Promise)) {
 } else if (typeof MutationObserver !== 'undefined' && (
     isNative(MutationObserver) ||
     // PhantomJS and iOS 7.x
     MutationObserver.toString() === '[object MutationObserverConstructor]'
   )) {
 } else {
   // fallback to setTimeout
   /* istanbul ignore next */
   timerFunc = function () {
     setTimeout(nextTickHandler, 0);
   };
 }
舉例來實際看:
<p id="app">
<p ref="dom">{{a}}</p>
</p>
new Vue({
el: '#app',
data: {
a: 1
},
mounted: function name(params) {
console.log('start');
this.$nextTick(function () {
console.log('beforeChange', this.$refs.dom.textContent)
})
this.a = 2;
console.log('change');
this.$nextTick(function () {
console.log('afterChange', this.$refs.dom.textContent)
})
console.log('end');
}
})
// 控制台依次打印
// start
// change
// end
// beforeChange 1
// afterChange 2你估計會有些納悶,既然都是最後才執行,那為什麼beforeChange輸出的是1而不是2,這是因為this.a=2背後觸發dom更新也是採用nextTick的方式,上面的程式碼實際執行的順序是:beforeChange>更新dom>afterChange。
Vue.set
Vue.set( target, key, 值 ),target不能是Vue 實例,或Vue 實例的根資料對象,因為來源碼中做如下判斷:
var ob = (target).__ob__;
if (target._isVue || (ob && ob.vmCount)) {
"development" !== 'production' && warn(
  'Avoid adding reactive properties to a Vue instance or its root $data ' +
  'at runtime - declare it upfront in the data option.'
);
return val
}
target._isVue阻止了為Vue實例新增屬性,ob && ob.vmCount阻止了給Vue實例的根資料物件新增屬性。
Vue.delete
如果Vue能偵測到delete操作,那麼就不會出現這個api。如果一定要用delete來刪除$data的屬性,那就用Vue.delete,否則不會觸發dom的更新。
同Vue.set,Vue.delete( target, key )的target不能是一個 Vue 範例或 Vue 範例的根資料物件。原始碼中的阻止方式和Vue.set相同。
在2.2.0+ 版本中target若為數組,key則是數組下標。因為Vue.delete刪除數組實際上是用splice來刪除,delete雖然能用於刪除數組,但位置還在,不能算真正的刪除。
var a = [1, 2, 3];
delete a[0];
console.log(a); // [undefined, 2, 3]
Vue.use
#Vue.use 原始碼比較簡單,可以全部貼出來。
Vue.use = function (plugin) {
  var installedPlugins = (this._installedPlugins || (this._installedPlugins = []));
  if (installedPlugins.indexOf(plugin) > -1) {
    return this
  }
  // additional parameters
  var args = toArray(arguments, 1);
  args.unshift(this);
  if (typeof plugin.install === 'function') {
    plugin.install.apply(plugin, args);
  } else if (typeof plugin === 'function') {
    plugin.apply(null, args);
  }
  installedPlugins.push(plugin);
  return this
};
安裝的插件放到了installedPlugins ,安裝插件前透過installedPlugins.indexOf(plugin)來判斷插件是否被安裝過,進而阻止註冊相同插件多次。
外掛程式類型為object,必須指定install 屬性來安裝外掛程式(typeof plugin.install === 'function'),另外外掛程式執行採用plugin.install.apply(plugin, args);,因此this 存取object 的其他屬性。此處的 args 是由 Vue(args.unshift(this);) 和 Vue.use 傳入的除了 plugin 的其他參數(toArray(arguments, 1),1 表示從 arguments[1] 開始截取)。
Vue.use({
  a: 1,
  install: function (Vue) {
    console.log(this.a) // 1
    console.log(arguments) // [function Vue(options),"a", "b", "c"]
  }
}, 'a', 'b', 'c')
插件類型為function,安裝呼叫plugin.apply(null, args);,因此在嚴格模式下插件運行時上下文this 為null,非嚴格模式為Window。
'use strict'
Vue.use(function plugin() {
  console.log(this) // null
  console.log(arguments) // [function Vue(options),"a", "b", "c"]
}, 'a', 'b', 'c')
Vue.compile
和众多 JS 模板引擎的原理一样,预先会把模板转化成一个 render 函数,Vue.compile 就是来完成这个工作的,目标是将模板(template 或 el)转化成 render 函数。
Vue.compile 返回了{render:Function,staticRenderFns:Array},render 可直接应用于 Vue 的配置项 render,而 staticRenderFns 是怎么来的,而且按照官网的例子,Vue 还有个隐藏的配置项 staticRenderFns,先来个例子看看。
var compiled = Vue.compile(
'<p>' +
'<header><h1>no data binding</h1></header>' +
'<section>{{prop}}</section>' +
'</p>'
)
console.log(compiled.render.toString())
console.log(compiled.staticRenderFns.toString())
// render
function anonymous() {
with(this) {
return _c('p', [_m(0), _c('section', [_v(_s(prop))])])
}
}
// staticRenderFns
function anonymous() {
with(this) {
return _c('header', [_c('h1', [_v("no data binding")])])
}
}原来没有和数据绑定的 dom 会放到 staticRenderFns 中,然后在 render 中以_m(0)来调用。但是并不尽然,比如上述模板去掉4a249f0d628e2318394fd9b75b4636b1,staticRenderFns 长度为 0,header 直接放到了 render 函数中。
function anonymous() {
  with(this) {
    return _c('p', [_c('header', [_v("no data binding")]), _c('section', [_v(_s(prop))])])
  }
}
Vue.compile 对应的源码比较复杂,上述渲染 1aa9e5d373740b65a0cc8f0a02150c53 没有放到 staticRenderFns 对应源码的核心判断如下:
 // For a node to qualify as a static root, it should have children that
 // are not just static text. Otherwise the cost of hoisting out will
 // outweigh the benefits and it's better off to just always render it fresh.
 if (node.static && node.children.length && !(
     node.children.length === 1 &&
     node.children[0].type === 3
   )) {
   node.staticRoot = true;
   return
 } else {
   node.staticRoot = false;
 }
1aa9e5d373740b65a0cc8f0a02150c53 不符判断条件 !(node.children.length === 1 && node.children[0].type === 3), 1aa9e5d373740b65a0cc8f0a02150c53 有一个子节点 TextNode(nodeType=3)。 注释也说明了一个 node 符合静态根节点的条件。
另外官网说明了此方法只在独立构建时有效,什么是独立构建?这个官网做了详细的介绍,不再赘述。对应官网地址:对不同构建版本的解释。
仔细观察编译后的 render 方法,和我们自己写的 render 方法有很大区别。但是仍然可以直接配置到 render 配置选项上。那么里面的那些 _c()、_m() 、_v()、_s() 能调用?随便看一个 Vue 的实例的 __proto__ 就会发现:
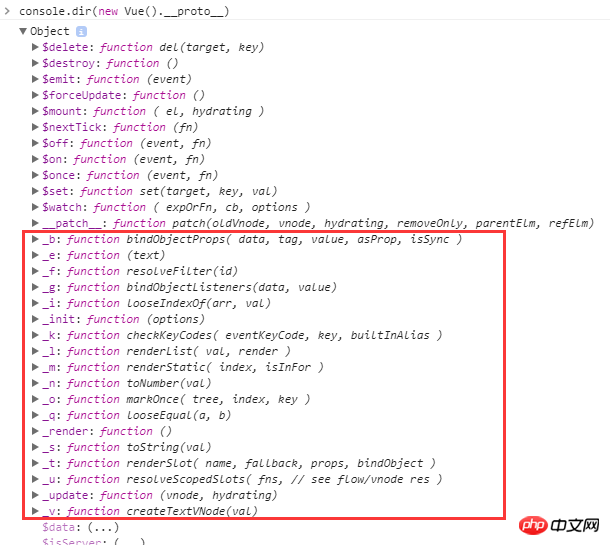
// internal render helpers.
// these are exposed on the instance prototype to reduce generated render
// code size.
Vue.prototype._o = markOnce;
Vue.prototype._n = toNumber;
Vue.prototype._s = toString;
Vue.prototype._l = renderList;
Vue.prototype._t = renderSlot;
Vue.prototype._q = looseEqual;
Vue.prototype._i = looseIndexOf;
Vue.prototype._m = renderStatic;
Vue.prototype._f = resolveFilter;
Vue.prototype._k = checkKeyCodes;
Vue.prototype._b = bindObjectProps;
Vue.prototype._v = createTextVNode;
Vue.prototype._e = createEmptyVNode;
Vue.prototype._u = resolveScopedSlots;
Vue.prototype._g = bindObjectListeners;
正如注释所说,这些方法是为了减少生成的 render 函数的体积。
全局 API 还剩 directive、filter、component、mixin,这几个比较类似,而且都对应着配置项,会在「选项」中再详细介绍。
相关推荐:
以上是深入理解Vue全域API的詳細內容。更多資訊請關注PHP中文網其他相關文章!