
Three.js入門之hello world以及如何繪製線
- 巴扎黑原創
- 2017-09-26 09:39:191606瀏覽
這篇文章主要為大家介紹了關於Three.js入門之hello world以及如何繪製線的相關資料,文中透過範例程式碼介紹的非常詳細,對大家的學習或工作具有一定的參考學習價值,需要的朋友們下面隨著小編來一起學習學習吧。
前言
本文屬於學習Three.js 的入門教程,文中透過範例介紹了hello world和線的實現,下面話不多說了,來一起看看詳細的介紹吧。
hello world
首先使用我們先用three.js建立一個立方體的hello world型別的案例。
<!doctype html>
<html>
<head>
 <meta charset="UTF-8">
 <meta name="viewport" content="width=device-width, user-scalable=no, initial-scale=1.0, maximum-scale=1.0, minimum-scale=1.0">
 <meta http-equiv="X-UA-Compatible" content="ie=edge">
 <title>Document</title>
 <script src="build/three.js"></script>
 <style>
  body{margin:0;}
  canvas{width: 100%; height:100%; display: block;}
 </style>
</head>
<body>
<script>
 //创建场景
 var scene = new THREE.Scene();
 //设置相机(视野,显示口的宽高比,近裁剪面,远裁剪面)
 var camera = new THREE.PerspectiveCamera( 75, window.innerWidth/window.innerHeight, 0.1, 1000 );
 //渲染器
 var renderer = new THREE.WebGLRenderer();
 //设置渲染器的高度和宽度,如果加上第三个值 false,则按场景大小显示,等比例缩放
 renderer.setSize( window.innerWidth, window.innerHeight,false);
 //将渲染器添加到html当中
 document.body.appendChild( renderer.domElement );

 //盒子模型(BoxGeometry),这是一个包含立方体所有顶点和填充面的对象。
 var geometry = new THREE.BoxGeometry( 1, 2, 1 );
 //使用网孔基础材料(MeshBasicMaterial)进行着色器,这里只绘制了一个绿色
 var material = new THREE.MeshBasicMaterial( { color: 0x00ffff } );
 //使用网孔(Mesh)来承载几何模型
 var cube = new THREE.Mesh( geometry, material );
 //将模型添加到场景当中
 scene.add( cube );
 //将相机沿z轴偏移5
 camera.position.z = 5;

 //设置一个动画函数
 var animate = function () {
  //一秒钟调用60次,也就是以每秒60帧的频率来绘制场景。
  requestAnimationFrame( animate );

  //console.log(cube.rotation);
  //每次调用模型的沿xy轴旋转0.01
  cube.rotation.x += 0.01;
  cube.rotation.y += 0.01;
  //使用渲染器把场景和相机都渲染出来
  renderer.render(scene, camera);
 };

 animate();
</script>
</body>
</html>
上面的程式碼案例解析:
(1)首先引入了three.js的程式庫文件,就和引入jq一樣。
(2)建立場景(17行)
(3)建立相機,並設定視野,顯示的寬高比,近裁切面,遠裁切面(19行)
(4)建立渲染器,並設定屬性,放置到dom中(21-25行)
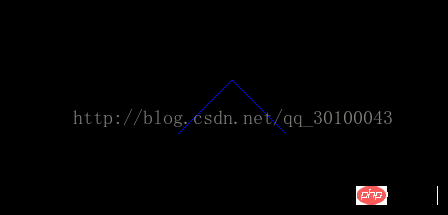
利用Three.js繪製線條
<!doctype html>
<html>
<head>
 <meta charset="UTF-8">
 <meta name="viewport" content="width=device-width, user-scalable=no, initial-scale=1.0, maximum-scale=1.0, minimum-scale=1.0">
 <meta http-equiv="X-UA-Compatible" content="ie=edge">
 <title>Document</title>
 <script src="build/three.js"></script>
 <style>
  body{margin:0;}
  canvas{width: 100%; height:100%; display: block;}
 </style>
</head>
<body>
<script>
 //创建场景
 var scene = new THREE.Scene();
 //设置相机(视野,显示口的宽高比,近裁剪面,远裁剪面)
 var camera = new THREE.PerspectiveCamera( 75, window.innerWidth/window.innerHeight, 0.1, 1000 );
 //设置相机的视点
 camera.position.set(0,0,100);
 //设置相机的朝向
 camera.lookAt(new THREE.Vector3(0,0,0));
 //渲染器
 var renderer = new THREE.WebGLRenderer();
 //设置渲染器的高度和宽度,如果加上第三个值 false,则按场景大小显示,等比例缩放
 renderer.setSize( window.innerWidth, window.innerHeight,false);
 //将渲染器添加到html当中
 document.body.appendChild( renderer.domElement );

 //定义线的基本材料,我们可以使用LineBasicMaterial(实线材料)和LineDashedMaterial(虚线材料)
 var material = new THREE.LineBasicMaterial({color:0x0000ff});
 //设置具有几何顶点的几何(Geometry)或缓冲区几何(BufferGeometry)设置顶点位置,看名字就知道了,一个是直接将数据保存在js里面的,另一个是保存在WebGL缓冲区内的,而且肯定保存到WebGL缓冲区内的效率更高
 var geometry = new THREE.Geometry();
 geometry.vertices.push(new THREE.Vector3(-10,0,0));
 geometry.vertices.push(new THREE.Vector3(0,10,0));
 geometry.vertices.push(new THREE.Vector3(10,0,0));
 //使用Line方法将线初始化
 var line = new THREE.Line(geometry, material);
 //将线添加到场景
 scene.add(line);

 //使用渲染器渲染出场景和相机
 renderer.render(scene, camera);
</script>
</body>
</html>
相對於上一節來說,只是模型方面有區別,這裡是先使用線紋理的方法設定線的紋理,然後使用幾何物件或緩衝區幾何物件產生頂點座標,最後呼叫Line方法繪製出來線。 以上是Three.js入門之hello world以及如何繪製線的詳細內容。更多資訊請關注PHP中文網其他相關文章!
陳述:
本文內容由網友自願投稿,版權歸原作者所有。本站不承擔相應的法律責任。如發現涉嫌抄襲或侵權的內容,請聯絡admin@php.cn