


動態腳本
我們在頁面中使用<script>元素就可以在頁面中插入javascript程式碼。有兩種方式:一種是透過src屬性來引用外部的JS文件,一種是用這個元素來包含一段js程式碼。所謂的動態腳本,就是指這個腳本在頁面載入時不存在,在未來的某個時刻透過修改DOM來動態的新增腳本。與操作html元素一樣,建立動態腳本也有兩種方式:插入外部檔案和直接插入JavaScript程式碼。 </script>
動態載入的外部JavaScript程式碼可以立刻執行,例如下面的程式碼:
var script = document.createElement("script");
script.type = "text/javascript";
script.src = "demo.js";
document.body.appendChild(script);
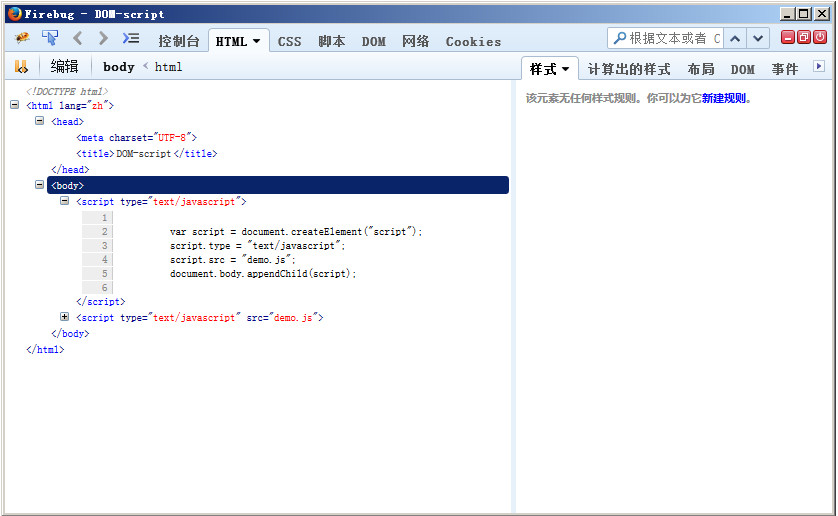
從上圖的結果可以看到,上面程式碼在
元素中產生了一個<script>節點: <div class="jb51code"> <pre class='brush:php;toolbar:false;'> <script type="text/javascript" src="demo.js"></script> </pre> <p>要注意的是,在執行最後一行程式碼把<script>加入到頁面之前,是不會下載外部腳本檔的。 <p>另一種指定JavaScript程式碼的方式是行內方式,例如: <div class="jb51code"> <pre class='brush:php;toolbar:false;'> var script = document.createElement("script"); script.type = "text/javascript"; script.appendChild(document.createTextNode("function fn1(){alert('hello wolrd!')} fn1();")); document.body.appendChild(script); </pre> <p style="text-align: center"><img src="/static/imghwm/default1.png" data-src="http://files.jb51.net/file_images/article/201512/2015128143006554.jpg?2015118143027?x-oss-process=image/resize,p_40" class="lazy" id="theimg" alt="" baiduimageplusrect="null" baiduimageplusstatus="2" onclick="window.open(this.src)" /> <p>上面的程式碼會在<body>元素中插入一段JavaScript程式碼: <div class="jb51code"> <pre class='brush:php;toolbar:false;'> <script type="text/javascript"> function fn1(){alert('hello wolrd!')} fn1(); </script> </pre> <p>執行上面的程式碼後會彈出提示框,顯示「hello world!」文字。 <p>在Firefox、Safari、Chrome和Opera瀏覽器中,上面操作的DOM程式碼是可以正常執行的。但是在舊版的IE瀏覽器中,這些程式碼會發生錯誤。舊版的IE瀏覽器將<script>元素看做特殊元素,不允許DOM存取它的子節點。不過,可以使用<script>元素的text屬性來指定JavaScript程式碼,例如: <div class="jb51code"> <pre class='brush:php;toolbar:false;'> var script = document.createElement("script"); script.type = "text/javascript"; script.text("function fn1(){alert('hello wolrd!')} fn1();"); document.body.appendChild(script); </pre> <p>像上面這樣修改程式碼之後,都可以在IE、Firefox、Safari3.0、Chrome和Opera瀏覽器中運作。 Safari3.0之前的瀏覽器雖然無法正確的執行text屬性,但可以使用文字節點來指定程式碼。所以如果需要支援舊版的瀏覽器,可以像下面這樣書寫程式碼: <div class="jb51code"> <pre class='brush:php;toolbar:false;'> var script = document.createElement("script"); script.type = "text/javascript"; var code = "function fn1(){alert('hello wolrd!')} fn1();"; try{ script.appendChild(document.createTextNode(code)); }catch(e){ script.text = code; }</pre> <p>上面的程式碼首先嘗試標準的DOM文字節點方法,因為除了舊版的IE瀏覽器之外,其它瀏覽器都支援這種方式。如果這行程式碼拋出異常,那麼表示是舊版的IE瀏覽器,那就必須使用text屬性。 <p>我們可以將動態新增腳本的程式碼封裝到一個函數中,透過不同的參數來動態載入不同的腳本。 <div class="jb51code"> <pre class='brush:php;toolbar:false;'> function loadScript(code){ var script = document.createElement("script"); script.type = "text/javascript"; try{ script.appendChild(document.createTextNode(code)); }catch(e){ script.text = code; } document.body.appendChild(script); } </pre> <p>要呼叫這個函數,可以像下面的樣子: <div class="jb51code"> <pre class='brush:php;toolbar:false;'> loadScript("function fn1(){alert('hello wolrd!')}"); </pre> <p>這種方式載入的程式碼會在全域作用域中執行,而且當腳本執行後立刻可用。實際上,這樣執行程式碼與在全域作用域中把相同的字串傳遞給eval()函數是一樣的。 <p><strong><span style="color: #0000ff">動態樣式 <p>通常可以將CSS樣式包含到HTML頁面中的元素有兩個:一個是<link>元素,用於包含來自外部的檔案;另一個是<style>元素,用於指定嵌入樣式。與動態腳本類似,動態樣式是指在頁面載入時並不存在的樣式。動態樣式是在頁面載入完成後動態新增到頁面中的腳本。例如下面的範例: <div class="jb51code"> <pre class='brush:php;toolbar:false;'> var link = document.createElement("link"); link.rel = "stylesheet" link.type = "text/css"; link.href = "styles.css"; var head = document.getElementsByTagName("head")[0];</pre> <p style="text-align: center"><img src="/static/imghwm/default1.png" data-src="http://files.jb51.net/file_images/article/201512/2015128143341450.jpg?2015118143357?x-oss-process=image/resize,p_40" class="lazy" id="theimg" alt="" baiduimageplusrect="null" baiduimageplusstatus="2" onclick="window.open(this.src)" /> <p>以上的程式碼在所有主流的瀏覽器中都可以正常運作。需要注意的是<link>元素要加入<head>元素中,而不是<body>元素中,才能確保所有瀏覽器中的行為一致。 <p>另外要注意的是,載入外部樣式檔案的過程是異步的,也就是說載入樣式和執行JavaScript程式碼的過程沒有固定的次序。 <p>另一個定義樣式的方式是使用<style>元素來包含嵌入式的CSS樣式。例如下面的程式碼: <div class="jb51code"> <pre class='brush:php;toolbar:false;'> var style = document.createElement("style"); style.type = "text/css"; style.appendChild(document.createTextNode("body{background:#f00;}")); var head = document.getElementsByTagName("head")[0]; head.appendChild(link); </pre> <p>上面的程式碼執行後可以在<head>元素中動態加入下面的節點: <div class="jb51code"> <pre class='brush:php;toolbar:false;'> <style type="text/css"> background:#f00; </style> </pre> <p>以上的代码可以在Firefox、Safari、Chrome和Opera浏览器中正常运行,在旧版本的IE浏览器中会报错。旧版本的IE浏览器会将<style>元素看做一个特殊的节点,不允许访问它的子节点。要解决旧版本IE的问题,就是访问元素的styleSheet属性,该属性又有一个cssText属性,可以接受CSS代码。例如下面的代码: <div class="jb51code"> <pre class='brush:php;toolbar:false;'> var style = document.createElement("style"); style.type = "text/css"; try{ style.appendChild(document.createTextNode("body{background:#f00;}")); }catch(e){ style.styleSheet.cssText = "body{background:#f00;}"; } </pre> <p>同样,我们也可以将动态添加样式的代码封装到一个函数中,通过不同的参数来动态加载不同的样式。 <div class="jb51code"> <pre class='brush:php;toolbar:false;'> function loadStyle(code){ var style = document.createElement("style"); style.type = "text/css"; try{ style.appendChild(document.createTextNode(code)); }catch(e){ style.styleSheet.cssText = code; } var head = document.getElementsByTagName("head")[0]; head.appendChild(style); } </pre> <p><strong><span style="color: #0000ff">JavaScript对表格的操作 <p>在JavaScript中,为了使我们能够方便的构建表格,HTML DOM为表格的<table>、<tbody>和<tr>提供了一些属性和方法。 <p>表格的<table>元素的属性和方法有: <p>caption:保存<caption>元素的引用的指针。<br /> tBodies:是一个<tbody>元素的HTMLCollection。<br /> tFoot:保存<tfoot>元素的引用的指针。<br /> tHead:保存<thead>元素的引用的指针。<br /> rows:是表格中所有行的HTMLCollection。<br /> createTHead():创建<thead>元素,将它放入表格中,并返回其引用。<br /> createTFoot():创建<tfoot>元素,将它放入表格中,并返回其引用。<br /> createCaption():创建<caption>元素,将它放入表格中,并返回其引用。<br /> deleteTHead():删除<thead>元素。<br /> deleteTFoot():删除<tfoot>元素<br /> deleteCaption():删除<caption>元素<br /> deleteRow(pos):删除指定位置的表格行。<br /> insertRow(pos):向rows集合中指定位置插入一行。 <p><span style="color: #ff0000"><strong>表格的<tbody>元素的属性和方法有: <p><br /> <p>rows:保存着<tbody>元素中行的HTMLCollection。<br /> deleteRow(pos):删除指定位置的表格行。<br /> insertRow(pos):向rows集合中指定位置插入一行。 <p><strong><span style="color: #ff0000">表格的<tr>元素的属性和方法有: <p>cells:保存着<tr>元素中单元格的HTMLCollection。<br /> deleteCell(pos):删除指定位置的单元格。<br /> insertCell(pos):向cells集合中指定位置插入一个单元格,并返回新插入单元格的引用。 <p>使用上面的这些属性和方法,可以使我们轻松的使用JavaScript来创建表格,例如下面的代码: <div class="jb51code"> <pre class='brush:php;toolbar:false;'> //创建表格 vatabldocument.createElement("table"); table.borde1; table.widt"100%"; //创建tbody vatboddocument.createElement("tbody"); table.appendChild(tbody); //创建第一个表格行 tbody.insertRow(0); tbody.rows[0].insertCell(0); tbody.rows[0].cells[0].appendChild(document.createTextNode("单元1-1")); tbody.rows[0].insertCell(1); tbody.rows[0].cells[1].appendChild(document.createTextNode("单元2-1")); //创建第二个表格行 tbody.insertRow(1); tbody.rows[1].insertCell(0); tbody.rows[1].cells[0].appendChild(document.createTextNode("单元1-2")); tbody.rows[1].insertCell(1); tbody.rows[1].cells[1].appendChild(document.createTextNode("单元2-2")); //将表格添加到文档中 document.body.appendChild(table) </pre> <p>使用上面的代码可以动态的在页面中创建一个表格。其中在创建表格行的时候,通过<tbody>元素调用了insertCell()方法,并传入参数0(表示将插入的行放在什么位置上)。执行了这一行代码后,会自动创建一个表格行,并将它插入到<tbody>元素的0位置上,此时就可以通过tbody.rows[0]来引用新插入的行。 <p>创建单元格的方式也与创建表格行的方式相同。通过<tr>元素来调用insertCell()方法,并传入要放置单元格的位置。然后就可以通过tbody.rows[0].cells[0]来引用新插入的单元格。 <p>关于NodeList <p>理解NodeList和NamedNodeMap、HTMLCollection是从整体上理解DOM的关键所在。这3个集合都是动态的,也就是说,每当文档结构发生了变化,它们始终都会保存最新的信息。从本质上来说,所有的NodeList对象都是在访问DOM文档时实时运行的查询。例如下面的代码会导致死循环的出现: <div class="jb51code"> <pre class='brush:php;toolbar:false;'> var divs = document.getElementsByTagName("div"); for(var i = 0; i < divs.length; i++){ var div = document.createElement("div"); document.body.appendChild(div); } </pre> <p>上面的代码首先获取了所有<div>元素的HTMLCollection,保存在一个变量中。由于这个集合是动态的,所以只要有新的<div>被添加到页面中,新的<div>元素就会被添加到这个集合中。这样导致的后果是div.length值是不断变化的,每次循环会在页面中添加一个<div>元素,length的值也会递增。这样i < divs.length条件就永远不会成立,导致死循环的发生。 <p>如果我们要迭代一个NodeList,最好将length属性初始化为第二个变量,然后将迭代器和这个变量做比较,例如: <div class="jb51code"> <pre class='brush:php;toolbar:false;'> var divs = document.getElementsByTagName("div"); for(var i = 0,len = divs.length; i < len; i++){ var div = document.createElement("div"); document.body.appendChild(div); } </pre> <p>由于len中保存了divs.length在循环开始时的一个快照,因此会避免死循环情况的发生。 <p>更多示例: <div class="jb51code"> <pre class='brush:php;toolbar:false;'> function sAlert(str){ var msgw,msgh,bordercolor; msgw=400;//提示窗口的宽度 msgh=100;//提示窗口的高度 titleheight=25 //提示窗口标题高度 bordercolor="#c51100";//提示窗口的边框颜色 titlecolor="#c51100";//提示窗口的标题颜色 var sWidth,sHeight; sWidth=screen.width; sHeight=screen.height; var bgObj=document.createElement("div"); bgObj.setAttribute('id','bgDiv'); bgObj.style.position="absolute"; bgObj.style.top="0"; bgObj.style.background="#cccccc"; bgObj.style.filter="progid:DXImageTransform.Microsoft.Alpha(style=3,opacity=25,finishOpacity=75"; bgObj.style.opacity="0.6"; bgObj.style.left="0"; bgObj.style.width=sWidth + "px"; bgObj.style.height=sHeight + "px"; bgObj.style.zIndex = "10000"; document.body.appendChild(bgObj); var msgObj=document.createElement("div") msgObj.setAttribute("id","msgDiv"); msgObj.setAttribute("align","center"); msgObj.style.background="white"; msgObj.style.border="1px solid " + bordercolor; msgObj.style.position = "absolute"; msgObj.style.left = "50%"; msgObj.style.top = "50%"; msgObj.style.font="12px/1.6em Verdana, Geneva, Arial, Helvetica, sans-serif"; msgObj.style.marginLeft = "-225px" ; msgObj.style.marginTop = -75+document.documentElement.scrollTop+"px"; msgObj.style.width = msgw + "px"; msgObj.style.height =msgh + "px"; msgObj.style.textAlign = "center"; msgObj.style.lineHeight ="25px"; msgObj.style.zIndex = "10001"; msgObj.style.position = "absolute"; var box=document.getElementById(str); var title=document.createElement("h4"); title.setAttribute("id","msgTitle"); title.setAttribute("align","right"); title.style.margin="0"; title.style.padding="3px"; title.style.background=bordercolor; title.style.filter="progid:DXImageTransform.Microsoft.Alpha(startX=20, startY=20, finishX=100, finishY=100,style=1,opacity=75,finishOpacity=100);"; title.style.opacity="0.75"; title.style.border="1px solid " + bordercolor; title.style.height="18px"; title.style.font="12px Verdana, Geneva, Arial, Helvetica, sans-serif"; title.style.color="white"; title.style.cursor="pointer"; title.onmousedown=function(){startDrag(this,'msgDiv')}; title.onmouseup=function(){stopDrag(this,'msgDiv')}; title.onmousemove=function(){drag('msgDiv')}; var closer=document.createElement("div"); closer.onclick=function(){ CloseReturn(); document.body.appendChild(box); box.style.display = "none"; document.body.removeChild(bgObj); document.getElementById("msgDiv").removeChild(title); document.body.removeChild(msgObj); }; closer.innerHTML="确定"; document.body.appendChild(msgObj); document.getElementById("msgDiv").appendChild(title); document.getElementById("msgTitle").appendChild(closer); box.style.display="inline"; document.getElementById("msgDiv").appendChild(box); ShowReturn(); }</pre> <p>html dom樹: <p style="text-align: center"><img src="/static/imghwm/default1.png" data-src="http://files.jb51.net/file_images/article/201512/2015128143651942.gif?201511814375?x-oss-process=image/resize,p_40" class="lazy" id="theimg" onclick="window.open(this.src)" baiduimageplusstatus="2" baiduimageplusrect="null" alt="" /></script>
 C和JavaScript:連接解釋Apr 23, 2025 am 12:07 AM
C 和JavaScript通過WebAssembly實現互操作性。 1)C 代碼編譯成WebAssembly模塊,引入到JavaScript環境中,增強計算能力。 2)在遊戲開發中,C 處理物理引擎和圖形渲染,JavaScript負責遊戲邏輯和用戶界面。
 從網站到應用程序:JavaScript的不同應用Apr 22, 2025 am 12:02 AM
JavaScript在網站、移動應用、桌面應用和服務器端編程中均有廣泛應用。 1)在網站開發中,JavaScript與HTML、CSS一起操作DOM,實現動態效果,並支持如jQuery、React等框架。 2)通過ReactNative和Ionic,JavaScript用於開發跨平台移動應用。 3)Electron框架使JavaScript能構建桌面應用。 4)Node.js讓JavaScript在服務器端運行,支持高並發請求。
 Python vs. JavaScript:比較用例和應用程序Apr 21, 2025 am 12:01 AM
Python更適合數據科學和自動化,JavaScript更適合前端和全棧開發。 1.Python在數據科學和機器學習中表現出色,使用NumPy、Pandas等庫進行數據處理和建模。 2.Python在自動化和腳本編寫方面簡潔高效。 3.JavaScript在前端開發中不可或缺,用於構建動態網頁和單頁面應用。 4.JavaScript通過Node.js在後端開發中發揮作用,支持全棧開發。
 C/C在JavaScript口譯員和編譯器中的作用Apr 20, 2025 am 12:01 AM
C和C 在JavaScript引擎中扮演了至关重要的角色,主要用于实现解释器和JIT编译器。1)C 用于解析JavaScript源码并生成抽象语法树。2)C 负责生成和执行字节码。3)C 实现JIT编译器,在运行时优化和编译热点代码,显著提高JavaScript的执行效率。
 JavaScript在行動中:現實世界中的示例和項目Apr 19, 2025 am 12:13 AM
JavaScript在現實世界中的應用包括前端和後端開發。 1)通過構建TODO列表應用展示前端應用,涉及DOM操作和事件處理。 2)通過Node.js和Express構建RESTfulAPI展示後端應用。
 JavaScript和Web:核心功能和用例Apr 18, 2025 am 12:19 AM
JavaScript在Web開發中的主要用途包括客戶端交互、表單驗證和異步通信。 1)通過DOM操作實現動態內容更新和用戶交互;2)在用戶提交數據前進行客戶端驗證,提高用戶體驗;3)通過AJAX技術實現與服務器的無刷新通信。
 了解JavaScript引擎:實施詳細信息Apr 17, 2025 am 12:05 AM
理解JavaScript引擎內部工作原理對開發者重要,因為它能幫助編寫更高效的代碼並理解性能瓶頸和優化策略。 1)引擎的工作流程包括解析、編譯和執行三個階段;2)執行過程中,引擎會進行動態優化,如內聯緩存和隱藏類;3)最佳實踐包括避免全局變量、優化循環、使用const和let,以及避免過度使用閉包。
 Python vs. JavaScript:學習曲線和易用性Apr 16, 2025 am 12:12 AM
Python更適合初學者,學習曲線平緩,語法簡潔;JavaScript適合前端開發,學習曲線較陡,語法靈活。 1.Python語法直觀,適用於數據科學和後端開發。 2.JavaScript靈活,廣泛用於前端和服務器端編程。


熱AI工具

Undresser.AI Undress
人工智慧驅動的應用程序,用於創建逼真的裸體照片

AI Clothes Remover
用於從照片中去除衣服的線上人工智慧工具。

Undress AI Tool
免費脫衣圖片

Clothoff.io
AI脫衣器

Video Face Swap
使用我們完全免費的人工智慧換臉工具,輕鬆在任何影片中換臉!

熱門文章
熱工具

記事本++7.3.1
好用且免費的程式碼編輯器

Dreamweaver CS6
視覺化網頁開發工具

ZendStudio 13.5.1 Mac
強大的PHP整合開發環境

MantisBT
Mantis是一個易於部署的基於Web的缺陷追蹤工具,用於幫助產品缺陷追蹤。它需要PHP、MySQL和一個Web伺服器。請查看我們的演示和託管服務。

SublimeText3 Mac版
神級程式碼編輯軟體(SublimeText3)

