
分享用MongoDB中oplog機制實作資料監控實例

- 零下一度原創
- 2017-07-03 16:43:592144瀏覽
MongoDB 的Replication是透過一個日誌來儲存寫入作業的,這個日誌就叫做oplog,而下面這篇文章主要給大家介紹了利用MongoDB中oplog機制實現準實時數據的操作監控的相關資料,需要的朋友可以參考借鑒,下面來一起看看吧。
前言
最近有一個需求是要即時取得到新插入到MongoDB的數據,而插入程式本身已經有一套處理邏輯,所以不方便直接在插入程序裡寫相關程序,傳統的資料庫大多自帶這種觸發器機制,但是Mongo沒有相關的函數可以用(也可能我了解的太少了,求修正),當然還有一點是需要python實現,於是收集整理了一個對應的實作方法。
一、引子
#首先可以想到,這種需求其實很像資料庫的主從備份機制,從資料庫之所以能夠同步主函式庫是因為有某些指標來做控制,我們知道MongoDB雖然沒有現成觸發器,但是它能夠實現主從備份,所以我們就從它的主從備份機制入手。
二、OPLOG
首先,需要以master模式來開啟mongod守護,命令列使用–master,或設定檔增加master鍵為true。
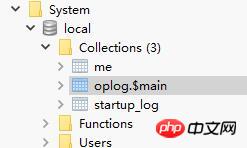
此時,我們可以在Mongo的系統函式庫local裡見到新增的collection-oplog,此時oplog.$main裡就會儲存進oplog訊息,如果此時還有充當從資料庫的Mongo存在,就會還有一些slaves的信息,由於我們這裡並不是主從同步,所以不存在這些集合。
再來看看oplog結構:
"ts" : Timestamp(6417682881216249, 1), 时间戳
"h" : NumberLong(0), 长度
"v" : 2,
"op" : "n", 操作类型
"ns" : "", 操作的库和集合
"o2" : "_id" update条件
"o" : {} 操作值,即document
這裡要知道op的幾個屬性:
insert,'i'
update, 'u'
remove(delete), 'd'
cmd, 'c'
noop, 'n' 空操作
從上面的資訊可以看出,我們只要不斷讀取到ts來做對比,然後根據op可以判斷當前出現的是什麼操作,相當於使用程式實作了一個從資料庫的接收端。
三、CODE
#在Github上找到了別人的實作方式,不過它的函式庫太老舊,所以在他的基礎上進行修改。
Github位址:github.com/RedBeard0531/mongo-oplog-watcher
mongo_oplog_watcher.py如下:
#!/usr/bin/python
import pymongo
import re
import time
from pprint import pprint # pretty printer
from pymongo.errors import AutoReconnect

class OplogWatcher(object):
  def init(self, db=None, collection=None, poll_time=1.0, connection=None, start_now=True):
    if collection is not None:
      if db is None:
        raise ValueError('must specify db if you specify a collection')
      self._ns_filter = db + '.' + collection
    elif db is not None:
      self._ns_filter = re.compile(r'^%s\.' % db)
    else:
      self._ns_filter = None

    self.poll_time = poll_time
    self.connection = connection or pymongo.Connection()

    if start_now:
      self.start()

  @staticmethod
  def get_id(op):
    id = None
    o2 = op.get('o2')
    if o2 is not None:
      id = o2.get('_id')

    if id is None:
      id = op['o'].get('_id')

    return id

  def start(self):
    oplog = self.connection.local['oplog.$main']
    ts = oplog.find().sort('$natural', -1)[0]['ts']
    while True:
      if self._ns_filter is None:
        filter = {}
      else:
        filter = {'ns': self._ns_filter}
      filter['ts'] = {'$gt': ts}
      try:
        cursor = oplog.find(filter, tailable=True)
        while True:
          for op in cursor:
            ts = op['ts']
            id = self.get_id(op)
            self.all_with_noop(ns=op['ns'], ts=ts, op=op['op'], id=id, raw=op)
          time.sleep(self.poll_time)
          if not cursor.alive:
            break
      except AutoReconnect:
        time.sleep(self.poll_time)

  def all_with_noop(self, ns, ts, op, id, raw):
    if op == 'n':
      self.noop(ts=ts)
    else:
      self.all(ns=ns, ts=ts, op=op, id=id, raw=raw)

  def all(self, ns, ts, op, id, raw):
    if op == 'i':
      self.insert(ns=ns, ts=ts, id=id, obj=raw['o'], raw=raw)
    elif op == 'u':
      self.update(ns=ns, ts=ts, id=id, mod=raw['o'], raw=raw)
    elif op == 'd':
      self.delete(ns=ns, ts=ts, id=id, raw=raw)
    elif op == 'c':
      self.command(ns=ns, ts=ts, cmd=raw['o'], raw=raw)
    elif op == 'db':
      self.db_declare(ns=ns, ts=ts, raw=raw)

  def noop(self, ts):
    pass

  def insert(self, ns, ts, id, obj, raw, **kw):
    pass

  def update(self, ns, ts, id, mod, raw, **kw):
    pass

  def delete(self, ns, ts, id, raw, **kw):
    pass

  def command(self, ns, ts, cmd, raw, **kw):
    pass

  def db_declare(self, ns, ts, **kw):
    pass

class OplogPrinter(OplogWatcher):
  def all(self, **kw):
    pprint (kw)
    print #newline

if name == 'main':
  OplogPrinter()
首先是實作一個資料庫的初始化,設定一個延遲時間(準實時):
self.poll_time = poll_time
self.connection = connection or pymongo.MongoClient()
主要的函數是start() ,實現一個時間的比對並進行對應欄位的處理:
def start(self):
 oplog = self.connection.local['oplog.$main']
 #读取之前提到的库
 ts = oplog.find().sort('$natural', -1)[0]['ts']
 #获取一个时间边际
 while True:
 if self._ns_filter is None:
  filter = {}
 else:
  filter = {'ns': self._ns_filter}
 filter['ts'] = {'$gt': ts}
 try:
  cursor = oplog.find(filter)
  #对此时间之后的进行处理
  while True:
  for op in cursor:
   ts = op['ts']
   id = self.get_id(op)
   self.all_with_noop(ns=op['ns'], ts=ts, op=op['op'], id=id, raw=op)
   #可以指定处理插入监控,更新监控或者删除监控等
  time.sleep(self.poll_time)
  if not cursor.alive:
   break
 except AutoReconnect:
  time.sleep(self.poll_time)
循環這個start函數,在all_with_noop這裡就可以寫出對應的監控處理邏輯。
這樣就可以實作一個簡易的準實時Mongo資料庫操作監控器,下一步就可以配合其他操作來對新入庫的程式進行對應處理。
以上是分享用MongoDB中oplog機制實作資料監控實例的詳細內容。更多資訊請關注PHP中文網其他相關文章!