
ASP.NET MVC重寫的實例教程

- 零下一度原創
- 2017-07-02 10:35:072193瀏覽
這篇文章主要為大家詳細介紹了ASP.NET MVC重寫RazorViewEngine實現多主題切換,具有一定的參考價值,有興趣的小伙伴們可以參考一下
#在ASP.NET MVC中來實現主題的切換一般有兩種方式,一種是透過切換皮膚的css和js引用,一種就是透過重寫視圖引擎。透過重寫視圖引擎的方式更加靈活,因為我不僅可以在不同主題下面佈局和样式不一樣,還可以讓不同的主題下面顯示的數據條目不一致,就是說可以在某些主題下面添加一下個性化的東西。
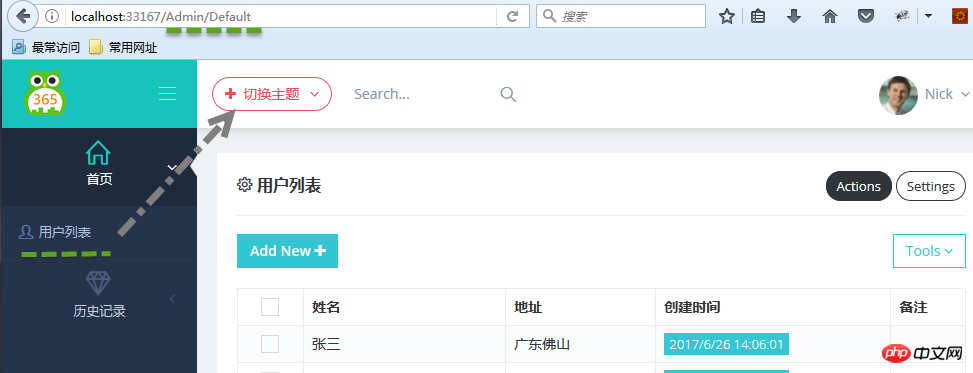
本篇我將透過重寫視圖引擎的方式來進行演示,在這之前,我假設你已經具備了MVC的一些基礎,我們先來看下效果:
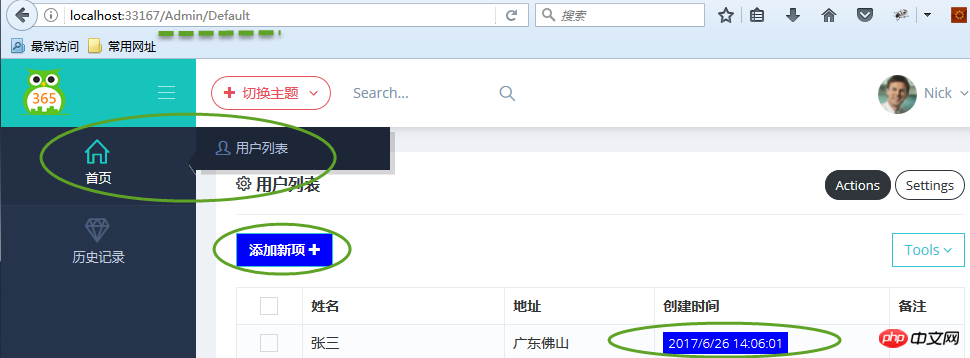
#系統登入後是預設主題,當我們點擊切換主題之後,左側選單列的佈局變了,右側內容的樣式也變了,而網址列是不變的。介面UI用的metronic,雖然官網是要收費的,但是在天朝,總是可以找到免費的。官方網址:http://keenthemes.com/preview/metronic/
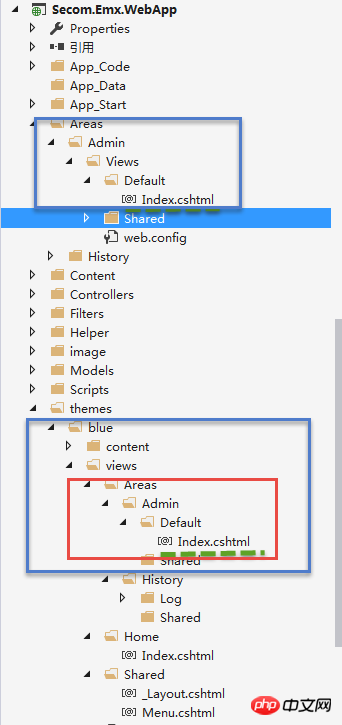
#在這裡,我使用了分區域、分模組(以獨立的業務功能劃分)的方式,一個模組就是一個獨立的dll,在這裡Secom.Emx.Admin和Secom.Emx.History就是兩個獨立的模組,並分別創建了區域Admin和History。
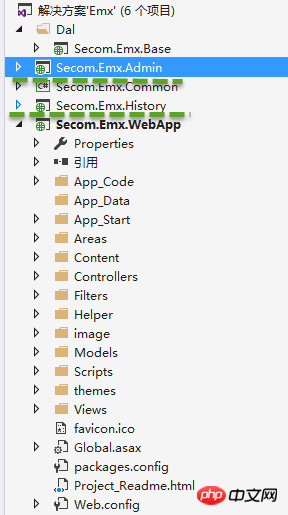

你會發現Secom.Emx.Admin模型下面的Areas目錄和Secom.Emx.WebApp中的目錄是一模一樣的,其實我最初不想在模組專案中新增任何的View,但為了方便獨立部署還是加了。
右鍵點選專案Secom.Emx.Admin,選擇「屬性」-「產生事件」新增以下程式碼:
xcopy /e/r/y $(ProjectDir)Areas\Admin\Views
$(SolutionDir)Secom.Emx.WebApp\Areas\Admin\Views
這指令很簡單,其實就是當編譯專案Secom.Emx.Admin的時候,將專案中的Views複製到Secom.Emx.WebApp專案的指定目錄下。

區域設定檔我放置到了Secom.Emx.WebApp中,其實你完全可以獨立放置到一個類別庫專案中,因為註冊區域路由的後,項目最終會尋找bin目錄下面所有繼承了AreaRegistration類別的,然後讓WebApp引用這個類別庫項目,Secom.Emx.WebApp項目添加Secom.Emx.Admin、Secom.Emx.History的引用。
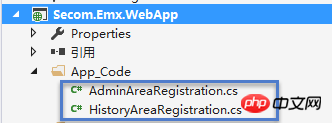
AdminAreaRegistration程式碼如下:
using System.Web.Mvc;

namespace Secom.Emx.WebApp
{
 public class AdminAreaRegistration : AreaRegistration
 {
  public override string AreaName
  {
   get
   {
    return "Admin";
   }
  }

  public override void RegisterArea(AreaRegistrationContext context)
  {
   context.MapRoute(
    "Admin_default",
    "Admin/{controller}/{action}/{id}",
    new { action = "Index", id = UrlParameter.Optional },
    namespaces:new string[1] { "Secom.Emx.Admin.Areas.Admin.Controllers" }
   );
  }
 }
}注意命名空間與後面新增的namespaces:new string[1] { "Secom.Emx.Admin.Areas.Admin.Controllers" },這個命名空間就是獨立模組Secom. Emx.Admin下面的控制器所在的命名空間。
HistoryAreaRegistration程式碼如下:
using System.Web.Mvc;

namespace Secom.Emx.WebApp
{
 public class HistoryAreaRegistration : AreaRegistration
 {
  public override string AreaName
  {
   get
   {
    return "History";
   }
  }

  public override void RegisterArea(AreaRegistrationContext context)
  {
   context.MapRoute(
    "History_default",
    "History/{controller}/{action}/{id}",
    new { action = "Index", id = UrlParameter.Optional },
    namespaces:new string[1] { "Secom.Emx.History.Areas.History.Controllers" }
   );
  }
 }
}我們先看下RazorViewEngine的原始建構子如下:
public RazorViewEngine(IViewPageActivator viewPageActivator)
  : base(viewPageActivator)
 {
  AreaViewLocationFormats = new[]
  {
   "~/Areas/{2}/Views/{1}/{0}.cshtml",
   "~/Areas/{2}/Views/{1}/{0}.vbhtml",
   "~/Areas/{2}/Views/Shared/{0}.cshtml",
   "~/Areas/{2}/Views/Shared/{0}.vbhtml"
  };
  AreaMasterLocationFormats = new[]
  {
   "~/Areas/{2}/Views/{1}/{0}.cshtml",
   "~/Areas/{2}/Views/{1}/{0}.vbhtml",
   "~/Areas/{2}/Views/Shared/{0}.cshtml",
   "~/Areas/{2}/Views/Shared/{0}.vbhtml"
  };
  AreaPartialViewLocationFormats = new[]
  {
   "~/Areas/{2}/Views/{1}/{0}.cshtml",
   "~/Areas/{2}/Views/{1}/{0}.vbhtml",
   "~/Areas/{2}/Views/Shared/{0}.cshtml",
   "~/Areas/{2}/Views/Shared/{0}.vbhtml"
  };

  ViewLocationFormats = new[]
  {
   "~/Views/{1}/{0}.cshtml",
   "~/Views/{1}/{0}.vbhtml",
   "~/Views/Shared/{0}.cshtml",
   "~/Views/Shared/{0}.vbhtml"
  };
  MasterLocationFormats = new[]
  {
   "~/Views/{1}/{0}.cshtml",
   "~/Views/{1}/{0}.vbhtml",
   "~/Views/Shared/{0}.cshtml",
   "~/Views/Shared/{0}.vbhtml"
  };
  PartialViewLocationFormats = new[]
  {
   "~/Views/{1}/{0}.cshtml",
   "~/Views/{1}/{0}.vbhtml",
   "~/Views/Shared/{0}.cshtml",
   "~/Views/Shared/{0}.vbhtml"
  };

  FileExtensions = new[]
  {
   "cshtml",
   "vbhtml",
  };
 }
然後新建CustomRazorViewEngine繼承自RazorViewEngine,對View的路由規則進行了重寫,既然可以重寫路由規則,那意味著,你可以任意定義規則,然後遵守自己定義的規則就可以了。需要注意的是,要注意路由數組中的順序,查找視圖時,是按照前後順序依次查找的,當找到了視圖就立即返回,不會再去匹配後面的路由規則。為了提昇路由查找效率,我在這裡刪除了所有vbhtml的路由規則,因為我整個專案都採用C#語言。
using System.Web.Mvc;

namespace Secom.Emx.WebApp.Helper
{
 public class CustomRazorViewEngine : RazorViewEngine
 {
  public CustomRazorViewEngine(string theme)
  {
   if (!string.IsNullOrEmpty(theme))
   {
    AreaViewLocationFormats = new[]
    {
      //themes
      "~/themes/"+theme+"/views/Areas/{2}/{1}/{0}.cshtml",
      "~/themes/"+theme+"/Shared/{0}.cshtml"

  "~/Areas/{2}/Views/{1}/{0}.cshtml",
  "~/Areas/{2}/Views/Shared/{0}.cshtml"
 };
    AreaMasterLocationFormats = new[]
    {
        //themes
    "~/themes/"+theme+"/views/Areas/{2}/{1}/{0}.cshtml",
    "~/themes/"+theme+"/views/Areas/{2}/Shared/{0}.cshtml",
    "~/themes/"+theme+"/views/Shared/{0}.cshtml",

  "~/Areas/{2}/Views/{1}/{0}.cshtml",
  "~/Areas/{2}/Views/Shared/{0}.cshtml"
 };
    AreaPartialViewLocationFormats = new[]
    {
       //themes
   "~/themes/"+theme+"/views/Shared/{0}.cshtml",

  "~/Areas/{2}/Views/{1}/{0}.cshtml",
  "~/Areas/{2}/Views/Shared/{0}.cshtml"
 };

    ViewLocationFormats = new[]
    {
       //themes
   "~/themes/"+theme+"/views/{1}/{0}.cshtml",

  "~/Views/{1}/{0}.cshtml",
  "~/Views/Shared/{0}.cshtml"
 };
    MasterLocationFormats = new[]
    {
       //themes
   "~/themes/"+theme+"/views/Shared/{0}.cshtml",

  "~/Views/{1}/{0}.cshtml",
  "~/Views/Shared/{0}.cshtml"
 };
    PartialViewLocationFormats = new[]
    {
       //themes
  "~/themes/"+theme+"/views/Shared/{0}.cshtml",

  "~/Views/{1}/{0}.cshtml",
  "~/Views/Shared/{0}.cshtml"
 };

    FileExtensions = new[]{"cshtml"};
   }

  }
 }
}
重寫後,我們的路由規則將是這樣的:當沒有選擇主題的情況下,沿用原來的路由規則,如果選擇了主題,則使用重寫後的路由規則。
新的路由規則:在選擇了主題的情況下,優先查找thems/主題名稱/views/Areas/區域名稱/控制器名稱/視圖名稱.cshtml,如果找不到再按照預設的路由規則去尋找,也就是Areas/區域名稱/Views/控制器名稱/檢視名稱.cshtml
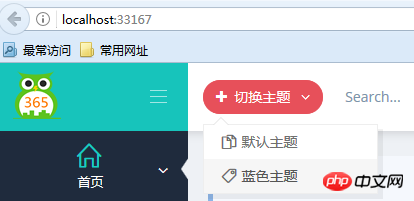
切换主题View代码:
<p class="btn-group">
<button type="button" class="btn btn-circle btn-outline red dropdown-toggle" data-toggle="dropdown">
<i class="fa fa-plus"></i>
<span class="hidden-sm hidden-xs">切换主题 </span>
<i class="fa fa-angle-down"></i>
</button>
<ul class="dropdown-menu" role="menu">
<li>
<a href="javascript:setTheme('default')">
<i class="icon-docs"></i> 默认主题
</a>
</li>
<li>
<a href="javascript:setTheme('Blue')">
<i class="icon-tag"></i> 蓝色主题
</a>
</li>
</ul>
</p>
<script type="text/javascript">
function setTheme(themeName)
{
window.location.href = "/Home/SetTheme?themeName=" + themeName + "&href=" + window.location.href;
}
</script>当用户登录成功的时候,从Cookie中读取所选主题信息,当Cookie中没有读取到主题记录时,则从Web.config配置文件中读取配置的主题名称,如果都没有读取到,则说明是默认主题,沿用原有的视图引擎规则。
在后台管理界面,每次选择了主题,我都将主题名称存储到Cookie中,默认保存一年,这样当下次再登录的时候,就能够记住所选的主题信息了。
using System;
using System.Web.Mvc;
using Secom.Emx.WebApp.Helper;
using System.Web;
using Secom.Emx.Common.Controllers;

namespace Secom.Emx.WebApp.Controllers
{
 public class HomeController : BaseController
 {
  string themeCookieName = "Theme";
  public ActionResult Index()
  {
   ViewData["Menu"] = GetMenus();
   return View();
  }
  public ActionResult SetTheme(string themeName,string href)
  {
   if (!string.IsNullOrEmpty(themeName))
   {
    Response.Cookies.Set(new HttpCookie(themeCookieName, themeName) { Expires = DateTime.Now.AddYears(1) });
   }
   else
   {
    themeName = Request.Cookies[themeCookieName].Value ?? "".Trim();
   }
   Utils.ResetRazorViewEngine(themeName);
   return string.IsNullOrEmpty(href)? Redirect("~/Home/Index"):Redirect(href);
  }
  public ActionResult Login()
  {
   string themeName = Request.Cookies[themeCookieName].Value ?? "".Trim();
   if (!string.IsNullOrEmpty(themeName))
   {
    Utils.ResetRazorViewEngine(themeName);
   }
   return View();
  }
 }
}
Utils类:
using System.Configuration;
using System.Web.Mvc;

namespace Secom.Emx.WebApp.Helper
{
 public class Utils
 {
  private static string _themeName;

  public static string ThemeName
  {
   get
   {
    if (!string.IsNullOrEmpty(_themeName))
    {
     return _themeName;
    }
    //模板风格
    _themeName =string.IsNullOrEmpty(ConfigurationManager.AppSettings["Theme"])? "" : ConfigurationManager.AppSettings["Theme"];
    return _themeName;
   }
  }
  public static void ResetRazorViewEngine(string themeName)
  {
   themeName = string.IsNullOrEmpty(themeName) ? Utils.ThemeName : themeName;
   if (!string.IsNullOrEmpty(themeName))
   {
    ViewEngines.Engines.Clear();
    ViewEngines.Engines.Add(new CustomRazorViewEngine(themeName));
   }
  }
 }
}实现方式实在是太简单,简单得我不知道如何表述才好,我还是记下来,方便有需要的人可以查阅,希望可以帮到你们。由于项目引入了庞大的各种相关文件以致文件比较大,网速原因无法上传源码还望见谅!
以上是ASP.NET MVC重寫的實例教程的詳細內容。更多資訊請關注PHP中文網其他相關文章!