
詳解hibernate5.2的基本配置

- 零下一度原創
- 2017-06-25 10:59:142127瀏覽
目標:將Student實體物件加入資料庫
1.首先需要下載三個東西:hibernate,slf4j,mysql。
2.分別取他們的套件導入新建的專案中,我這裡的版本是:hibernate-release-5.2.10裡面lib目錄下的required中的全部檔案 slf4j-1.7.25下的受slf4j-nop-1.7.25.jar mysql的mysql-connector-java-5.1.42-bin.jar
3.在src下設定hibernate.cfg.xml(建議直接去文件複製然後改
<?xml version='1.0' encoding='utf-8'?> <!DOCTYPE hibernate-configuration PUBLIC"-//Hibernate/Hibernate Configuration DTD 3.0//EN" "http://www.hibernate.org/dtd/hibernate-configuration-3.0.dtd"> <hibernate-configuration> <session-factory> <!-- Database connection settings --> <property name="connection.driver_class">com.mysql.jdbc.Driver</property> <property name="connection.url">jdbc:mysql://localhost/text02</property><property name="connection.username">root</property> <property name="connection.password">6530033197</property> <!-- JDBC connection pool (use the built-in) --> <!-- <property name="connection.pool_size">1</property> --> <!-- SQL dialect --> <property name="dialect">org.hibernate.dialect.MySQLDialect</property> <!-- Enable Hibernate's automatic session context management --> <!-- <property name="current_session_context_class">thread</property> --> <!-- Disable the second-level cache --> <property name="cache.provider_class">org.hibernate.cache.internal.NoCacheProvider</property> <!-- Echo all executed SQL to stdout --> <property name="show_sql">true</property> <!-- Drop and re-create the database schema on startup --> <!-- <property name="hbm2ddl.auto">update</property> --> <mapping resource="student/Student.hbm.xml"/> </session-factory> </hibernate-configuration>
4.在mysql中建立student表,欄位:id age name
5.建立自己的實體類別在src下建套件student,然後建立Class:Student.java
package student;public class Student {private int id;private int age;private String name;public int getId() {return id;
}public void setId(int id) {this.id = id;
}public int getAge() {return age;
}public void setAge(int age) {this.age = age;
}public String getName() {return name;
}public void setName(String name) {this.name = name;
}public Student(int id, int age, String name) {super();this.id = id;this.age = age;this.name = name;
}public Student() {// TODO Auto-generated constructor stub}

}
6.在對應package即student下設定檔:Student.hbm.xml
#
<?xml version="1.0"?>
<!DOCTYPE hibernate-mapping PUBLIC"-//Hibernate/Hibernate Mapping DTD 3.0//EN"
"http://www.hibernate.org/dtd/hibernate-mapping-3.0.dtd">

<hibernate-mapping package="student">
<class name="Student" table="student">
<id name="id" column="id">
</id>
<property name="name" type="string" column="name"/>
<property name="age" type="int" column="age"/>
</class>
</hibernate-mapping>
7.建立測試類別:StudentText.java
package student;import org.hibernate.Session;import org.hibernate.SessionFactory;import org.hibernate.cfg.Configuration;public class StudentText {public static void main(String[] args) {
Student stu = new Student();
stu.setId(4);
stu.setName("小明");
stu.setAge(12);

Configuration con = new Configuration();
SessionFactory sf = con.configure().buildSessionFactory();
Session s = sf.openSession();
s.beginTransaction();
s.save(stu);
s.getTransaction().commit();
s.close();
sf.close();

}

}
#輸出結果,完成: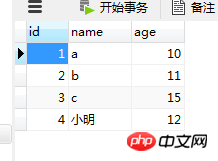
以上是詳解hibernate5.2的基本配置的詳細內容。更多資訊請關注PHP中文網其他相關文章!
陳述:
本文內容由網友自願投稿,版權歸原作者所有。本站不承擔相應的法律責任。如發現涉嫌抄襲或侵權的內容,請聯絡admin@php.cn
上一篇:有向圖之任務調度拓樸圖介紹下一篇:有向圖之任務調度拓樸圖介紹