C#開發實例-訂位螢幕截圖工具(七)加入放大鏡功能的程式碼範例
- 黄舟原創
- 2017-03-14 13:35:483361瀏覽
由於截圖時可能需要精確地截取某一部分,所以需要放大鏡的功能,這樣截取的時候才更容易定位截圖的位置。
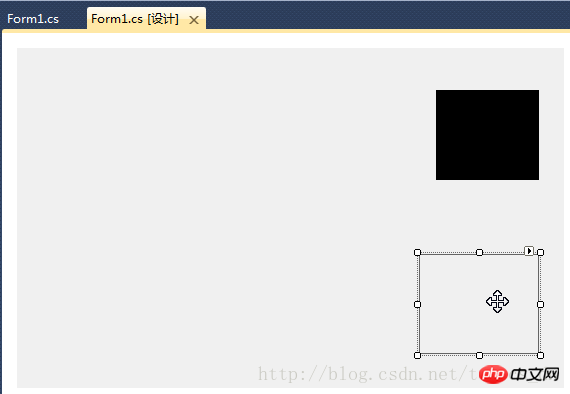
新增PictureBox,name屬性設定為「pictureBox_zoom」;

For


# m1_Load”
事件處理函數
中新增以下程式碼://设置放大镜的大小
this.pictureBox_zoom.Width = this.ZoomBoxWidth;
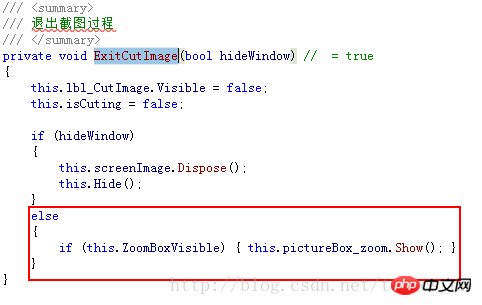
this.pictureBox_zoom.Height = this.ZoomBoxHeight; 在「ExitCutImage」方法中新增程式碼:
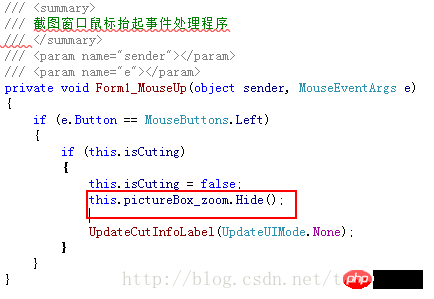
#在「Form1_MouseUp」事件處理函數中加入程式碼:
###############在「ShowForm」方法的###else###條件最後加上程式碼: ###if (this.ZoomBoxVisible)
{
UpdateCutInfoLabel(UpdateUIMode.ShowZoomBox);
this.pictureBox_zoom.Show();
}###在「UpdateCutInfoLabel」函數最後新增以下程式碼:###if (this.pictureBox_zoom.Visible || (updateUIMode & UpdateUIMode.ShowZoomBox) != UpdateUIMode.None)
{
Point zoomLocation = new Point(MousePosition.X + 15, MousePosition.Y + 22);
if (zoomLocation.Y + this.pictureBox_zoom.Height > this.Height)
{
if (zoomLocation.X + this.pictureBox_zoom.Width > this.Width)
{
zoomLocation = new Point(MousePosition.X - this.pictureBox_zoom.Width - 10, MousePosition.Y - this.pictureBox_zoom.Height - 10);
}
else
{
zoomLocation = new Point(MousePosition.X + 15, MousePosition.Y - this.pictureBox_zoom.Height - 15);
}
}
else
{
if (zoomLocation.X + this.pictureBox_zoom.Width > this.Width)
{
zoomLocation = new Point(MousePosition.X - this.pictureBox_zoom.Width - 15, MousePosition.Y);
}
}
this.pictureBox_zoom.Location = zoomLocation;
if (!this.pictureBox_zoom.Visible)
{
this.pictureBox_zoom.Show();
}
}###在「Form1_###Key###Up」事件處理函數中新增下列程式碼:###### ############為「pictureBox_zoom」新增「Paint」事件處理程序,程式碼如下:### /// <summary>
/// 放大镜组件重绘事件处理程序
/// 实时显示鼠标指针位置放大后的图像
/// </summary>
/// <param name="sender"></param>
/// <param name="e"></param>
private void pictureBox_zoom_Paint(object sender, PaintEventArgs e)
{
Bitmap bmp_lbl = new Bitmap(e.ClipRectangle.Width, e.ClipRectangle.Height);
int srcWidth = (int)(this.ZoomBoxWidth / 10);
int srcHeight = (int)(this.ZoomBoxHeight / 10);
Bitmap bmp = new Bitmap(srcWidth, srcHeight);
Rectangle srcRect = new Rectangle(MousePosition.X - 5, MousePosition.Y - 4, srcWidth, srcHeight);
if (!isCuting)
{
srcRect = new Rectangle(MousePosition.X - 6, MousePosition.Y - 5, srcWidth, srcHeight);
}
Graphics g = Graphics.FromImage(bmp);
g.DrawImage(screenImage, 0, 0, srcRect, GraphicsUnit.Pixel);
g.Dispose();
//Zoom
int x, y;
for (int row = 0; row < bmp.Height; row++)
{
for (int col = 0; col < bmp.Width; col++)
{
Color pc = bmp.GetPixel(col, row);
for (int h = 0; h < 10; h++)
{
for (int w = 0; w < 10; w++)
{
x = col * 10 + w;
y = row * 10 + h;
if (x < bmp_lbl.Width && y < bmp_lbl.Height)
{
bmp_lbl.SetPixel(x, y, pc);
}
}
}
}
}
e.Graphics.DrawImage(bmp_lbl, 0, 0);
int blockX = e.ClipRectangle.Width / 2;
int blockY = e.ClipRectangle.Height / 2;
SolidBrush brush = new SolidBrush(Color.FromArgb(10, 124, 202));
Pen pen = new Pen(brush, 2.0F);
e.Graphics.DrawLine(pen, new Point(0, blockY), new Point(e.ClipRectangle.Width, blockY));
e.Graphics.DrawLine(pen, new Point(blockX, 0), new Point(blockX, e.ClipRectangle.Height));
g.Dispose();
bmp_lbl.Dispose();
}###編譯,運行,截圖看看效果吧! ###以上是C#開發實例-訂位螢幕截圖工具(七)加入放大鏡功能的程式碼範例的詳細內容。更多資訊請關注PHP中文網其他相關文章!
陳述:
本文內容由網友自願投稿,版權歸原作者所有。本站不承擔相應的法律責任。如發現涉嫌抄襲或侵權的內容,請聯絡admin@php.cn

