


這篇文章主要介紹了微信小程式swiper元件詳解及實例程式碼的相關資料,需要的朋友可以參考下
微信小程式swiper元件
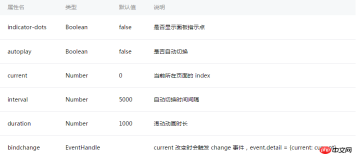
常用屬性:
效果圖:

swiper.wxml新增程式碼:
<swiper indicator-dots="{{indicatorDots}}"
 autoplay="{{autoplay}}" interval="{{interval}}" duration="{{duration}} " bindchange="bindchangeTag">
 <block wx:for="{{imgUrls}}">
  <swiper-item>
   <image src="{{item}}" class="slide-image"/>
  </swiper-item>
 </block>
</swiper>
<button bindtap="changeIndicatorDots"> 是否显示面板指示点 </button>
<button bindtap="changeAutoplay"> 是否自动切换 </button>
<slider bindchange="intervalChange" show-value min="1000" max="2000"/> 自动切换时间间隔
<slider bindchange="durationChange" show-value min="1800" max="10000"/> 滑动动画时长
js:
Page({
 data: {
  imgUrls: [
   'http://img02.tooopen.com/images/20150928/tooopen_sy_143912755726.jpg',
   'http://img06.tooopen.com/images/20160818/tooopen_sy_175866434296.jpg',
   'http://img06.tooopen.com/images/20160818/tooopen_sy_175833047715.jpg'
  ],
  indicatorDots: false,
  autoplay: false,
  interval: 1000,
  duration: 1800
 },
 //是否显示面板指示点
 changeIndicatorDots: function(e) {
  this.setData({
   indicatorDots: !this.data.indicatorDots
  })
 },
 //是否自动切换
 changeAutoplay: function(e) {
  this.setData({
   autoplay: !this.data.autoplay
  })
 },
 //自动切换时间间隔
 intervalChange: function(e) {
  this.setData({
   // e.detail.value获取slider的值
   interval: e.detail.value
  })
 },
 //滑动动画时长
 durationChange: function(e) {
  this.setData({
   duration: e.detail.value
  })
 },
 //当页面改变是会触发
 bindchangeTag:function(e){
  console.log("bindchangeTag...")
 },
 onLoad:function(options){
  // 页面初始化 options为页面跳转所带来的参数
 },
 onReady:function(){
  // 页面渲染完成
 },
 onShow:function(){
  // 页面显示
 },
 onHide:function(){
  // 页面隐藏
 },
 onUnload:function(){
  // 页面关闭
 }
})
css:
.slide-image{
  width: 100%;
  height: 160px;
}
感謝閱讀,希望能幫助大家,謝謝大家對本站的支持!
以上是微信小程式-swiper組件詳解實例的詳細內容。更多資訊請關注PHP中文網其他相關文章!
陳述
本文內容由網友自願投稿,版權歸原作者所有。本站不承擔相應的法律責任。如發現涉嫌抄襲或侵權的內容,請聯絡admin@php.cn

熱AI工具

Undresser.AI Undress
人工智慧驅動的應用程序,用於創建逼真的裸體照片

AI Clothes Remover
用於從照片中去除衣服的線上人工智慧工具。

Undress AI Tool
免費脫衣圖片

Clothoff.io
AI脫衣器

AI Hentai Generator
免費產生 AI 無盡。

熱門文章
R.E.P.O.能量晶體解釋及其做什麼(黃色晶體)
4 週前By尊渡假赌尊渡假赌尊渡假赌
R.E.P.O.最佳圖形設置
4 週前By尊渡假赌尊渡假赌尊渡假赌
刺客信條陰影:貝殼謎語解決方案
2 週前ByDDD
R.E.P.O.如果您聽不到任何人,如何修復音頻
4 週前By尊渡假赌尊渡假赌尊渡假赌
WWE 2K25:如何解鎖Myrise中的所有內容
1 個月前By尊渡假赌尊渡假赌尊渡假赌
熱工具

SublimeText3漢化版
中文版,非常好用

SAP NetWeaver Server Adapter for Eclipse
將Eclipse與SAP NetWeaver應用伺服器整合。

Dreamweaver Mac版
視覺化網頁開發工具

Safe Exam Browser
Safe Exam Browser是一個安全的瀏覽器環境,安全地進行線上考試。該軟體將任何電腦變成一個安全的工作站。它控制對任何實用工具的訪問,並防止學生使用未經授權的資源。

MinGW - Minimalist GNU for Windows
這個專案正在遷移到osdn.net/projects/mingw的過程中,你可以繼續在那裡關注我們。 MinGW:GNU編譯器集合(GCC)的本機Windows移植版本,可自由分發的導入函式庫和用於建置本機Windows應用程式的頭檔;包括對MSVC執行時間的擴展,以支援C99功能。 MinGW的所有軟體都可以在64位元Windows平台上運作。

