Spring入門實戰之Profile詳解
- 黄舟原創
- 2017-03-07 09:54:482145瀏覽
什麼是spring profile?簡單講profile就是一組配置,不同profile提供不同組合的配置,程式執行時可以選擇使用哪些profile來適應環境。以下這篇文章主要介紹了Spring中Profile實戰的相關資料,需要的朋友可以參考借鑒。
前言
Spring中的Profile功能其實早在Spring 3.1的版本就已經出來,它可以理解為我們在Spring容器中所定義的Bean的邏輯群組名稱,只有當這些Profile被啟動的時候,才會將Profile中所對應的Bean註冊到Spring容器中。
看到Profile這個關鍵字,或許你從來沒有正眼瞧過他,又或者腦海中有些模糊的印象,比如除了這裡Springmvc中的Profile,maven中也有Profile的標籤。
從字面意思來看,Profile表示側面,那什麼情況下才會用到側面這個功能呢,而側面具體又有什麼含義呢
打一個比方,對於資料庫的配置問題,在開發的眼中可以使用嵌入的資料庫,並且載入測試資料(後面會給出程式碼範例)。但在測試的眼中,可能會配配一個資料庫連線池類似這樣
@Bean(destroyMethod="close")
public DataSource dataSource () {
 BasicDataSource dataSource = new BasicDataSource();
 dataSource.setUrl("jdbc:h2:tcp://dbserver/~/test");
 dataSource.setDriverClassName("org.h2.Driver");
 dataSource.setUsername("sa");
 dataSource.setPassword("password");
 dataSource.setInitialSize(20);
 dataSource.setMaxActive(30);
 return dataSource;
}
當然還有產品環境下的設定等等。對於這種百花齊放的配置方式你還能說什麼,默默的為這套套的環境都部署相應的配置文件啊,沒有profile這套我們一直都是這麼做。
但現在有了Profile,我們就多了一個選擇,一種更聰明省心的配置方式。透過Profile配置,Spring可以在根據環境在運行階段來決定bean的創建與否,先舉例如下,主要從Profile bean的配置和激活來展開。
Profile bean的設定
#透過註解@Profile配置
#對於上面比方中的第一種情況,在開發環境中我們配置一個資料來源可能是這樣的
@Bean(destroyMethod = "shutdown")
public DataSource embeddedDataSource() {
 return new EmbeddedDatabaseBuilder()
 .addScript("classpath:schema.sql")
 .addScript("classpath:test-data.sql")
 .build();
 }
這裡會使用EmbeddedDatabaseBuilder建立一個嵌入式資料庫,模式定義在類別檔案下的schema.sql檔案中
schema.sql
#create table Things ( id identity, name varchar(100) );
這裡定義了一張Things表包含了兩個欄位
除了模式文件,還需要透過test-data.sql載入測試資料
#test-data.sql
insert into Things (name) values ('A')
對於這個@Bean完全不知道是放在開發的環境下創建還是產品的環境下。所以我們這裡可以使用註解@Profile來幫助我們為這個bean打上標誌。
從Spring 3.1版本中就引入了bean profile的功能,可以讓你將不同的bean定義到一個或多個profile裡,然後在部署應用時告知要激活那個profile,則相應的bean就會被創建。
例如這裡
@Configuration
@Profile("dev")
public class DevelopmentProfileConfig {

 @Bean(destroyMethod = "shutdown")
 public DataSource embeddedDataSource() {
 return new EmbeddedDatabaseBuilder()
 .setType(EmbeddedDatabaseType.H2)
 .addScript("classpath:schema.sql")
 .addScript("classpath:test-data.sql")
 .build();
 }
}
#透過@Profile("dev")為EmbedderDataSource bean標記為dev環境下要建立的bean。
注意:1. @Profile被載入類別層級上,如果dev profile沒有被激活,那麼類別中對應的所有bean就不會被建立
2. 如果目前是dev環境被啟動了,那麼對於沒有使用@Profile的bean都會被創建,被標記為其他的profile如prod,則不會創建相應的bean
3. 從3.2開始@Profile不僅僅可以加載類層級上,也可以載入方法上,具體程式碼如下
package com.myapp;

import javax.sql.DataSource;

import org.springframework.context.annotation.Bean;
import org.springframework.context.annotation.Configuration;
import org.springframework.context.annotation.Profile;
import org.springframework.jdbc.datasource.embedded.EmbeddedDatabaseBuilder;
import org.springframework.jdbc.datasource.embedded.EmbeddedDatabaseType;
import org.springframework.jndi.JndiObjectFactoryBean;

@Configuration
public class DataSourceConfig {

 @Bean(destroyMethod = "shutdown")
 @Profile("dev")
 public DataSource embeddedDataSource() {
 return new EmbeddedDatabaseBuilder()
 .setType(EmbeddedDatabaseType.H2)
 .addScript("classpath:schema.sql")
 .addScript("classpath:test-data.sql")
 .build();
 }

 @Bean
 @Profile("prod")
 public DataSource jndiDataSource() {
 JndiObjectFactoryBean jndiObjectFactoryBean = new JndiObjectFactoryBean();
 jndiObjectFactoryBean.setJndiName("jdbc/myDS");
 jndiObjectFactoryBean.setResourceRef(true);
 jndiObjectFactoryBean.setProxyInterface(javax.sql.DataSource.class);
 return (DataSource) jndiObjectFactoryBean.getObject();
 }

}
#透過xml設定檔配置
除了簡單的註解方式,我們哈可以透過在xml設定檔中宣告的方式,具體配置如下
datasource-config.xml
<?xml version="1.0" encoding="UTF-8"?>
<beans xmlns="http://www.springframework.org/schema/beans"
 xmlns:xsi="http://www.w3.org/2001/XMLSchema-instance" xmlns:jdbc="http://www.springframework.org/schema/jdbc"
 xmlns:jee="http://www.springframework.org/schema/jee" xmlns:p="http://www.springframework.org/schema/p"
 xsi:schemaLocation="
 http://www.php.cn/
 http://www.php.cn/
 http://www.php.cn/
 http://www.php.cn/
 http://www.php.cn/
 http://www.php.cn/">

 <beans profile="dev">
 <jdbc:embedded-database type="H2">
 <jdbc:script location="classpath:schema.sql" />
 <jdbc:script location="classpath:test-data.sql" />
 </jdbc:embedded-database>
 </beans>

 <beans profile="prod">
 <jee:jndi-lookup
 lazy-init="true"
 jndi-name="jdbc/myDatabase"
 resource-ref="true"
 proxy-interface="javax.sql.DataSource" />
 </beans>
</beans>
這裡分別宣告了兩種環境以及對應的profile。
profile啟動
雖然我們已經設定好了profile,但是如何啟動對應的環境。這裡我們需要兩個屬性spring.profile.active以及spring.profile.default。
如果spring.profile.active被賦值了,則spring.profile.default就不會起作用,如果spring.profie.active沒有賦值,則使用預設的spring.profile.default#設定的值。當然,如果兩者都沒有設定的話,則只會建立那些定義在對應的profile中的bean。
設定這兩個屬性的方式有很多:
作為DispactcherServlet的初始化參數
作為Web應用上下文參數
作為JNDI條目
作為環境變數
作為JVM的系統屬性
在整合測試類別上,使用@ActiveProfiles註解設定
例如我們在web .xml中可以宣告程式碼如下
<?xml version="1.0" encoding="UTF-8"?>
<web -app version="2.5"
...>

 //为上下文设置默认的profile
 <context-param>
 <param-name>spring.profile.default</param-name>
 <param-value>dev</param-value>
 </context-param>

...

 <servlet>
 ...
 //为Serlvet设置默认的profile
 <init-param>
  <param-name>spring-profiles.default</param-name>
  <param-value>dev</param-value>
 </init-prama>

...
<web-app>
這樣就可以指定需要啟動那種環境,並準備對應的bean。
另外对于测试,spring为什么提供了一个简单的注解可以使用@ActiveProfiles,它可以指定运行测试的时候应该要激活那个profile。比如这里的测试类DevDataSourceTest
package profiles;
import static org.junit.Assert.*;
import java.sql.ResultSet;
import java.sql.SQLException;
import java.util.List;
import javax.sql.DataSource;
import org.junit.Test;
import org.junit.runner.RunWith;
import org.springframework.beans.factory.annotation.Autowired;
import org.springframework.jdbc.core.JdbcTemplate;
import org.springframework.jdbc.core.RowMapper;
import org.springframework.test.context.ActiveProfiles;
import org.springframework.test.context.ContextConfiguration;
import org.springframework.test.context.junit4.SpringJUnit4ClassRunner;
import com.myapp.DataSourceConfig;
public class DataSourceConfigTest {
@RunWith(SpringJUnit4ClassRunner.class)
@ContextConfiguration(classes=DataSourceConfig.class)
@ActiveProfiles("dev")
public static class DevDataSourceTest {
@Autowired
private DataSource dataSource;
@Test
public void shouldBeEmbeddedDatasource() {
assertNotNull(dataSource);
JdbcTemplate jdbc = new JdbcTemplate(dataSource);
List<String> results = jdbc.query("select id, name from Things", new RowMapper<String>() {
@Override
public String mapRow(ResultSet rs, int rowNum) throws SQLException {
return rs.getLong("id") + ":" + rs.getString("name");
}
});
assertEquals(1, results.size());
assertEquals("1:A", results.get(0));
}
}
@RunWith(SpringJUnit4ClassRunner.class)
@ContextConfiguration(classes=DataSourceConfig.class)
@ActiveProfiles("prod")
public static class ProductionDataSourceTest {
@Autowired
private DataSource dataSource;
@Test
public void shouldBeEmbeddedDatasource() {
// should be null, because there isn't a datasource configured in JNDI
assertNull(dataSource);
}
}
@RunWith(SpringJUnit4ClassRunner.class)
@ContextConfiguration("classpath:datasource-config.xml")
@ActiveProfiles("dev")
public static class DevDataSourceTest_XMLConfig {
@Autowired
private DataSource dataSource;
@Test
public void shouldBeEmbeddedDatasource() {
assertNotNull(dataSource);
JdbcTemplate jdbc = new JdbcTemplate(dataSource);
List<String> results = jdbc.query("select id, name from Things", new RowMapper<String>() {
@Override
public String mapRow(ResultSet rs, int rowNum) throws SQLException {
return rs.getLong("id") + ":" + rs.getString("name");
}
});
assertEquals(1, results.size());
assertEquals("1:A", results.get(0));
}
}
@RunWith(SpringJUnit4ClassRunner.class)
@ContextConfiguration("classpath:datasource-config.xml")
@ActiveProfiles("prod")
public static class ProductionDataSourceTest_XMLConfig {
@Autowired(required=false)
private DataSource dataSource;
@Test
public void shouldBeEmbeddedDatasource() {
// should be null, because there isn't a datasource configured in JNDI
assertNull(dataSource);
}
}
}
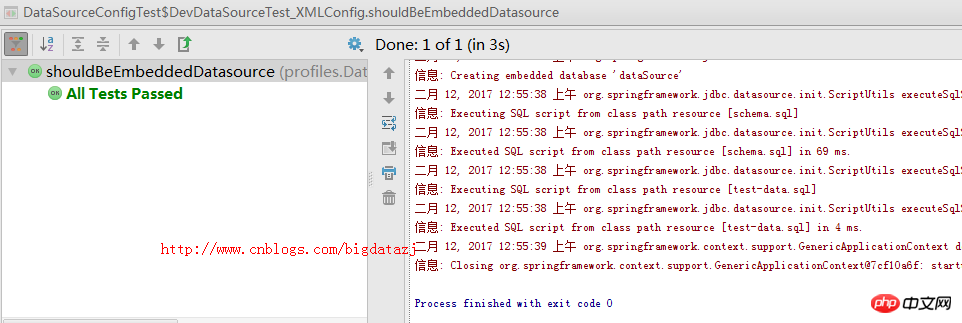
运行shouldBeEmbeddedDatasource方法,测试通过

总结
以上就是Spring入门实战之Profile详解的内容,更多相关内容请关注PHP中文网(www.php.cn)!

