【Python教學】繪製漂亮的長條圖
- 黄舟原創
- 2017-02-07 16:14:364451瀏覽
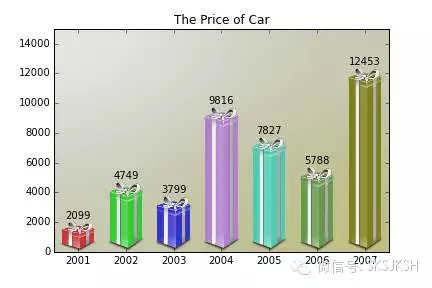
Matplotlib是基于Python语言的开源项目,其旨在为Python提供一个数据绘图包,本文简单介绍如何使用该程序包绘制漂亮的柱状图。
导入命令
1)设置工作环境%cd "F:\\Dropbox\\python"2)导入程序包import matplotlib.pyplot as plt
import numpy as np
from matplotlib.image import BboxImage
from matplotlib._png import read_png
import matplotlib.colors
from matplotlib.cbook import get_sample_data
import pandas as pd3)读取数据data=pd.read_csv("CAR.csv")4)定义并绘制图像
class RibbonBox(object):original_image = read_png(get_sample_data("Minduka_Present_Blue_Pack.png",asfileobj=False))cut_location = 70
b_and_h = original_image[:,:,2]
color = original_image[:,:,2] - original_image[:,:,0]
alpha = original_image[:,:,3]
nx = original_image.shape[1]def __init__(self, color):
rgb = matplotlib.colors.colorConverter.to_rgb(color)im = np.empty(self.original_image.shape,
self.original_image.dtype)im[:,:,:3] = self.b_and_h[:,:,np.newaxis]
im[:,:,:3] -= self.color[:,:,np.newaxis]*(1.-np.array(rgb))
im[:,:,3] = self.alphaself.im = imdef get_stretched_image(self, stretch_factor):
stretch_factor = max(stretch_factor, 1)
ny, nx, nch = self.im.shape
ny2 = int(ny*stretch_factor)stretched_image = np.empty((ny2, nx, nch),
self.im.dtype)
cut = self.im[self.cut_location,:,:]
stretched_image[:,:,:] = cut
stretched_image[:self.cut_location,:,:] = \
self.im[:self.cut_location,:,:]
stretched_image[-(ny-self.cut_location):,:,:] = \
self.im[-(ny-self.cut_location):,:,:]self._cached_im = stretched_image
return stretched_image
class RibbonBoxImage(BboxImage):
zorder = 1def __init__(self, bbox, color,
cmap = None,
norm = None,
interpolation=None,
origin=None,
filternorm=1,
filterrad=4.0,
resample = False,
**kwargs
):BboxImage.__init__(self, bbox,
cmap = cmap,
norm = norm,
interpolation=interpolation,
origin=origin,
filternorm=filternorm,
filterrad=filterrad,
resample = resample,
**kwargs
)self._ribbonbox = RibbonBox(color)
self._cached_ny = Nonedef draw(self, renderer, *args, **kwargs):bbox = self.get_window_extent(renderer)
stretch_factor = bbox.height / bbox.widthny = int(stretch_factor*self._ribbonbox.nx)
if self._cached_ny != ny:
arr = self._ribbonbox.get_stretched_image(stretch_factor)
self.set_array(arr)
self._cached_ny = nyBboxImage.draw(self, renderer, *args, **kwargs)if 1:
from matplotlib.transforms import Bbox, TransformedBbox
from matplotlib.ticker import ScalarFormatterfig, ax = plt.subplots()years = np.arange(2001,2008)
box_colors = [(0.8, 0.2, 0.2),
(0.2, 0.8, 0.2),
(0.2, 0.2, 0.8),
(0.7, 0.5, 0.8),
(0.3, 0.8, 0.7),
(0.4, 0.6, 0.3),
(0.5, 0.5, 0.1),
]
heights = data['price']fmt = ScalarFormatter(useOffset=False)
ax.xaxis.set_major_formatter(fmt)for year, h, bc in zip(years, heights, box_colors):
bbox0 = Bbox.from_extents(year-0.4, 0., year+0.4, h)
bbox = TransformedBbox(bbox0, ax.transData)
rb_patch = RibbonBoxImage(bbox, bc, interpolation="bicubic")ax.add_artist(rb_patch)
ax.annotate(h,
(year, h), va="bottom", ha="center")
ax.set_title('The Price of Car')patch_gradient = BboxImage(ax.bbox,
interpolation="bicubic",
zorder=0.1,
)
gradient = np.zeros((2, 2, 4), dtype=np.float)
gradient[:,:,:3] = [1, 1, 0.]
gradient[:,:,3] = [[0.1, 0.3],[0.3, 0.5]]
patch_gradient.set_array(gradient)
ax.add_artist(patch_gradient)ax.set_xlim(years[0]-0.5, years[-1]+0.5)
ax.set_ylim(0, 15000)5)保存图像fig.savefig('The Price of Car.png')
plt.show()
输出图像如下

以上就是【Python教程】绘制漂亮的柱状图的内容,更多相关内容请关注PHP中文网(www.php.cn)!
陳述:
本文內容由網友自願投稿,版權歸原作者所有。本站不承擔相應的法律責任。如發現涉嫌抄襲或侵權的內容,請聯絡admin@php.cn
上一篇:【Python教學】繪製小提琴圖下一篇:【Python教學】繪製小提琴圖

