AdminLTE 是一个基于Bootstrap 3.x的免费高级管理控制面板主题,完全响应式管理,适合从小型移动设备到大型台式机很多的屏幕分辨率。
AdminLTE的特点:
充分响应
可分类的仪表盘
18插件和3自定义插件
重量轻和快速
与大多数主流浏览器兼容
完全支持Glyphicons,Fontawesome和图标
我们使用的工具
Laravel
AdminLTE 2.3.2
Bower
Composer
下载一个全新的 Laravel
如果不太清楚可以去官方网站查看文档link
在此我们直接使用命令行即可
composer create-project laravel/laravel myapp --prefer-dist
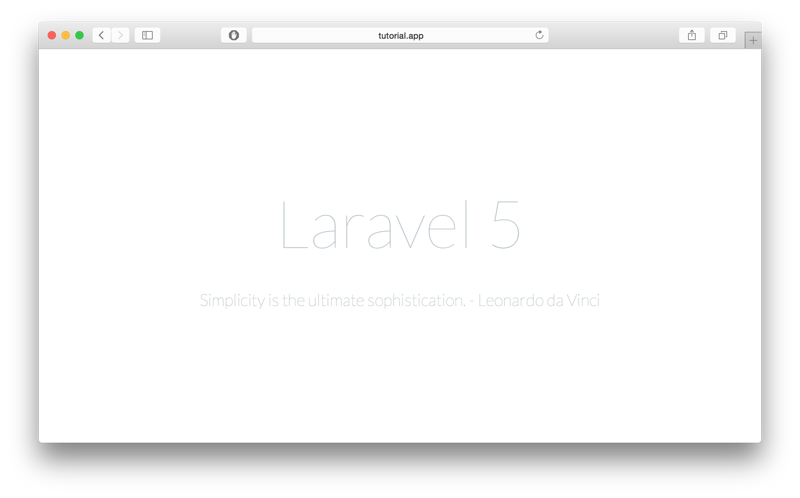
通过这个命令我们创建了一个全新的名字为 myapp 的Laravel项目,如果你成功的话你可以看到下面的图片

通过 Bower 下载 AdminLTE
进入到 myapp/public 文件夹
cd myapp/public
在这个文件夹下执行下面的命令
bower install admin-lte
一旦完成,你会发现多了一个 bower_componets 的文件夹,而且在这个文件夹中你会看到 AdminLTE
将 AdminLTE 的starter.html 转化为 Blade 模板
Laravel 在此使用了一个很好的模板引擎 Blade,为了更充分的利用Blade,我们需要将一些常规的通用的 HTML 的 起始页面应用到 Blade 模板中,首先创建一个 view 在 resources/views文件夹中,命名为admin_template.blade.php,而后我们为这个页面创建一个对应的路由。如下面我所创建的
 Route::get('admin', function () {
  return view('admin_template');
 });
然后,将bower_components/admin-lte/starter.html中的内容复制到我们视图模板中,并且将其中的相关链接指向我们的 AdminLTE 的对应目录下,如下是我初步的设置:
<script src="{{ asset("/bower_components/AdminLTE/plugins/jQuery/jQuery-2.1.4.min.js")}}"></script>
<!-- Bootstrap 3.3.5 -->
<script src="{{ asset("/bower_components/AdminLTE/bootstrap/js/bootstrap.min.js")}}"></script>
<!-- AdminLTE App -->
<script src="{{ asset("/bower_components/AdminLTE/dist/js/app.min.js")}}"></script>
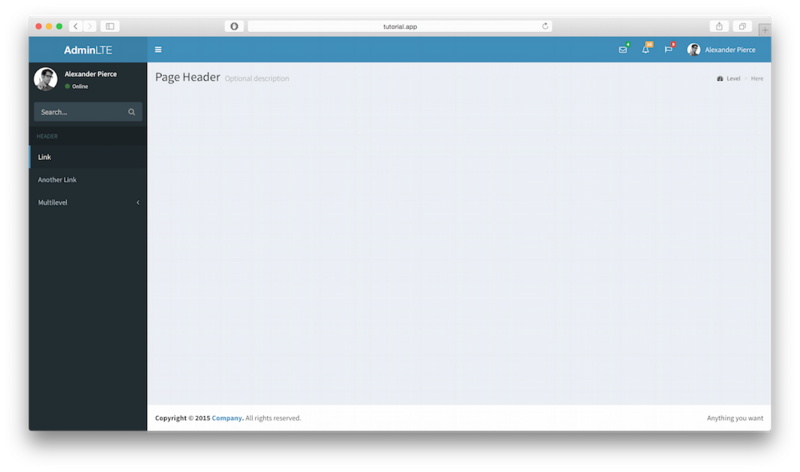
类似这样,将css 和 js 的相关的链接指向相应的目录下,而后我们通过 localhost:8000/admin 查看页面的变化,此时页面变成了如下图:

现在我们拥有了所有的使用 AdminLTE 的所有的资源,下面对我们的主要视图增加最后的收尾工作,我将分开这个模板为三个文件,sidebar.blade.php, header.blade.php, 和 footer.blade.php
这三个文件的内容分别是admin_template.blade.phpheader 部分和 aside 部分和footer 部分,将这三部分截取出来依次放到三个文件中。
最后的润色工作
现在我们已经将我们的模板个性化的分离开了,下面我们需要设置我们的最初的admin_template.blade.php
模板以便于内容动态加载,如下所示:
<!DOCTYPE html>
<html>
head>
<meta charset="UTF-8">
<title>{{ $page_title or "AdminLTE Dashboard" }}</title>
<meta content='width=device-width, initial-scale=1, maximum-scale=1, user-scalable=no' name='viewport'>
<!-- Bootstrap 3.3.2 -->
<link href="{{ asset("/bower_components/AdminLTE/bootstrap/css/bootstrap.min.css") }}" rel="stylesheet"
type="text/css" />
<!-- Font Awesome Icons -->
<link href="https://maxcdn.bootstrapcdn.com/font-awesome/4.3.0/css/font-awesome.min.css" rel="stylesheet"
type="text/css" />
<!-- Ionicons -->
<link href="http://code.ionicframework.com/ionicons/2.0.0/css/ionicons.min.css" rel="stylesheet"
type="text/css" />
<!-- Theme style -->
<link href="{{ asset("/bower_components/AdminLTE/dist/css/AdminLTE.min.css")}}" rel="stylesheet"
type="text/css" />
<!-- AdminLTE Skins. We have chosen the skin-blue for this starter
page. However, you can choose any other skin. Make sure you
apply the skin class to the body tag so the changes take effect.
-->
<link href="{{ asset("/bower_components/AdminLTE/dist/css/skins/skin-blue.min.css")}}" rel="stylesheet"
type="text/css" />
<!-- HTML5 Shim and Respond.js IE8 support of HTML5 elements and media queries -->
<!-- WARNING: Respond.js doesn't work if you view the page via file:// -->
<!--[if lt IE 9]>
<script src="https://oss.maxcdn.com/libs/html5shiv/3.7.0/html5shiv.js"></script>
<script src="https://oss.maxcdn.com/libs/respond.js/1.3.0/respond.min.js"></script>
<![endif]-->
</head>
<body class="hold-transition skin-blue sidebar-mini">
<div class="wrapper">
<!-- Header -->
@include('header')
<!-- Sidebar -->
@include('sidebar')
<!-- Content Wrapper. Contains page content -->
<div class="content-wrapper">
<!-- Content Header (Page header) -->
<section class="content-header">
<h1>
{{ $page_title or "Page Title" }}
<small>{{ $page_description or null }}</small>
</h1>
<!-- You can dynamically generate breadcrumbs here -->
<ol class="breadcrumb">
<li><a href="#"><i class="fa fa-dashboard"></i> Level</a></li>
<li class="active">Here</li>
</ol>
</section>
<!-- Main content -->
<section class="content">
<!-- Your Page Content Here -->
@yield('content')
</section><!-- /.content -->
</div><!-- /.content-wrapper -->
<!-- Footer -->
@include('footer')
<aside class="control-sidebar control-sidebar-dark">
<!-- Create the tabs -->
<ul class="nav nav-tabs nav-justified control-sidebar-tabs">
<li class="active"><a href="#control-sidebar-home-tab" data-toggle="tab"><i class="fa fa-home"></i></a></li>
<li><a href="#control-sidebar-settings-tab" data-toggle="tab"><i class="fa fa-gears"></i></a></li>
</ul>
<!-- Tab panes -->
<div class="tab-content">
<!-- Home tab content -->
<div class="tab-pane active" id="control-sidebar-home-tab">
<h3 class="control-sidebar-heading">Recent Activity</h3>
<ul class="control-sidebar-menu">
<li>
<a href="javascript::;">
<i class="menu-icon fa fa-birthday-cake bg-red"></i>
<div class="menu-info">
<h4 class="control-sidebar-subheading">Langdon's Birthday</h4>
<p>Will be 23 on April 24th</p>
</div>
</a>
</li>
</ul>
<!-- /.control-sidebar-menu -->
<h3 class="control-sidebar-heading">Tasks Progress</h3>
<ul class="control-sidebar-menu">
<li>
<a href="javascript::;">
<h4 class="control-sidebar-subheading">
Custom Template Design
<span class="label label-danger pull-right">70%</span>
</h4>
<div class="progress progress-xxs">
<div class="progress-bar progress-bar-danger" style="width: 70%"></div>
</div>
</a>
</li>
</ul>
<!-- /.control-sidebar-menu -->
</div>
<!-- /.tab-pane -->
<!-- Stats tab content -->
<div class="tab-pane" id="control-sidebar-stats-tab">Stats Tab Content</div>
<!-- /.tab-pane -->
<!-- Settings tab content -->
<div class="tab-pane" id="control-sidebar-settings-tab">
<form method="post">
<h3 class="control-sidebar-heading">General Settings</h3>
<div class="form-group">
<label class="control-sidebar-subheading">
Report panel usage
<input type="checkbox" class="pull-right" checked>
</label>
<p>
Some information about this general settings option
</p>
</div>
<!-- /.form-group -->
</form>
</div>
<!-- /.tab-pane -->
</div>
</aside>
<!-- /.control-sidebar -->
<!-- Add the sidebar's background. This div must be placed
immediately after the control sidebar -->
<div class="control-sidebar-bg"></div>
</div><!-- ./wrapper -->
<!-- REQUIRED JS SCRIPTS -->
<!-- jQuery 2.1.3 -->
<script src="{{ asset ("/bower_components/AdminLTE/plugins/jQuery/jQuery-2.1.3.min.js") }}"></script>
<!-- Bootstrap 3.3.2 JS -->
<script src="{{ asset ("/bower_components/AdminLTE/bootstrap/js/bootstrap.min.js") }}"
type="text/javascript"></script>
<!-- AdminLTE App -->
<script src="{{ asset ("/bower_components/AdminLTE/dist/js/app.min.js") }}" type="text/javascript">
</script>
<!-- Optionally, you can add Slimscroll and FastClick plugins.
Both of these plugins are recommended to enhance the
user experience -->
</body>
</html>在上面代码中,我们添加了contetn,这里包含着我们的主要的内容,增加了页面标题针对不同的页面,将其重命名为dashboard.blade.php现在这个模板已经可以使用了。
测试页面
为了验证我们之前所做的工作,我将创建一个简单的页面
1.创建 test.blade.php
@extends('dashboard')
@section('content')
<div class='row'>
<div class='col-md-6'>
<!-- Box -->
<div class="box box-primary">
<div class="box-header with-border">
<h3 class="box-title">Randomly Generated Tasks</h3>
<div class="box-tools pull-right">
<button class="btn btn-box-tool" data-widget="collapse" data-toggle="tooltip" title="Collapse">
<i class="fa fa-minus"></i></button>
<button class="btn btn-box-tool" data-widget="remove" data-toggle="tooltip" title="Remove">
<i class="fa fa-times"></i></button>
</div>
</div>
<div class="box-body">
@foreach($tasks as $task)
<h5>
{{ $task['name'] }}
<small class="label label-{{$task['color']}} pull-right">{{$task['progress']}}%</small>
</h5>
<div class="progress progress-xxs">
<div class="progress-bar progress-bar-{{$task['color']}}" style="width: {{$task['progress']}}%">
</div>
</div>
@endforeach
</div><!-- /.box-body -->
<div class="box-footer">
<form action='#'>
<input type='text' placeholder='New task' class='form-control input-sm' />
</form>
</div><!-- /.box-footer-->
</div><!-- /.box -->
</div><!-- /.col -->
<div class='col-md-6'>
<!-- Box -->
<div class="box box-primary">
<div class="box-header with-border">
<h3 class="box-title">Second Box</h3>
<div class="box-tools pull-right">
<button class="btn btn-box-tool" data-widget="collapse" data-toggle="tooltip" title="Collapse">
<i class="fa fa-minus"></i></button>
<button class="btn btn-box-tool" data-widget="remove" data-toggle="tooltip" title="Remove">
<i class="fa fa-times"></i></button>
</div>
</div>
<div class="box-body">
A separate section to add any kind of widget. Feel free
to explore all of AdminLTE widgets by visiting the demo page
on <a href="https://almsaeedstudio.com">Almsaeed Studio</a>.
</div><!-- /.box-body -->
</div><!-- /.box -->
</div><!-- /.col -->
</div><!-- /.row -->
@endsection2.创建TestController.php
php artisan make:controller TestController --plain
下面是这个控制器的代码部分:
<?php
namespace App\Http\Controllers;
use Illuminate\Http\Request;
use App\Http\Requests;
use App\Http\Controllers\Controller;
class TestController extends Controller
{
public function index() {
$data['tasks'] = [
[
'name' => 'Design New Dashboard',
'progress' => '87',
'color' => 'danger'
],
[
'name' => 'Create Home Page',
'progress' => '76',
'color' => 'warning'
],
[
'name' => 'Some Other Task',
'progress' => '32',
'color' => 'success'
],
[
'name' => 'Start Building Website',
'progress' => '56',
'color' => 'info'
],
[
'name' => 'Develop an Awesome Algorithm',
'progress' => '10',
'color' => 'success'
]
];
return view('test')->with($data);
}
}3.创建对应的路由
Route::get('test', 'TestController@index');
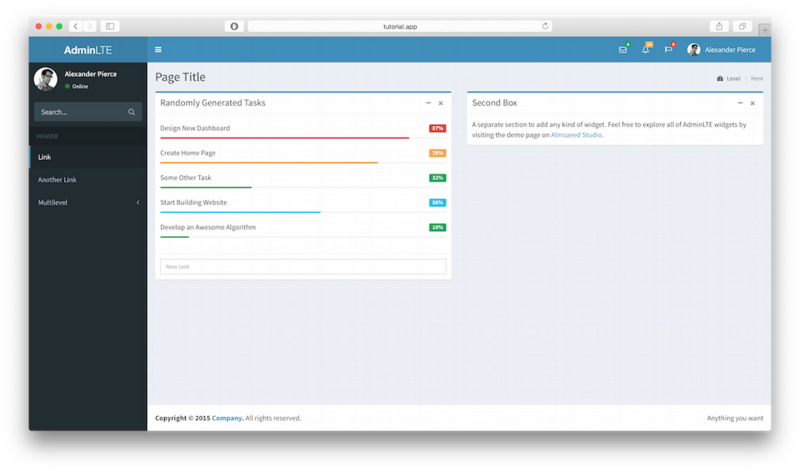
4.打开对应的页面,如果你没有出错的 应该如下图所示

以上就是PHP的Laravel框架中使用AdminLTE模板来编写网站后台界面_php技巧的内容,更多相关内容请关注PHP中文网(www.php.cn)!
 PHP的當前狀態:查看網絡開發趨勢Apr 13, 2025 am 12:20 AM
PHP在現代Web開發中仍然重要,尤其在內容管理和電子商務平台。 1)PHP擁有豐富的生態系統和強大框架支持,如Laravel和Symfony。 2)性能優化可通過OPcache和Nginx實現。 3)PHP8.0引入JIT編譯器,提升性能。 4)雲原生應用通過Docker和Kubernetes部署,提高靈活性和可擴展性。
 PHP與其他語言:比較Apr 13, 2025 am 12:19 AM
PHP適合web開發,特別是在快速開發和處理動態內容方面表現出色,但不擅長數據科學和企業級應用。與Python相比,PHP在web開發中更具優勢,但在數據科學領域不如Python;與Java相比,PHP在企業級應用中表現較差,但在web開發中更靈活;與JavaScript相比,PHP在後端開發中更簡潔,但在前端開發中不如JavaScript。
 PHP與Python:核心功能Apr 13, 2025 am 12:16 AM
PHP和Python各有優勢,適合不同場景。 1.PHP適用於web開發,提供內置web服務器和豐富函數庫。 2.Python適合數據科學和機器學習,語法簡潔且有強大標準庫。選擇時應根據項目需求決定。
 PHP:網絡開發的關鍵語言Apr 13, 2025 am 12:08 AM
PHP是一種廣泛應用於服務器端的腳本語言,特別適合web開發。 1.PHP可以嵌入HTML,處理HTTP請求和響應,支持多種數據庫。 2.PHP用於生成動態網頁內容,處理表單數據,訪問數據庫等,具有強大的社區支持和開源資源。 3.PHP是解釋型語言,執行過程包括詞法分析、語法分析、編譯和執行。 4.PHP可以與MySQL結合用於用戶註冊系統等高級應用。 5.調試PHP時,可使用error_reporting()和var_dump()等函數。 6.優化PHP代碼可通過緩存機制、優化數據庫查詢和使用內置函數。 7
 PHP:許多網站的基礎Apr 13, 2025 am 12:07 AM
PHP成為許多網站首選技術棧的原因包括其易用性、強大社區支持和廣泛應用。 1)易於學習和使用,適合初學者。 2)擁有龐大的開發者社區,資源豐富。 3)廣泛應用於WordPress、Drupal等平台。 4)與Web服務器緊密集成,簡化開發部署。
 超越炒作:評估當今PHP的角色Apr 12, 2025 am 12:17 AM
PHP在現代編程中仍然是一個強大且廣泛使用的工具,尤其在web開發領域。 1)PHP易用且與數據庫集成無縫,是許多開發者的首選。 2)它支持動態內容生成和麵向對象編程,適合快速創建和維護網站。 3)PHP的性能可以通過緩存和優化數據庫查詢來提升,其廣泛的社區和豐富生態系統使其在當今技術棧中仍具重要地位。
 PHP中的弱參考是什麼?什麼時候有用?Apr 12, 2025 am 12:13 AM
在PHP中,弱引用是通過WeakReference類實現的,不會阻止垃圾回收器回收對象。弱引用適用於緩存系統和事件監聽器等場景,需注意其不能保證對象存活,且垃圾回收可能延遲。
 解釋PHP中的__ Invoke Magic方法。Apr 12, 2025 am 12:07 AM
\_\_invoke方法允許對象像函數一樣被調用。 1.定義\_\_invoke方法使對象可被調用。 2.使用$obj(...)語法時,PHP會執行\_\_invoke方法。 3.適用於日誌記錄和計算器等場景,提高代碼靈活性和可讀性。


熱AI工具

Undresser.AI Undress
人工智慧驅動的應用程序,用於創建逼真的裸體照片

AI Clothes Remover
用於從照片中去除衣服的線上人工智慧工具。

Undress AI Tool
免費脫衣圖片

Clothoff.io
AI脫衣器

AI Hentai Generator
免費產生 AI 無盡。

熱門文章

熱工具

MantisBT
Mantis是一個易於部署的基於Web的缺陷追蹤工具,用於幫助產品缺陷追蹤。它需要PHP、MySQL和一個Web伺服器。請查看我們的演示和託管服務。

記事本++7.3.1
好用且免費的程式碼編輯器

MinGW - Minimalist GNU for Windows
這個專案正在遷移到osdn.net/projects/mingw的過程中,你可以繼續在那裡關注我們。 MinGW:GNU編譯器集合(GCC)的本機Windows移植版本,可自由分發的導入函式庫和用於建置本機Windows應用程式的頭檔;包括對MSVC執行時間的擴展,以支援C99功能。 MinGW的所有軟體都可以在64位元Windows平台上運作。

PhpStorm Mac 版本
最新(2018.2.1 )專業的PHP整合開發工具

SublimeText3漢化版
中文版,非常好用


