


Sometimes a chance to show somebody how things are done proves more effective than having to come up with lengthy instructions. This is often true for educators, developers, IT support, YouTubers, online businesses, and teams working from different locations and even different time zones.
Taking a video of your actions as they happen on the screen of your Mac is called screen recording. (You can record your entire screen, a selected portion of the screen, or an app window.)
Ways to record screen with audio |
Steps to follow |
With a specialized third-party app |
Install and open CleanShot X. Choose Record Screen > Press Space bar > Click the microphone icon to Record MacBook Microphone or other source. Install and open iShowU. Set recording preferences and press the red circled dot in the bottom right corner of the app to start recording. |
With Mac’s webcam |
Install and open Capto. Choose the Record option from the toolbar > Select Record Camera > FaceTime HD Camera > Start recording. |
Using Mac’s built-in tools |
Use QuickTime from the menu bar to record the screen. |
With a Mac keyboard shortcut using a microphone |
Press Command + Shift + 5 > Click Options to turn on the audio recording > Record. |

Record your Mac’s screen with Capto
Capture, edit, and share your Mac screen effortlessly with Capto. Record any screen area and add real-time voiceovers.
Try free Security-testedThe best Mac screen recorder option for your Mac
A great comprehensive all-in-one tool for screen recording Mac users can rely on is Capto.
With Capto you get to not only record your screen with real-time voiceover and webcam feed, but also edit your video and audio tracks, add text or speech bubbles, and share instantly from the app:
- Capture a specific app window, a browser, your whole screen, or select an area of any size with any number of windows in it
- Hide desktop while recording
- Take screenshots
- Edit video and images: crop, cut, fade in and fade out for audio
- Add annotations
- Share to Dropbox, YouTube, Facebook, and all possible shared storages, including FTP/SFTP servers

You can also use iShowU to record your screen. This app is particularly handy for creating product walkthroughs and demos and it can record high quality video with a selfie cam overlay. This allows you to create videos with a “talking head” inserted in them.
iShowU can also replace the background in your selfie video to make it look more polished and professional.

How to record your screen on Mac using the Screenshot toolbar
If you’re wondering, “Can I screen record on my Mac with a native macOS utility?” the answer is — yes. Apple has its own built-in screen recording feature called Screenshot that lets you capture video of whatever’s happening on your screen (with real-time audio, should you choose to).
You can use the Screenshot toolbar for taking both screenshots and video recordings of your screen (for video choose from the last two screen icons with a dot in the lower right corner).
To record with Screenshot:
- Press Shift + Command + 5 to open the toolbar
- Choose Record Entire Screen or Record Selected Portion (you’ll be able to drag and resize the frame of the screen area you want to be recorded, if you choose this option)
- Go to Options and choose microphone settings, decide where you’d like to save your recording to, or set a countdown timer
- Click on Record to start the recording
- Click on Stop Recording menu bar icon when you’re done
If your Screenshot toolbar is already set to screen recording, you can use hotkeys for recording your screen: press Shift + Command + 5 to start the recording and Command + Control + Esc to stop the recording.
How to record audio in screen recordings
When you think about how to screen record on MacBook, it’s important to also understand how to include sound in your videos.
As we have already discussed, your native Mac screen recorder allows you to capture audio from your Mac’s built-in microphone, but if you’re looking for more advanced capabilities (like creating and editing voiceovers or learning to record your Skype meetings), you can find out more from our dedicated article on how to record your screen on Mac with sound.
How to screen record on Mac using QuickTime
Another option to record a screen Mac users can try is QuickTime Player. We know this app for playing media files, but it can also be used for recording your screen and sound.
To use QuickTime Player as a Mac screen recorder, simply launch it from Applications and choose New Screen Recording from the File menu. This will open the Screenshot toolbar that lets you configure and start your recording.
The only difference with Screenshot is that with QuickTime Player, once you’re done recording, your file will automatically open inside the app and you can edit it right away.

Read also:
- Crop Video on Mac
- No Clutter Screen Capturing for Mac
- Record Edit Share Videos on Mac
- Take A Scrolling Screenshot
How to screen record for collaboration
Another great tool for asynchronous screen sharing is CleanShot X.It’s a simple screen recording macOS app that comes with a rich toolkit, allowing you to capture your screen without desktop icons, record as MP4 or GIF, trim video, annotate, and keep your recordings saved on CleanShot’s cloud for free — all a few clicks on the menu bar icon away.

How to record a screen with OBS Studio
Another popular contender for Mac screen recorder of choice is OBS Studio.
OBS Studio is a free open-source app used for both streaming and screen recording by many content creators. It’s known for a variety of advanced features, but can also be easily used by beginners.
Understanding how to screen record on Mac with OBS Studio starts with the basics:
- Download (obsproject.com), install, and launch the app
- Set up video: Sources ➙ + icon ➙ Display Capture ➙ name the source ➙ OK
- Set up audio: OBS Studio is set to capture audio from the built-in microphone on your Mac by default — you can add external audio sources or apps for capturing system sound in Sources
- Choose where you want to save your recorded files: Controls ➙ Settings ➙ Output ➙ Recording ➙ Browse ➙ OK
- Choose Start Recording under Controls to begin screen recording Mac
- Press Stop Recording when you're finished

If you’re also looking for an advanced app to help you edit your recordings, check CamerBag Pro. It’s a powerful photo and video editor that allows for professional adjustments and offers pro-quality preset filters to add style to your creations.
How to record your screen on Mac and have an impact?
Being able to clearly get your point across even if you aren’t in the same room with your audience or colleagues is very important. Having a video recording to illustrate it — is priceless. Learning how to screen record on Mac is, without a doubt, a useful skill, and you can master it in no time with Mac’s built-in Screenshot and QuickTime Player or a more advanced OBS Studio screen recording setup.
If you’d like an effective tool that lets you both record and edit your videos from the same app on Mac, opt forCaptoorCleanShot X(if you also like creating GIFs). And, finally, for advance editing and pro quality image adjustments arm yourself withCamerBag Proto present your ideas with style.
Be sure to try Capto, CleanShot X, CameraBag Pro, and iShowU for free with the 7-day trial ofSetapp, a platform of high-performance apps for tasks on Mac and iPhone. Learn how to screen record MacBook and check out more than 250 other options to boost productivity.
FAQ
How to record screen and audio at the same time on Mac
All the above mentioned methods of screen recording Mac users can choose from allow for recording audio from Mac’s built-in mic: you can capture your voice commentary, as well as any sounds playing at the moment (music, app sounds, etc.)
How can I record my screen on Mac with sound but without a mic?
All Macs have an internal microphone built-in, so you don’t have to have an external microphone for capturing sound when screen recording Mac.
Where does screen recording go on a Mac?
The answer differs depending on the app you choose for recording your screen:
Mac’s native Screenshot utility saves recorded files to Desktop (you can choose a different location in Options ➙ Save to)
QuickTime Player automatically opens the video after you hit Stop Recording, and you can then choose where to save your file (File ➙ Save)
OBS Studio lets you locate recordings using the File menu (File ➙ Show Recordings)
-
Apps like CleanShot X save your files to your free in-app cloud account
What is the recording shortcut on Mac?
Use Shift + Command + 5 to start screen recording Mac.以上是如何在Mac上篩選記錄:簡單快捷的詳細內容。更多資訊請關注PHP中文網其他相關文章!

 如何從MAC存儲設備中刪除存儲的密碼May 09, 2025 am 09:28 AM
MacOS可輕鬆加密任何安裝的音量。 每次卷安裝時,包括重新啟動後,都需要加密密碼。 您可以通過在設置過程中選擇“記住”來選擇將此密碼保存在鍵鏈中。 需要t
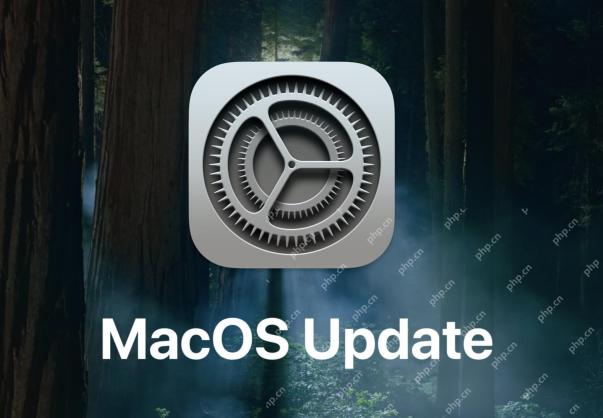 MacOS紅杉15.2更新與Chatgpt Siri,Image Playground,Bug Fix等發布May 09, 2025 am 09:13 AM
macOS Sequoia 15.2現已推出,為使用Sequoia操作系統的Mac用戶帶來諸多改進。此更新包含Apple Intelligence的新功能,包括Siri的ChatGPT支持和Image Playground圖像生成工具,以及一些寫作工具AI的改進。除了AI之外,您還將發現查找我的項目共享功能的增強、各種應用程序的改進以及通常的錯誤修復和安全增強功能。 如果您使用的是非macOS Sequoia 15.2的Mac,則會看到macOS Sonoma 14.7.2和macOS Vent
 為什麼可以從iPhone鏡像中訪問控制中心?May 09, 2025 am 09:07 AM
MacOS Sequoia 15.0及更高版本的一大亮點是iPhone鏡像功能,它允許Mac用戶直接在Mac上與iPhone交互並使用iPhone。 iPhone鏡像功能幾乎涵蓋了所有iPhone功能,您幾乎可以在Mac上訪問所有iPhone功能……但“幾乎所有”並非全部,因為目前iPhone鏡像尚不支持某些iPhone功能。 目前iPhone鏡像不支持的一個比較突出的iPhone功能是控制中心,它是訪問許多iPhone功能和網絡、Shazam、輔助功能切換等眾多其他功能的快速切換方式。 另一個
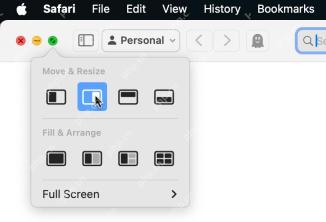 如何在Macos紅杉中使用窗戶瓷磚May 09, 2025 am 09:06 AM
MacOS Sequoia 之后,Mac 的窗口平铺功能得到了显著改进,现在在屏幕上排列和平铺窗口比以往任何时候都更容易。 窗口平铺功能允许您分割窗口、将窗口发送到左侧或右侧、将窗口四分之一地显示在屏幕上等等。有多种不同的方法可以访问 Mac 上改进后的窗口平铺功能,因此请熟悉它们,您很快就能成为高手。 如何在 Mac 上使用窗口平铺 使用窗口平铺最简单的方法之一是从 Mac 窗口上的绿色调整窗口大小按钮开始: 将鼠标悬停在您想要平铺的窗口上的绿色窗口按钮上; 选择您想要使用的平铺选项:
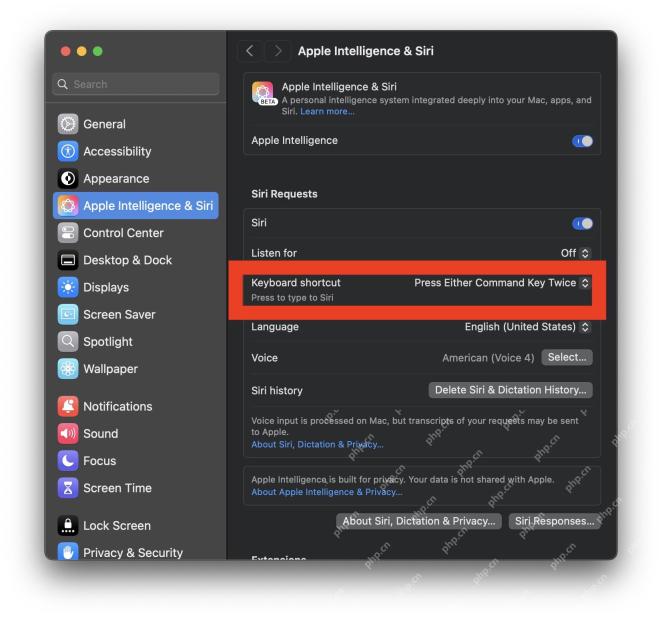 如何將類型的鍵盤快捷鍵更改為Mac上的SiriMay 08, 2025 am 11:30 AM
Mac系統上“鍵入以使用Siri”功能的快捷鍵修改指南 Mac上的“鍵入以使用Siri”功能非常實用,尤其是在Siri具備Apple Intelligence功能之後。對於Mac用戶來說,使用“鍵入以使用Siri”可能比使用語音激活的Siri命令更加方便,但一些Mac用戶可能會意外地通過無意中按下啟動命令序列來觸發此功能。 如果您想更改Mac上“鍵入以使用Siri”的鍵盤快捷鍵,可以通過簡單的設置更改來快速實現,具體步驟如下: 如何更改Mac上“鍵入以使用Siri”的鍵盤快捷鍵 打開蘋果菜單
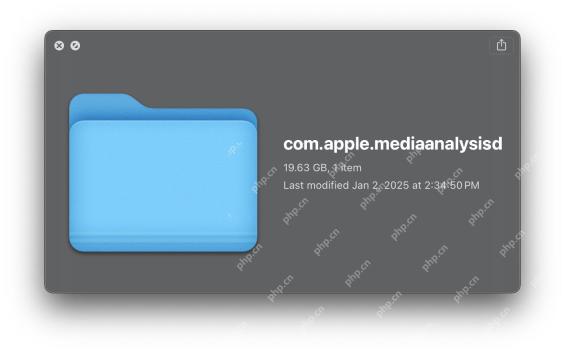 com.apple.Mediaanalysisd在Mac上使用大量存儲?這裡的修復程序May 08, 2025 am 11:17 AM
MacOS Sequoia 的 com.apple.mediaanalysisd 目錄緩存文件佔用大量磁盤空間問題 一些 MacOS Sequoia 用戶發現,MacOS 系統中的 com.apple.mediaanalysisd 目錄因緩存文件佔用大量磁盤空間。 如果您在安裝或更新到 MacOS Sequoia 後發現 Mac 磁盤空間減少,則過大的 com.apple.mediaanalysisd 緩存文件問題可能是罪魁禍首。許多 Mac 用戶報告該目錄中充滿了 15GB 以上的數據,一些用
 如何在iOS 18.2中的iPhone上禁用郵件發送者圖標May 08, 2025 am 10:46 AM
蘋果最新版iPhone郵件應用的改版引發了用戶強烈爭議,其新增的郵件類別功能和醒目的發件人頭像尤其令人詬病。這些大尺寸的頭像擠占了郵件界面空間,不僅難以辨識發件人,還遮擋了郵件主題和預覽內容,降低了郵件閱讀和瀏覽效率。即使頭像顯示的是聯繫人照片,但大多數郵件並未關聯照片,取而代之的是模糊不清的縮略圖,進一步影響了界面美觀和使用體驗。 幸運的是,如同可以禁用惱人的郵件類別功能一樣,我們也可以關閉這些礙眼的巨型發件人頭像和聯繫人照片,恢復郵件應用的經典外觀,提升使用體驗。 如何在iPhone郵件應用
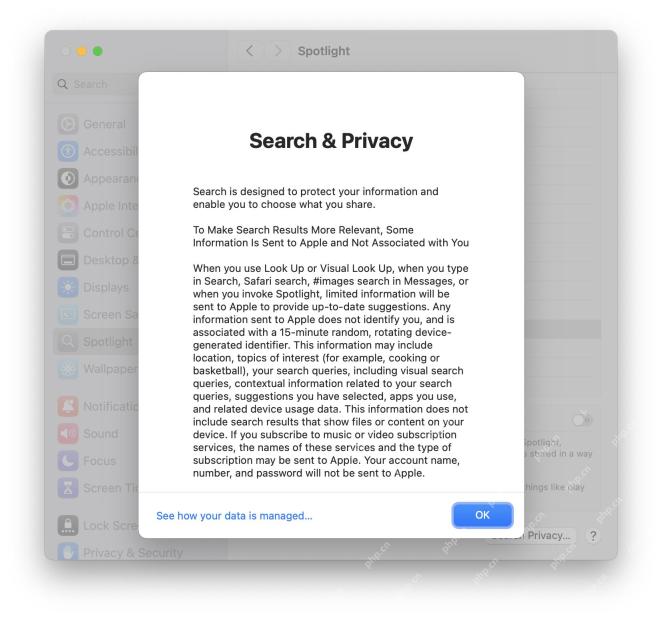 如何在Mac上停止聚光燈搜索數據與Apple共享May 08, 2025 am 10:38 AM
保護Mac搜索隱私:輕鬆關閉Apple搜索數據共享 默認情況下,您在Mac的Spotlight、Safari、Siri、Lookup和#images中輸入的搜索查詢會被發送到Apple。雖然這些信息經過匿名處理,不會洩露您的身份,Apple也表示這些信息用於改進搜索結果,但許多Mac用戶可能根本不想與Apple共享這些搜索信息。此外,注重隱私的用戶可能會覺得這種數據收集方式不可取。 幸運的是,您可以輕鬆關閉Mac上的“幫助Apple改進搜索”設置,阻止Safari、Siri、Spotlight、


熱AI工具

Undresser.AI Undress
人工智慧驅動的應用程序,用於創建逼真的裸體照片

AI Clothes Remover
用於從照片中去除衣服的線上人工智慧工具。

Undress AI Tool
免費脫衣圖片

Clothoff.io
AI脫衣器

Video Face Swap
使用我們完全免費的人工智慧換臉工具,輕鬆在任何影片中換臉!

熱門文章
熱工具

SublimeText3 Linux新版
SublimeText3 Linux最新版

Dreamweaver Mac版
視覺化網頁開發工具

EditPlus 中文破解版
體積小,語法高亮,不支援程式碼提示功能

ZendStudio 13.5.1 Mac
強大的PHP整合開發環境

MantisBT
Mantis是一個易於部署的基於Web的缺陷追蹤工具,用於幫助產品缺陷追蹤。它需要PHP、MySQL和一個Web伺服器。請查看我們的演示和託管服務。

