


The Definitive Guide to Upgrading to Windows 11: From Backup to Installation
Upgrading to Windows 11 can enhance your computing experience with its new features and improved performance. However, ensuring a smooth transition requires careful preparation, from backing up your data to verifying your hardware's compatibility. In this guide, we'll walk you through the essential steps for a successful upgrade to Windows 11.
What are the essential steps for backing up my data before upgrading to Windows 11?
Before you dive into the upgrade process, backing up your data is crucial. This ensures that your important files, documents, and personal settings are safe, even if something goes wrong during the upgrade. Here are the steps to follow:
- Identify Important Data: Start by identifying the data you need to back up. This includes personal documents, photos, videos, music, and any other files you want to keep safe. Don't forget to include browser bookmarks, emails, and application settings.
- Choose a Backup Method: You can choose between several backup methods, such as external hard drives, cloud storage services (like OneDrive, Google Drive, or Dropbox), or network-attached storage (NAS). Each has its pros and cons, but cloud storage is often the most convenient for easy access and recovery.
- Use Windows Backup Tools: Windows offers built-in tools like File History and the Backup and Restore feature. To use File History, connect an external drive, go to Settings > Update & Security > Backup, and add your drive. Turn on File History to automatically back up your files. For a full system image, use the Control Panel's Backup and Restore (Windows 7) tool to create a comprehensive backup.
- Verify the Backup: After completing the backup, it’s essential to verify that all your important data has been successfully copied. Open your backup storage and check a few files to ensure they are there and can be opened.
- Document Application Settings: Some applications may not transfer settings automatically during an upgrade. Take screenshots or notes of important application settings, and consider exporting these settings if possible.
- Plan for Recovery: Keep your backup media in a safe place and know how to access it. In case of any issues during the upgrade, you’ll be able to restore your data quickly.
How can I ensure my hardware meets the requirements for a smooth Windows 11 installation?
Ensuring your hardware meets the minimum requirements for Windows 11 is vital for a successful installation. Microsoft has set specific criteria that your PC must meet. Here’s how to check and ensure your hardware is up to the task:
- Check System Requirements: The minimum requirements for Windows 11 include a 64-bit processor with at least 1 GHz and 2 or more cores, 4 GB of RAM, 64 GB of storage, a DirectX 12 compatible graphics card with WDDM 2.0 driver, and a TPM 2.0 chip. You also need a display with at least 720p resolution and 9 inches diagonally.
- Use the PC Health Check App: Microsoft provides a PC Health Check app to help you verify if your device meets the Windows 11 requirements. Download and run the app to get a clear report on your system's compatibility.
- Check for TPM 2.0: The Trusted Platform Module (TPM) 2.0 is a critical requirement. To check if your PC has a TPM, go to Start > Settings > Update & Security > Windows Security > Device Security > Security Processor Details. If you see “TPM 2.0” under “TPM Specification Version,” your PC meets this requirement.
- Update Your BIOS/UEFI: Ensuring your BIOS or UEFI is up to date can help meet Windows 11 requirements. Visit your PC or motherboard manufacturer’s website to find and install the latest BIOS or UEFI update.
- Consider Upgrades: If your hardware doesn't meet the requirements, consider upgrading components like the CPU, RAM, or storage. However, upgrading to meet the TPM requirement may be more challenging without a compatible motherboard.
What should I do if I encounter issues during the upgrade process to Windows 11?
Encountering issues during the upgrade process is not uncommon, but there are several steps you can take to resolve them:
- Check Windows Update: Ensure your current version of Windows is up to date. Sometimes, issues can be resolved by installing the latest updates before attempting the upgrade. Go to Settings > Update & Security > Windows Update and check for updates.
- Run the Windows 11 Installation Assistant: If the upgrade fails through Windows Update, you can use the Windows 11 Installation Assistant, available for download from Microsoft’s website. This tool can help diagnose and resolve common issues.
- Review the Installation Log: If the upgrade fails, the installation log can provide clues about what went wrong. You can find the log in the C:$Windows.~BT\Sources\Panther directory, and it's named setuperr.log. Look for error codes or messages that can help you understand the problem.
- Check for Driver Compatibility: Outdated or incompatible drivers can cause upgrade issues. Visit your hardware manufacturer’s website to download the latest drivers for your devices. Pay special attention to graphics and chipset drivers.
- Disable Non-essential Software: Some third-party software can interfere with the upgrade process. Temporarily disable antivirus software, VPNs, and other non-essential programs before trying the upgrade again.
- Perform a Clean Boot: Starting Windows with a minimal set of drivers and startup programs can help identify software conflicts. To perform a clean boot, type “msconfig” in the Start menu, go to the Services tab, check “Hide all Microsoft services,” and then click “Disable all.” Then, go to the Startup tab and disable all startup items. Restart your PC and attempt the upgrade.
- Seek Support: If you’ve tried all the above steps and are still facing issues, consider seeking support from Microsoft’s support team. You can also check Microsoft’s community forums for solutions others may have found.
By following these steps, you can navigate the upgrade process more confidently and enjoy all that Windows 11 has to offer.
以上是升級到Windows 11的權威指南:從備份到安裝的詳細內容。更多資訊請關注PHP中文網其他相關文章!

 如何更改文件資源管理器中的默認視圖(Windows 11)May 09, 2025 pm 02:02 PM
自定義Windows 11文件資源管理器:設置和保存首選視圖的指南 厭倦了File Explorer的默認視圖? 本指南向您展示瞭如何在Windows 11中輕鬆更改並永久保存首選文件夾視圖
 Fedora 42加入Windows子系統的LinuxMay 09, 2025 am 03:01 AM
推動Linux的邊界:探索異常應用程序。 純粹是為了娛樂。 帖子7從技術上講,您可以為任何兼容的Linux發行版創建WSL圖像。 但是,官方支持的圖像提供了明顯更順暢的E
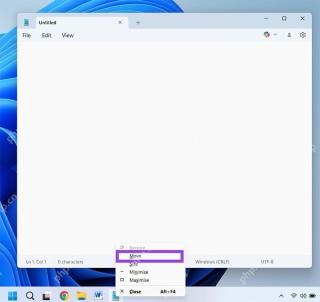 當您無法單擊標題欄時,如何移動窗口May 09, 2025 am 01:03 AM
當應用程序出乎意料地擴展到屏幕邊緣時,訪問其標題條就變得不可能。這在雙重監視器中尤其常見,但也可以在單個顯示器上發生。 本指南提供了重新控制的解決方案
 這個限量版的'骨架”硬盤向您展示了它的寫入字節May 08, 2025 pm 09:04 PM
HD-SKL是一種限量版硬盤,是布法羅(Buffalo)1998年的骨架硬盤的現代化。 原始的4.3GB驅動器帶有透明的丙烯酸外殼,以500個單元的有限運行生產。 布法羅(Buffalo)引用了1978年的Melco 3533轉盤
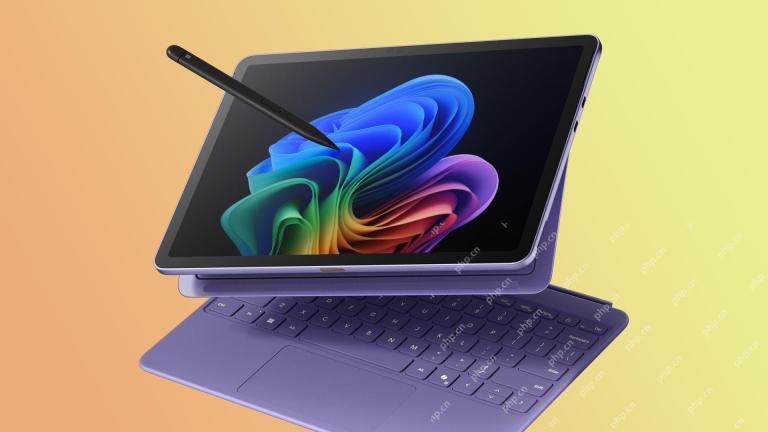 新的Surface Pro不感覺到ProMay 08, 2025 am 06:01 AM
新的Surface Pro:退後一步? Microsoft的最新Surface Pro通過兩個USB-C端口提供了連接性,支持充電,USB 3.2數據傳輸和DisplayPort 1.4A(最多可在60Hz處進行兩個4K顯示器)。 但是,該設備沒有電源廣告
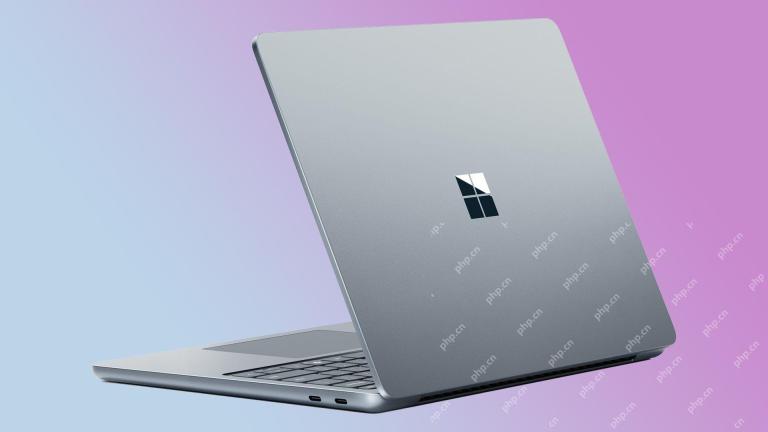 Microsoft用新的表面筆記本電腦挑戰MacBook AirMay 08, 2025 am 03:02 AM
微軟的最新表面筆記本電腦旨在與MacBook Air競爭,但有一些值得注意的折衷方案。 沒有表面連接端口與以前的型號有很大的不同,這反映了Thunderbolt和USB的越來越多
 解決eclipse中svn插件總是提示輸入密碼的問題May 07, 2025 pm 05:03 PM
一、背景最近在eclipse中使用svn插件進行遠程倉庫代碼管理時,老是出現提示讓輸入密碼,特別煩人,經過努力,終於解決該問題,拿來和大家分享~二、svn插件密碼機制以及出現問題的原因分析當我們第一次使用svn插件並輸入密碼時,會生成一個保存密碼的文件,然後每次svn插件默認去讀取用戶名和密碼信息。啟動eclipse時,會自動將配置信息讀取到程序緩存中。 svn的密碼修改以後,無法再次登錄,也沒有提示重新輸入密碼。這時,我們可以通過刪除相關配置文件的方式讓svn插件提示我們重新輸入密碼。但是,ec
 win8系統還原怎麼操作 win8系統還原詳細步驟May 07, 2025 pm 05:00 PM
在Windows8中啟動系統還原的步驟是:1.按下Windows鍵 X,打開快捷菜單;2.選擇“控制面板”,進入“系統和安全”,點擊“系統”;3.選擇“系統保護”,點擊“系統還原”;4.輸入管理員密碼並選擇還原點。選擇合適的還原點時,建議選擇問題出現之前的還原點,或記得系統運行良好的特定日期。系統還原過程中,如遇到“無法完成系統還原”,可嘗試其他還原點或使用“sfc/scannow”命令修復系統文件。還原後,需檢查系統運行情況,重新安裝或配置軟件,並重新備份數據,定期創建新還原點。


熱AI工具

Undresser.AI Undress
人工智慧驅動的應用程序,用於創建逼真的裸體照片

AI Clothes Remover
用於從照片中去除衣服的線上人工智慧工具。

Undress AI Tool
免費脫衣圖片

Clothoff.io
AI脫衣器

Video Face Swap
使用我們完全免費的人工智慧換臉工具,輕鬆在任何影片中換臉!

熱門文章
熱工具

VSCode Windows 64位元 下載
微軟推出的免費、功能強大的一款IDE編輯器

Dreamweaver Mac版
視覺化網頁開發工具

mPDF
mPDF是一個PHP庫,可以從UTF-8編碼的HTML產生PDF檔案。原作者Ian Back編寫mPDF以從他的網站上「即時」輸出PDF文件,並處理不同的語言。與原始腳本如HTML2FPDF相比,它的速度較慢,並且在使用Unicode字體時產生的檔案較大,但支援CSS樣式等,並進行了大量增強。支援幾乎所有語言,包括RTL(阿拉伯語和希伯來語)和CJK(中日韓)。支援嵌套的區塊級元素(如P、DIV),

禪工作室 13.0.1
強大的PHP整合開發環境

Dreamweaver CS6
視覺化網頁開發工具

