


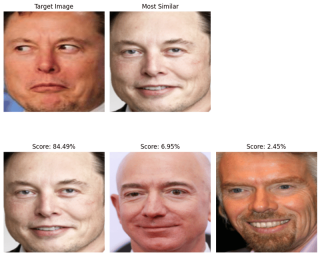
本指南示範了使用facenet-pytorch的人臉相似度偵測工具。該工具利用 FaceNet 模型的高品質人臉嵌入,將目標影像與多個候選影像進行比較,以確定最接近的匹配。 讓我們來探索一下實現方式。
基本工具與函式庫
- PyTorch:深度學習操作的基礎。
- FaceNet-PyTorch: 提供用於人臉偵測和嵌入產生的預訓練模型。
- Pillow (PIL): 處理影像處理任務。
- Matplotlib:用於結果視覺化。
採用了兩個核心模型:
- MTCNN: 偵測影像中的人臉。
- InceptionResnetV1:擷取臉部嵌入。
初始化
import torch
from facenet_pytorch import MTCNN, InceptionResnetV1
from PIL import Image
import requests
from io import BytesIO
import matplotlib.pyplot as plt

# Initialize face detection (MTCNN) and embedding extraction (InceptionResnetV1) modules.
mtcnn = MTCNN(image_size=160, keep_all=True)
resnet = InceptionResnetV1(pretrained='vggface2').eval()
函數定義
1。圖片載入與嵌入擷取:
此函數從 URL 檢索圖像、偵測人臉並計算嵌入。
def get_embedding_and_face(image_path):
    """Loads an image, detects faces, and returns the embedding and detected face."""
    try:
        response = requests.get(image_path)
        response.raise_for_status()
        content_type = response.headers.get('Content-Type')
        if 'image' not in content_type:
            raise ValueError(f"Invalid image URL: {content_type}")
        image = Image.open(BytesIO(response.content)).convert("RGB")
    except Exception as e:
        print(f"Image loading error from {image_path}: {e}")
        return None, None

    faces, probs = mtcnn(image, return_prob=True)
    if faces is None or len(faces) == 0:
        return None, None

    embedding = resnet(faces[0].unsqueeze(0))
    return embedding, faces[0]
2。張量到影像的轉換:
準備用於顯示的張量。
def tensor_to_image(tensor):
    """Converts a normalized tensor to a displayable image array."""
    image = tensor.permute(1, 2, 0).detach().numpy()
    image = (image - image.min()) / (image.max() - image.min())
    image = (image * 255).astype('uint8')
    return image
3。最相似的人臉辨識:
將目標影像的嵌入與候選影像的嵌入進行比較。
def find_most_similar(target_image_path, candidate_image_paths):
    """Identifies the most similar image to the target from a list of candidates."""
    target_emb, target_face = get_embedding_and_face(target_image_path)
    if target_emb is None:
        raise ValueError("No face detected in the target image.")

    highest_similarity = float('-inf')
    most_similar_face = None
    most_similar_image_path = None

    candidate_faces = []
    similarities = []

    for candidate_image_path in candidate_image_paths:
        candidate_emb, candidate_face = get_embedding_and_face(candidate_image_path)
        if candidate_emb is None:
            similarities.append(None)
            candidate_faces.append(None)
            continue

        similarity = torch.nn.functional.cosine_similarity(target_emb, candidate_emb).item()
        similarities.append(similarity)
        candidate_faces.append(candidate_face)

        if similarity > highest_similarity:
            highest_similarity = similarity
            most_similar_face = candidate_face
            most_similar_image_path = candidate_image_path

    # Visualization
    plt.figure(figsize=(12, 8))

    # Display target image
    plt.subplot(2, len(candidate_image_paths) + 1, 1)
    plt.imshow(tensor_to_image(target_face))
    plt.title("Target Image")
    plt.axis("off")

    # Display most similar image
    if most_similar_face is not None:
        plt.subplot(2, len(candidate_image_paths) + 1, 2)
        plt.imshow(tensor_to_image(most_similar_face))
        plt.title("Most Similar")
        plt.axis("off")

    # Display all candidates with similarity scores
    for idx, (candidate_face, similarity) in enumerate(zip(candidate_faces, similarities)):
        plt.subplot(2, len(candidate_image_paths) + 1, idx + len(candidate_image_paths) + 2)
        if candidate_face is not None:
            plt.imshow(tensor_to_image(candidate_face))
            plt.title(f"Score: {similarity * 100:.2f}%")
        else:
            plt.title("No Face Detected")
        plt.axis("off")

    plt.tight_layout()
    plt.show()

    if most_similar_image_path is None:
        raise ValueError("No faces detected in candidate images.")

    return most_similar_image_path, highest_similarity
用法
用於比較的圖片網址:
image_url_target = 'https://d1mnxluw9mpf9w.cloudfront.net/media/7588/4x3/1200.jpg'
candidate_image_urls = [
    'https://beyondthesinglestory.wordpress.com/wp-content/uploads/2021/04/elon_musk_royal_society_crop1.jpg',
    'https://cdn.britannica.com/56/199056-050-CCC44482/Jeff-Bezos-2017.jpg',
    'https://cdn.britannica.com/45/188745-050-7B822E21/Richard-Branson-2003.jpg'
]

most_similar_image, similarity_score = find_most_similar(image_url_target, candidate_image_urls)
print(f"Most similar image: {most_similar_image}")
print(f"Similarity score: {similarity_score * 100:.2f}%")
結果
結論
這個範例展示了facenet-pytorch的臉部辨識功能。 人臉偵測和嵌入產生的結合可以為各種應用程式建立工具,例如身份驗證或內容過濾。
以上是使用 Python 和 FaceNet 進行人臉識別的詳細內容。更多資訊請關注PHP中文網其他相關文章!

 Python是按線執行的嗎?May 10, 2025 am 12:03 AM
Python不是嚴格的逐行執行,而是基於解釋器的機制進行優化和條件執行。解釋器將代碼轉換為字節碼,由PVM執行,可能會預編譯常量表達式或優化循環。理解這些機制有助於優化代碼和提高效率。
 python中兩個列表的串聯替代方案是什麼?May 09, 2025 am 12:16 AM
可以使用多種方法在Python中連接兩個列表:1.使用 操作符,簡單但在大列表中效率低;2.使用extend方法,效率高但會修改原列表;3.使用 =操作符,兼具效率和可讀性;4.使用itertools.chain函數,內存效率高但需額外導入;5.使用列表解析,優雅但可能過於復雜。選擇方法應根據代碼上下文和需求。
 Python:合併兩個列表的有效方法May 09, 2025 am 12:15 AM
有多種方法可以合併Python列表:1.使用 操作符,簡單但對大列表不內存高效;2.使用extend方法,內存高效但會修改原列表;3.使用itertools.chain,適用於大數據集;4.使用*操作符,一行代碼合併小到中型列表;5.使用numpy.concatenate,適用於大數據集和性能要求高的場景;6.使用append方法,適用於小列表但效率低。選擇方法時需考慮列表大小和應用場景。
 編譯的與解釋的語言:優點和缺點May 09, 2025 am 12:06 AM
CompiledLanguagesOffersPeedAndSecurity,而interneterpretledlanguages provideeaseafuseanDoctability.1)commiledlanguageslikec arefasterandSecureButhOnderDevevelmendeclementCyclesclesclesclesclesclesclesclesclesclesclesclesclesclesclesclesclesclesandentency.2)cransportedeplatectentysenty
 Python:對於循環,最完整的指南May 09, 2025 am 12:05 AM
Python中,for循環用於遍歷可迭代對象,while循環用於條件滿足時重複執行操作。 1)for循環示例:遍歷列表並打印元素。 2)while循環示例:猜數字遊戲,直到猜對為止。掌握循環原理和優化技巧可提高代碼效率和可靠性。
 python concatenate列表到一個字符串中May 09, 2025 am 12:02 AM
要將列表連接成字符串,Python中使用join()方法是最佳選擇。 1)使用join()方法將列表元素連接成字符串,如''.join(my_list)。 2)對於包含數字的列表,先用map(str,numbers)轉換為字符串再連接。 3)可以使用生成器表達式進行複雜格式化,如','.join(f'({fruit})'forfruitinfruits)。 4)處理混合數據類型時,使用map(str,mixed_list)確保所有元素可轉換為字符串。 5)對於大型列表,使用''.join(large_li
 Python的混合方法:編譯和解釋合併May 08, 2025 am 12:16 AM
pythonuseshybridapprace,ComminingCompilationTobyTecoDeAndInterpretation.1)codeiscompiledtoplatform-Indepententbybytecode.2)bytecodeisisterpretedbybythepbybythepythonvirtualmachine,增強效率和通用性。


熱AI工具

Undresser.AI Undress
人工智慧驅動的應用程序,用於創建逼真的裸體照片

AI Clothes Remover
用於從照片中去除衣服的線上人工智慧工具。

Undress AI Tool
免費脫衣圖片

Clothoff.io
AI脫衣器

Video Face Swap
使用我們完全免費的人工智慧換臉工具,輕鬆在任何影片中換臉!

熱門文章
熱工具

VSCode Windows 64位元 下載
微軟推出的免費、功能強大的一款IDE編輯器

Dreamweaver Mac版
視覺化網頁開發工具

mPDF
mPDF是一個PHP庫,可以從UTF-8編碼的HTML產生PDF檔案。原作者Ian Back編寫mPDF以從他的網站上「即時」輸出PDF文件,並處理不同的語言。與原始腳本如HTML2FPDF相比,它的速度較慢,並且在使用Unicode字體時產生的檔案較大,但支援CSS樣式等,並進行了大量增強。支援幾乎所有語言,包括RTL(阿拉伯語和希伯來語)和CJK(中日韓)。支援嵌套的區塊級元素(如P、DIV),

禪工作室 13.0.1
強大的PHP整合開發環境

Dreamweaver CS6
視覺化網頁開發工具

